Last updated: 17 January 2026
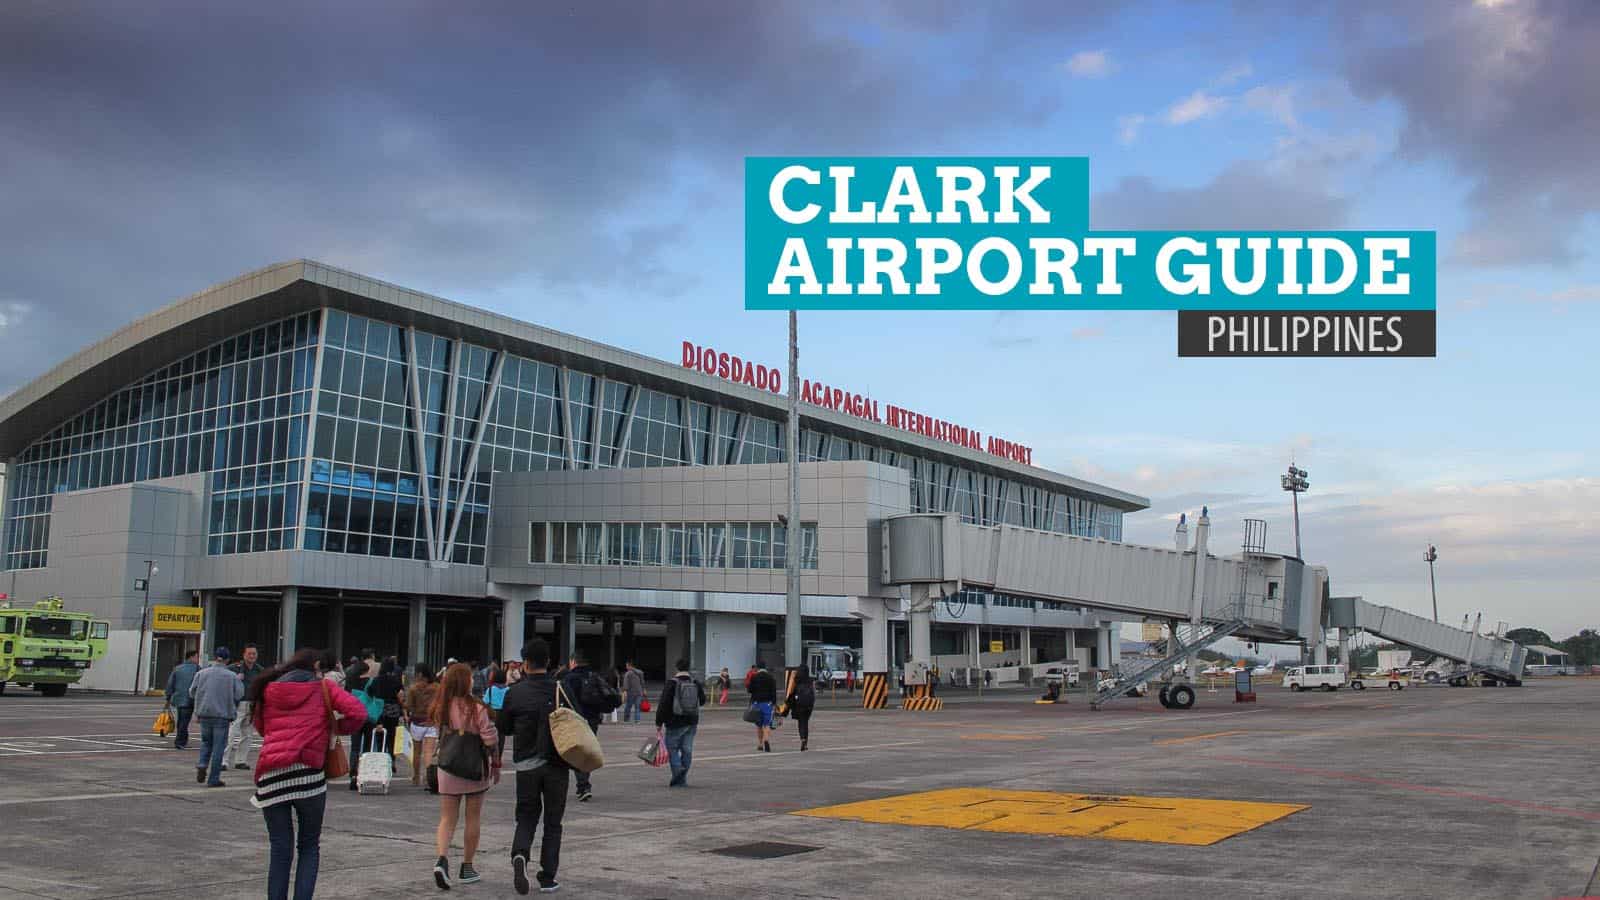
It’s not always that I fly out of Diosdado Macapagal International Airport, more popularly known as Clark Airport (CRK). Living in Metro Manila, I still prefer flights that take off and land at Ninoy Aquino International Airport (NAIA) because it is obviously more convenient to me. The air traffic congestion problem in Manila, however, pushed many airlines (PAL, Cebu Pacific Air, AirAsia, and more) to fly to and from Clark, making this Central Luzon gateway probably the fastest growing airport in the country.


HOW TO GET TO CLARK AIRPORT
Clark Airport is located two to three hours from Manila, depending on which part of the city you’re coming from. If you’re not very lucky, traffic can make the travel time even longer. Thus, to be on the safe side, I usually leave Manila six hours before my flight schedule — that gives me a four-hour allowance on the road and two hours to get through all the airport processes.
For example, if my flight is scheduled at 12 noon, I am already at the bus terminal at around 6am. I know that may be too much time but you know what they say, better safe than sorry. After all, it gives me ample time to come up with a Plan B should something unfortunate happen like the bus breaking down at the expressway or something.
Here are the timetables. We also added the schedule of P2P buses from BAGUIO, BALANGA, OLONGAPO, and DAGUPAN.
NAIA TO CLARK AIRPORT SCHEDULE
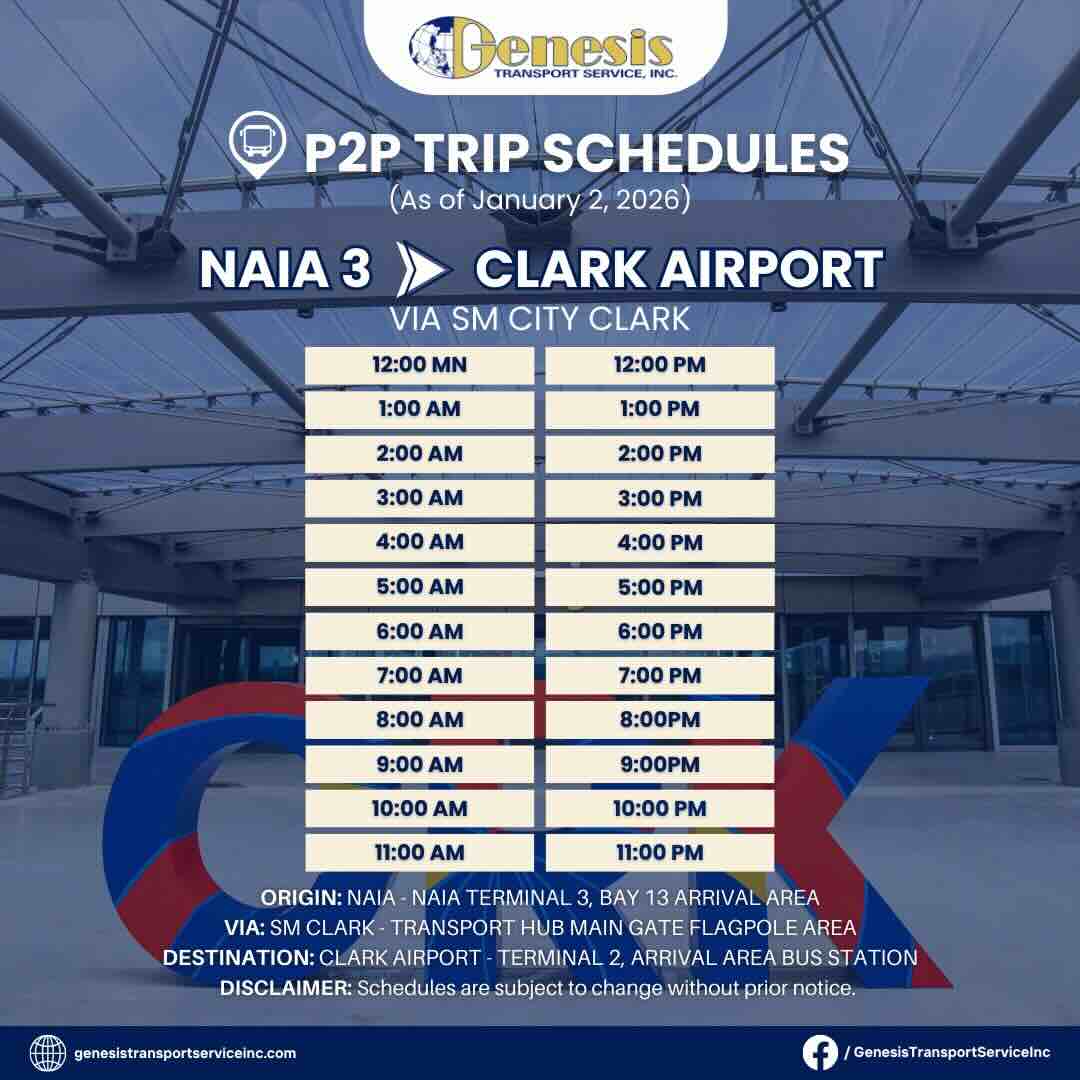
Fare: P450
As of: 2 January 2026
TRINOMA TO CLARK AIRPORT SCHEDULE
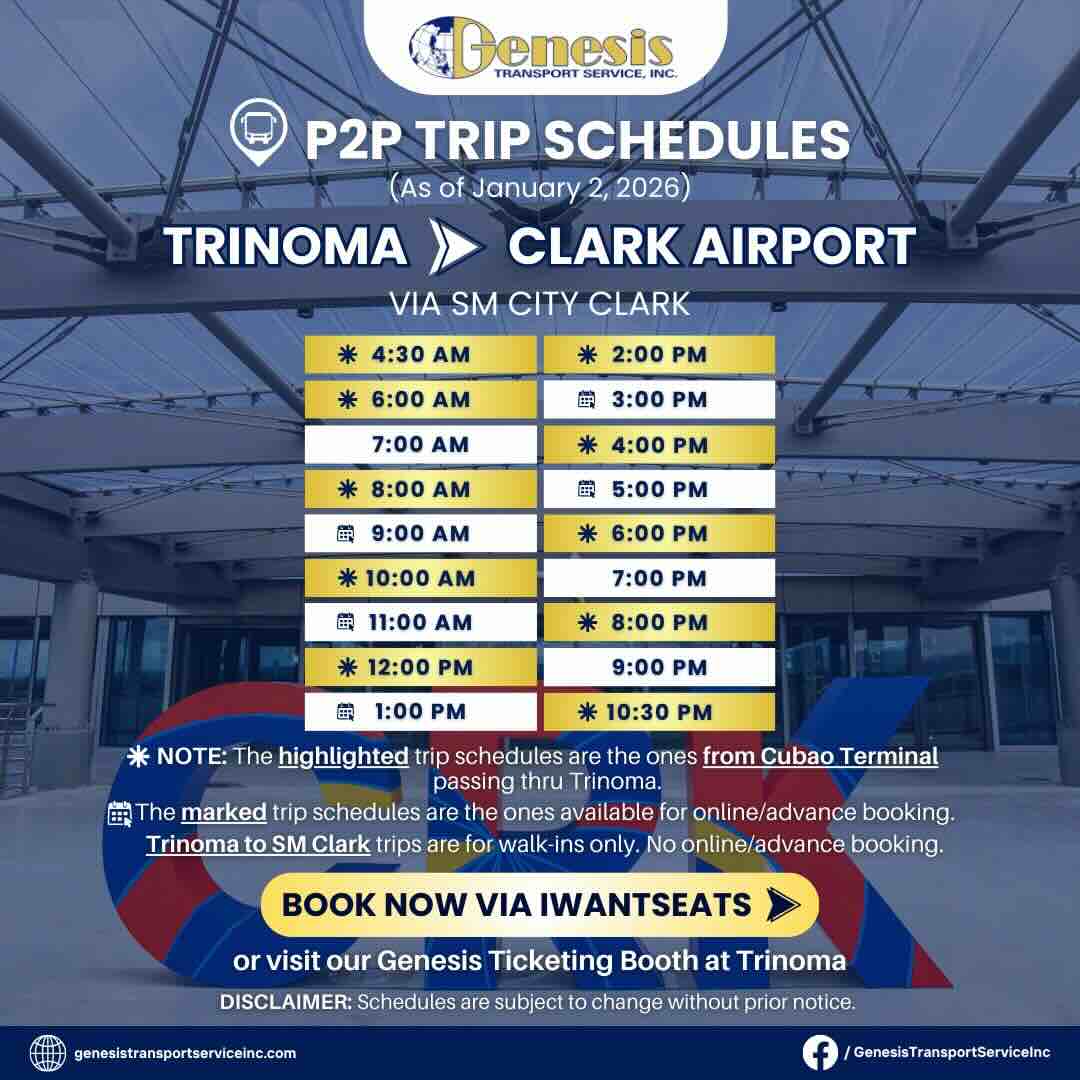
Fare: P310
As of: 2 January 2026
BAGUIO TO CLARK AIRPORT SCHEDULE
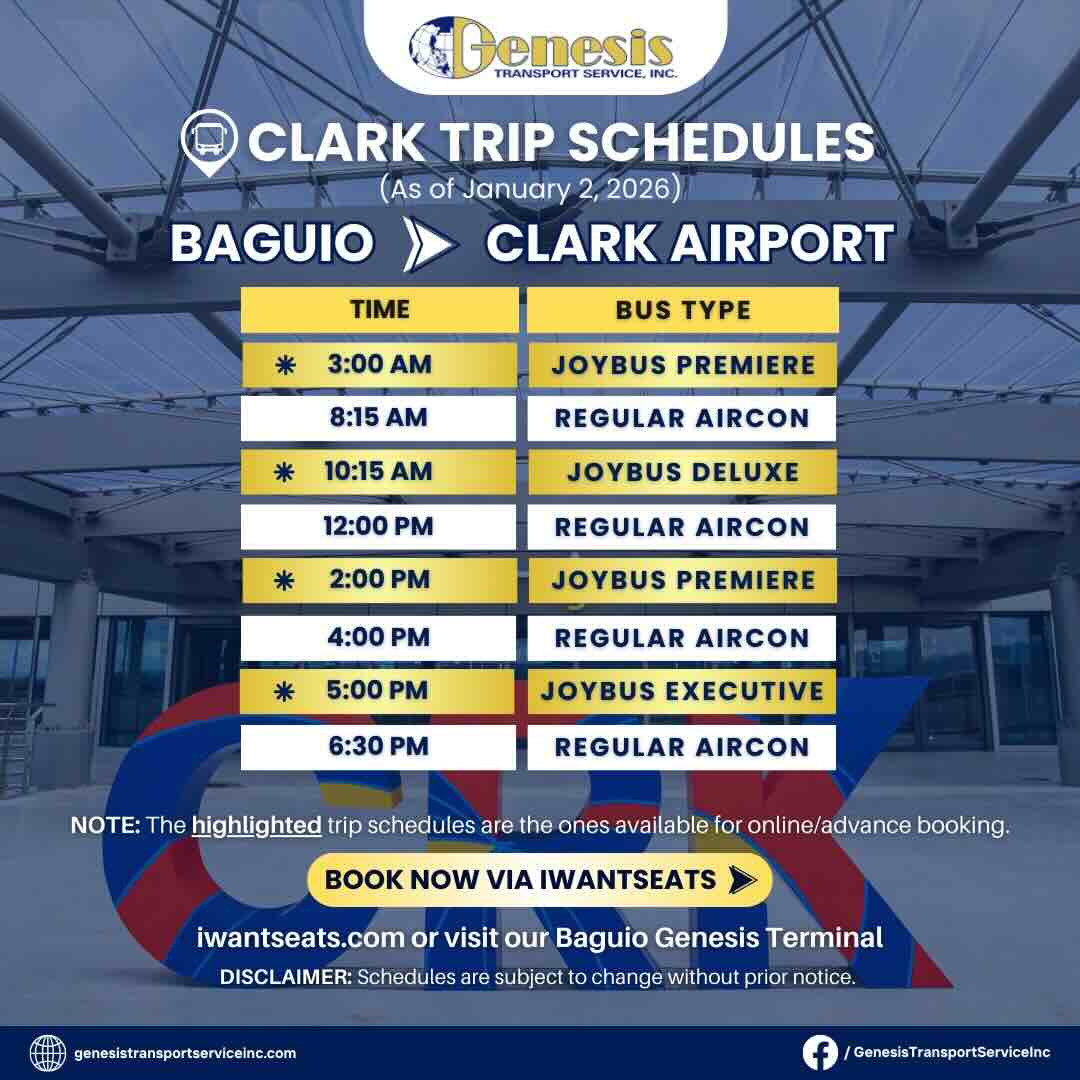
Fare: P670 (Joybus Premiere); P620 (Joybus Executive); P540 (Deluxe); P450 (Regular Aircon)
As of: 2 January 2026
BALANGA (BATAAN) TO CLARK AIRPORT SCHEDULE
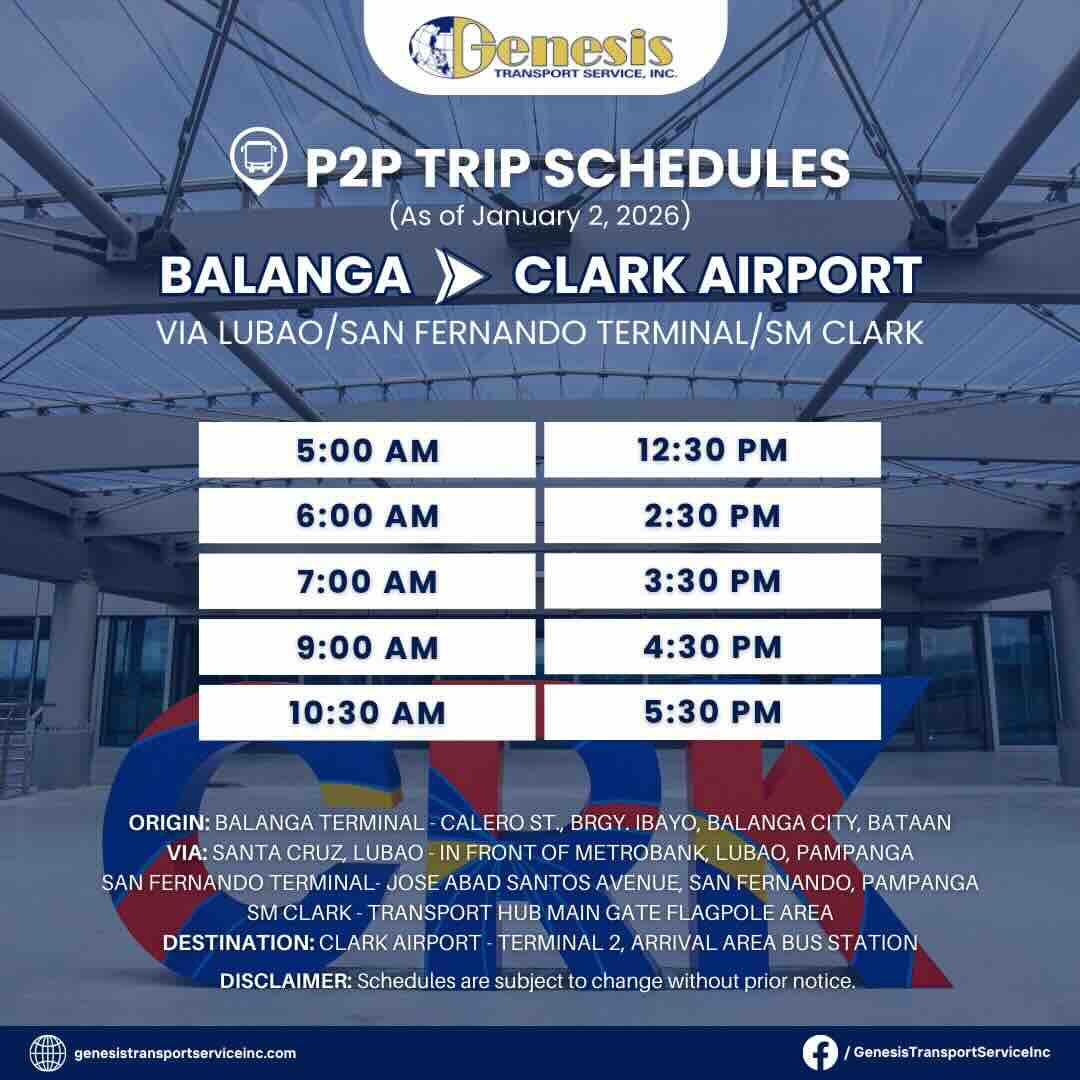
Fare: P250
As of: 2 January 2026
OLONGAPO TO CLARK AIRPORT SCHEDULE
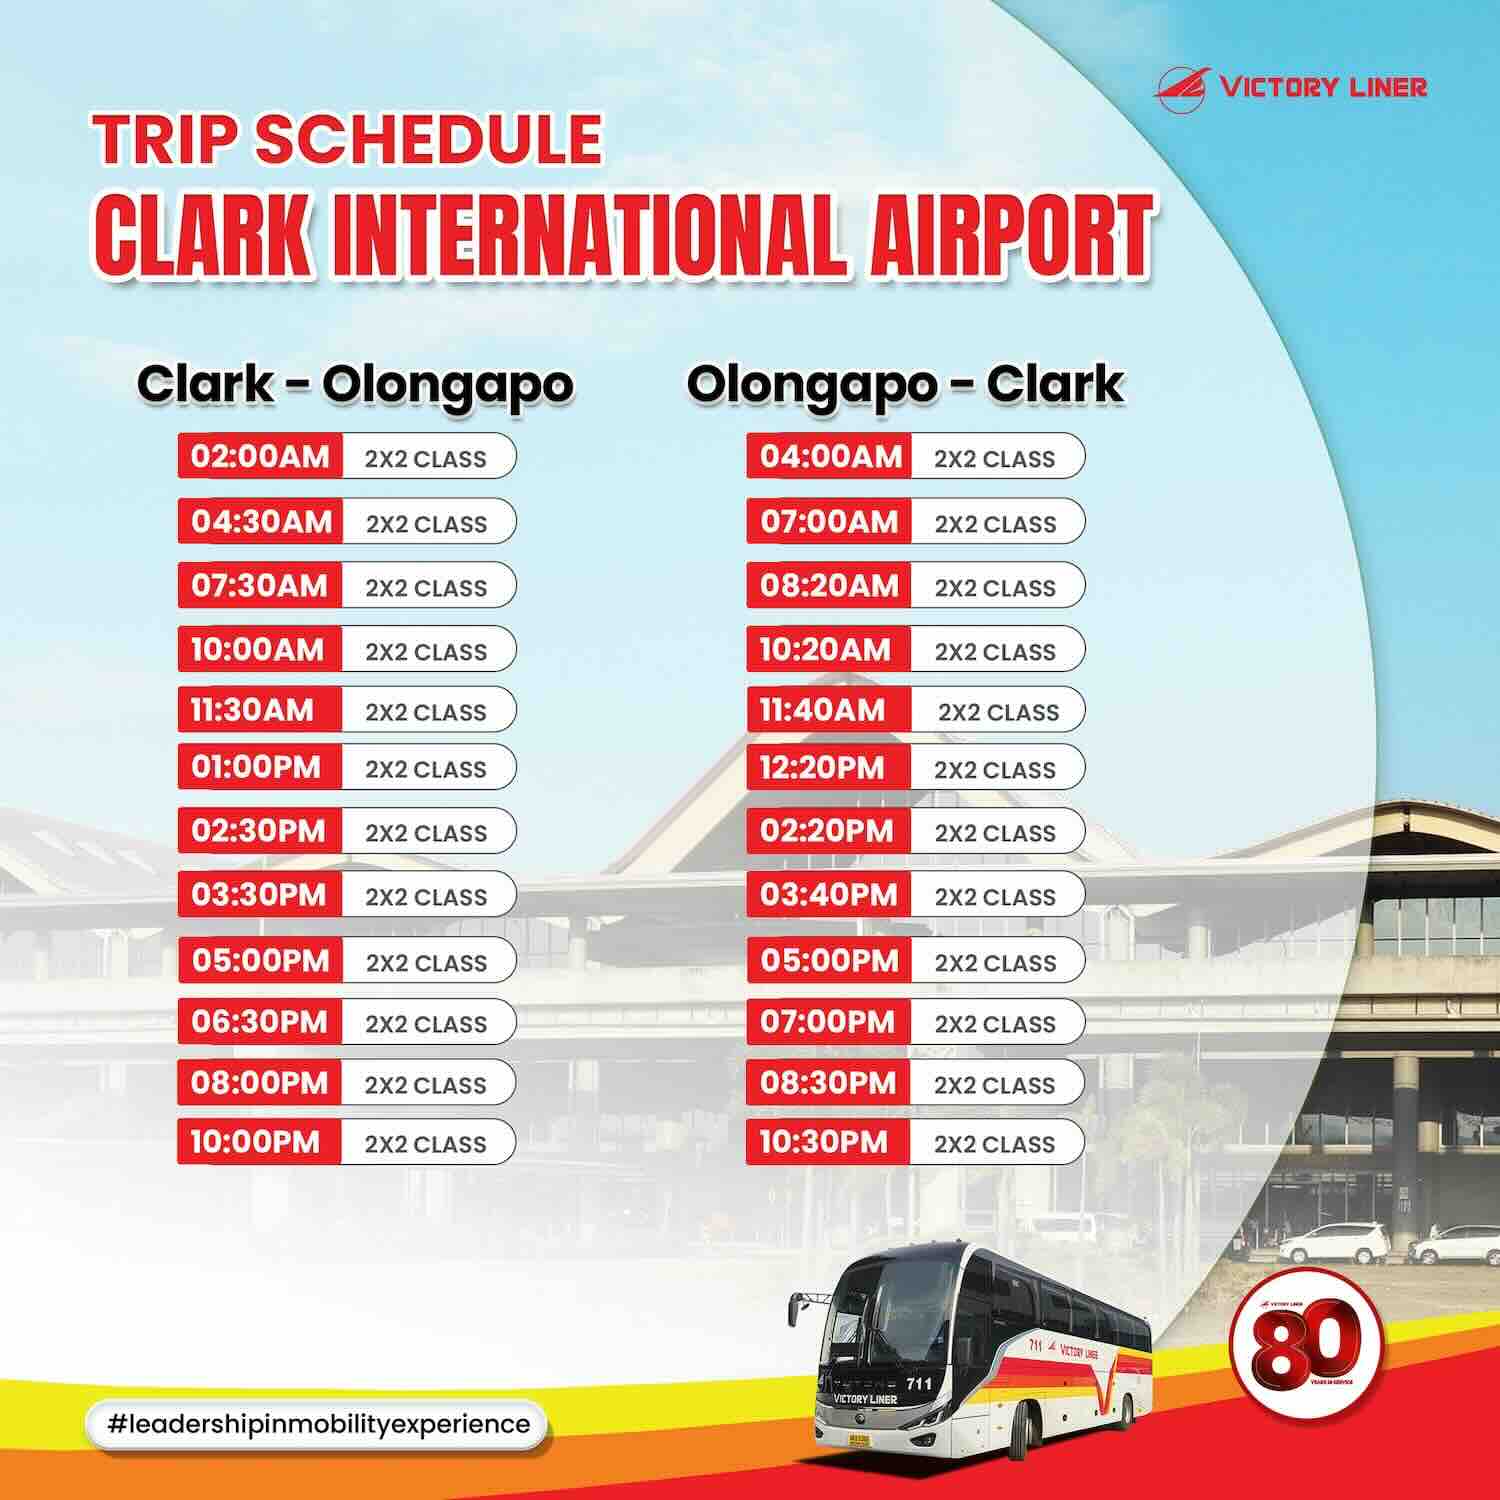
Fare: P258
As of: 4 January 2026
DAGUPAN TO CLARK AIRPORT SCHEDULE
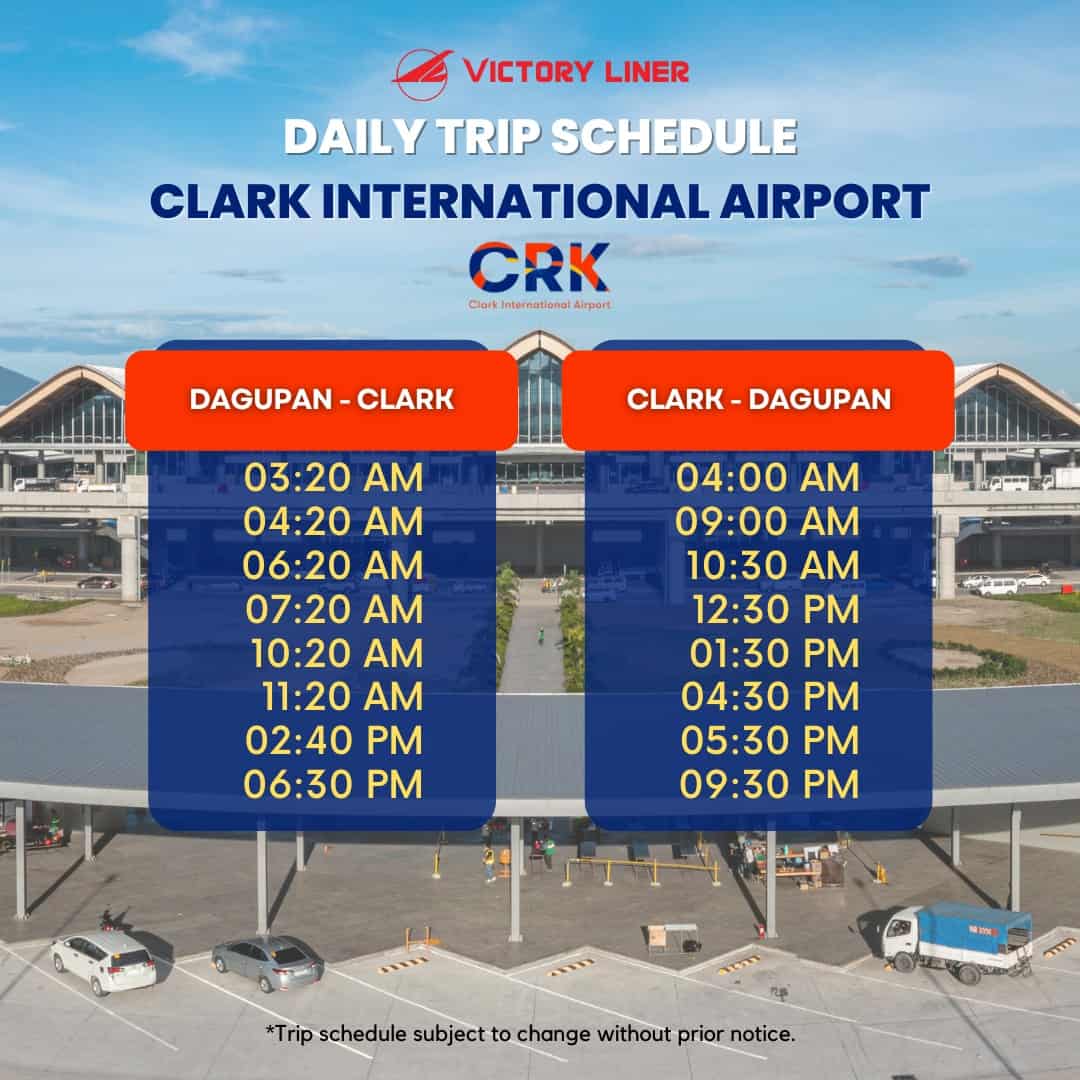
FARE P331
As of: 7 January 2024
What To Do Before an International Flight at Clark
If you’ve flown to a foreign destination before from NAIA, then you won’t have any problem going through the check-in process at Clark. It’s almost exactly the same. If anything, it’s much easier because the counters lie close to one another.
- Accomplish your e-Travel form. Don’t forget to save or “screencap” your QR code.
- Check in! Present your passport to the check-in agent and drop your bags for check in. The agent will give you your boarding pass.
- Pay the travel tax and terminal fee. Travel tax is P1,620 per person for economy class. Terminal fee is P600 per person. They will give you a receipt.
- Proceed to Immigration counters. Line up and clear Immigration check.
- Final security check. Remove all gadgets and metal items (including belts and coins) from your body. Remove your shoes, too.
After the final security check, head to the Pre-Departure Area. Check your boarding pass to see what gate you should go to. All you need to do now is wait for the boarding call.
Oh by the way, there is a Foreign Exchange (FOREX) Counter at the Check-in Hall. If you want to exchange currencies before your flight, do so before approaching the Immigration Booth. (There’s no turning back once you made it through. Trust me; I tried. Haha.)
There you have it! Have a safe journey!


Things to Bring
Like I said on this post, I always have a checklist of items I MUST NOT forget when I travel abroad. Here it is:
- Passport – Do not ever, ever forget your passport.
- Printed Flight Itinerary/Tickets – Make sure you print out the tickets. When I fly domestic, I usually just show the check-in agent the tickets on my phone. They accept it. But for international flights, you will be showing your tickets too many times (check-in counter, travel tax counter, departure fee counter, immigration, etc) that it would be impractical and ridiculously annoying to whip out your phone every step of the way. A printed ticket will make it a lot easier for you and the people who will check it. Besides, a piece of paper does not need to be charged.
- Valid IDs – Not really that important because the passport is considered a valid ID. But to be safe, I always bring other IDs, just in case I was invited by Immigration Officers for a short “talk.”
- DSWD Clearance – Only when I’m traveling with my nephew or niece and their parents are not joining the trip.
- Credit card – Some airlines require a copy of the credit card used when the tickets are booked online. You might also need it as a safety net in case you run short of cash. Some hotels also ask for credit card for deposit.
- Travel Itinerary – Make a clear plan of what you want to do and write them down. In case the Immigration Officers pick you for a random check, a printed itinerary will help convince them that you will really go to your destination to tour and nothing else.
- Hotel address and contact number – You will need it. If you’re traveling with a kid or someone who doesn’t speak English (or the language spoken in the country you’re visiting), give them the address and contact number of the place you are staying in. In case they get lost, it will be easier for them to find their way to you. You will also need the hotel address when filling out immigration forms.
- A Pen – Yes, the humble pen is important. You will be accomplishing forms.
How to Avoid Being Offloaded

Aside from the items above, there may be other documents that you need to prepare depending on your situation or background. We created a separate post for it.
✅ READ: HOW TO AVOID BEING OFFLOADED
Frequently Asked Questions
We answered some of the usual questions we get from our readers and made a separate post for them.
✅ VIEW FREQUENTLY ASKED QUESTIONS!


Our flight to HK via AirAsia is 7:40AM. Do you know any bus who leaves MNL as early as 2:30AM? Thanks! :)
Aaw, I don’t. Sorry. :(
Since I live in Northern part of the metro, Clark is becoming very attractive to me. I tried it last month when we went to Malaysia. The lines are shorter, the wait for take-off are shorter, not as crowded — generally less chaotic than NAIA.
The only downside is the NLEX toll fees. :p
Haha, yes, shorter queues and waiting time. Most flights are on time, too. But the immigration officers are stricter, i noticed.
Can I ask how many hours does I wait from Clark to Macau? And any idea how to go from Macau Airport to doha Qatar? Pls responds
whats the 200 processing fee for? thats absurd!
i dont tnk they have it here in mla airports?
even if theyve reduced airport tax , stil you have a processing fee of 200 on top of the regular travel tax!
i cant believe this… ONLI IN DA PILIPINES
Wonderful articles! I love to travel… just read a few articles so far and I have learned a lot already. thanks for sharing all these experiences of yours… keep writing please.. hehehe…
Thanks, John! Hope you visit this site regularly! :)
Hi! Next year will be the first time that I will be travelling internationally and I’ll be leaving through the Clark airport. Thank you so much for this guide! I’ve learned a lot from this. I love reading about your other travels as well. Keep it up!
Thanks Anna! I hope you visit again! :)
Flights to Singapore via air asia is usually early morning. since the last bus from pasay philtranco leaves at 8PM. it means we will be staying overnite in DMIA? is that how you do it? or we need to book (Addl cost) in a nearest hotel?
Hi Povillo! I’ve never flown to Singapore from Clark airport but yes, that would be the best option if you have an AirAsia SG flight. But maybe there are new bus schedules from Trinoma…
sir… different pa ba yung travel tax and terminal fee sa international flights?
sorry for the question, but i haven’t had the chance to fly abroad yet. :)))
Dear Sir/Madam , Is there any chances that we might got offloaded ? we will travel to Thailand on October this year, me and my cousin, i have read a lot of offloading testimonies because of the B.I officers, i don’t want to waste my cousin’s money that he will spend for this travel, we want to take the plane out of the country from Clark International Airport , can you help us on the things to do and say for the B.I. Officers let us pass? Please help us thanks..
I AM FROM MINDANAO, I SAW GOOD PACKAGE DEAL TO HONGKONG VIA CLARK… I AM A BIT APPREHENSIVE BUT EXCITED SINCE THIS WILL BE MY FIRST TIME TO FLY ABROAD… AM NERVOUS BECAUSE I DONT HAVE A JOB BUT AM A GRADUATE AND A LICENSED PROFESSIONAL BUT NO WORKING SINCE I PASSED MY LICENSURE EXAM… WILL I STILL BE OFFLOADED EVEN IF AM TRAVELLING ON PACKAGE TOUR? (PACKAGE TOUR THAT IS 3D2N ROUND TRIP TICKET, TOUR SERVICE PACKAGE AND HOTEL ACCOMODATION) I HAVE FUNDS TO SUFFICE MY TOUR SINCE THIS IS A GIFT FROM MY PARENTS AFTER PASSING THE BOARD EXAM LAST 2012. NOW, IM A BIT APPREHENSIVE THAT I MAYBE BE OFFLOADED BECAUSE OF LACK PROOF OF EMPLOYMENT LIKE COMPANY ID OR WHATSOEVER AND ALSO THEY MAY THINK THAT I MAY FIND JOB IN HONGKONG, BUT I HAVE SUFFICIENT MONEY ANYWAY…
PLEASE HELP ME… THANK YOU AND MERRY XMAS IN ADVANCE
hi! is there any show money needed? im travelng to hong kong from clark early ths year, im only 18 and i havnt tried int’l flights yet.. thank you!
Hi dee. When do u plan do travel in HK?
Hi, this is the first time I will travel Hk from Manila with my kids and my mom, can I pay the travel tax and terminal fe with my credit card? Thanks for your help.
Hi. When do you plan to go HK coz i’ll be travelling there next week or perhaps you already did.
Hello, I would like to go to Hongkong from Clark Airport because prices are really cheapest on the date I want if I leave from Clark airport than if I leave from Ninoy airport.
Therefore I have several questions:
1/ Do you know if it is possible to go to Clark from other cities than Manila (I am volunteering in an NGO, located in Angat, Bulacan; it is at the North of Manila between Metro Manila and Clark on the map, so it could be clever to go directly from there)
2/ How much the bus from Metro Manila costs ?
2/ What is this travel tax and terminal fee ? I went to Bangkok last month and I did not have to pay for a travel tax (it’s 1620php !!)
Thanks for your help!
good day! i would like to ask if there is a bus from clark airport going to cabanatuan city? thanks
and may i ask also how much is the fare cost and schedule from clark airport to cabanatuan city by bus? thanks
Just do you know that they have Genesis going from ESDA/Taft to Clark now for P500 If I remember right.
Hi
How do we commute to Clark airport from Nueva Ecija or Cabanatuan?
What to do before the flight is not at all I expect to read. Wasted my time. Those things you mentioned are the standard protocol prior to check in. I was expecting you’ll guide us to spend time if we have the luxury to spend more time and have fun instead of just sit and wait stuff. But thanks anyway. I appreciate your effort but you can rename that “What to do segment”
Hi Navigator, this post is mainly for those traveling for the first time and flying from Clark.
Do you have any suggestion for the new title of that segment?
(PLEASE BEAR WITH MY CAPS LOCK)
I WILL BE GOING TO SANTA CLARA SANTA MARIA BULACAN. MY FLIGHT SCHEDULE IS MAY 30 FROM CEBU TO CLARK. WHAT BUS I WILL RIDE THAT WILL PASS BY SANTA CLARA SANTA MARIA BULACAN? PLEASE HELP. THANKS