Whether you’re applying for a Japan Tourist Visa or a Visit Visa, the first thing you need to do is to get hold of a copy of the application form and fill it out appropriately. You can get a copy from the agency where you will be applying. But if you want to take care of it before you go to the agency, you can download a copy of the application form below with instructions.


Download the form here
How to Fill Out Japan Visa Application Form
First, a few important reminders.
- Complete the form either by hand or electronically. Either is accepted. If you go the hand-written route, make sure that you write in block letters and that they are readable.
- In fields that don’t apply to you, write NA. Don’t leave any field blank.
- Print the form in an A4-size paper. Other sizes will be rejected.
- Paste a photo on the designated area. PASTE! DO NOT STAPLE! The photo must have been taken within the past 6 months.
- Use a black pen or font. Do not use pencil or one of those erasable pens.
- Avoid erasures! If it can’t be helped, use double line (2 strikethroughs). If there are too many erasures, start over. Never ever use correction tape or liquid.
Here are some parts of the form that you might have questions about. For the purpose of explanation, I filled out the form in big blue letters just to make it obvious. But when you complete your form, use BLACK.
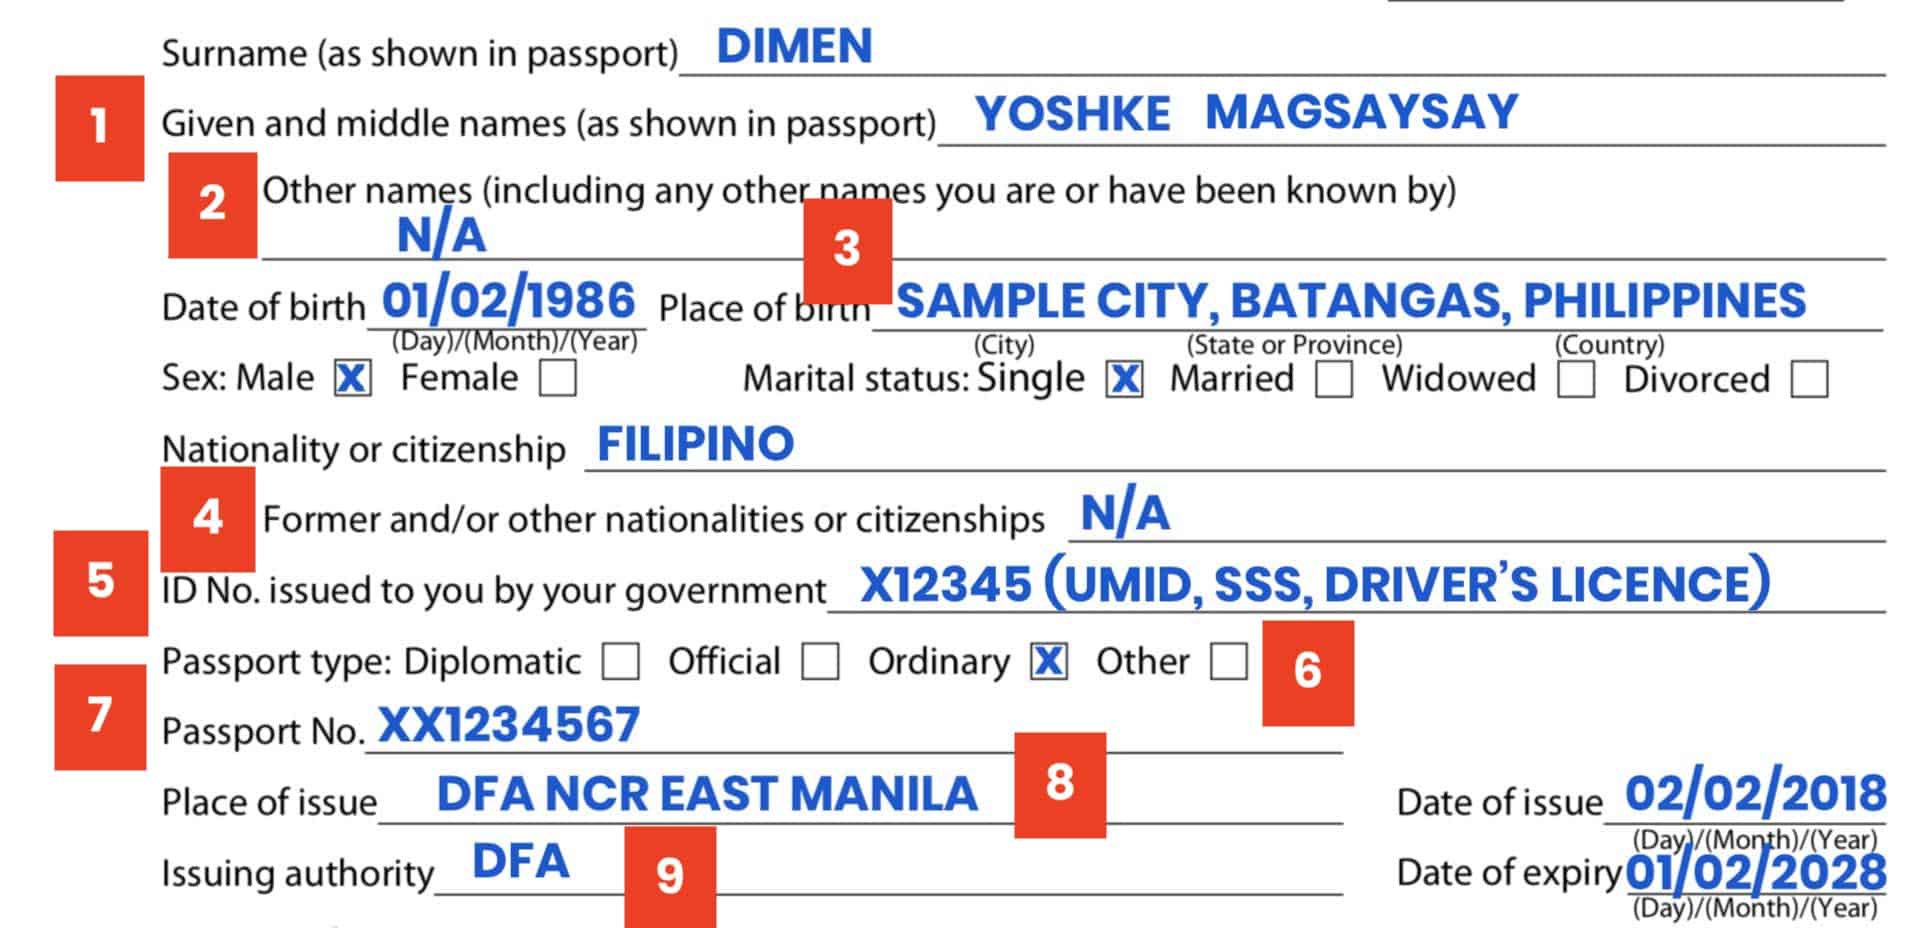
- Given and middle names: Write both your given name AND your middle name (your mom’s last name).
- Other names: If you have a pen name or nickname or if you’re known by any other name, write it down. If none, write N/A.
- Place of birth: If you have no province and you’re born in Metro Manila, write METRO MANILA. For example, if you were born in Makati, write: Makati, Metro Manila, Philippines.
- Former and/or other nationalities or citizenships: Only if you have one. Write N/A if you have none.
- ID No. issued to you by your government: Any government-issued ID will do. I have tried using UMID. My cousin used Driver’s License. A few times, I wrote the passport number here too, I didn’t have any problem.
- Passport type: Ordinary.
- Passport number: Double check. Make sure it’s correct.
- Place of issue: You can write the city name. In the case of Manila, you can write MANILA. You can also be specific. I usually write DFA NCR EAST, because that’s what’s on my passport.
- Issuing authority: DFA.
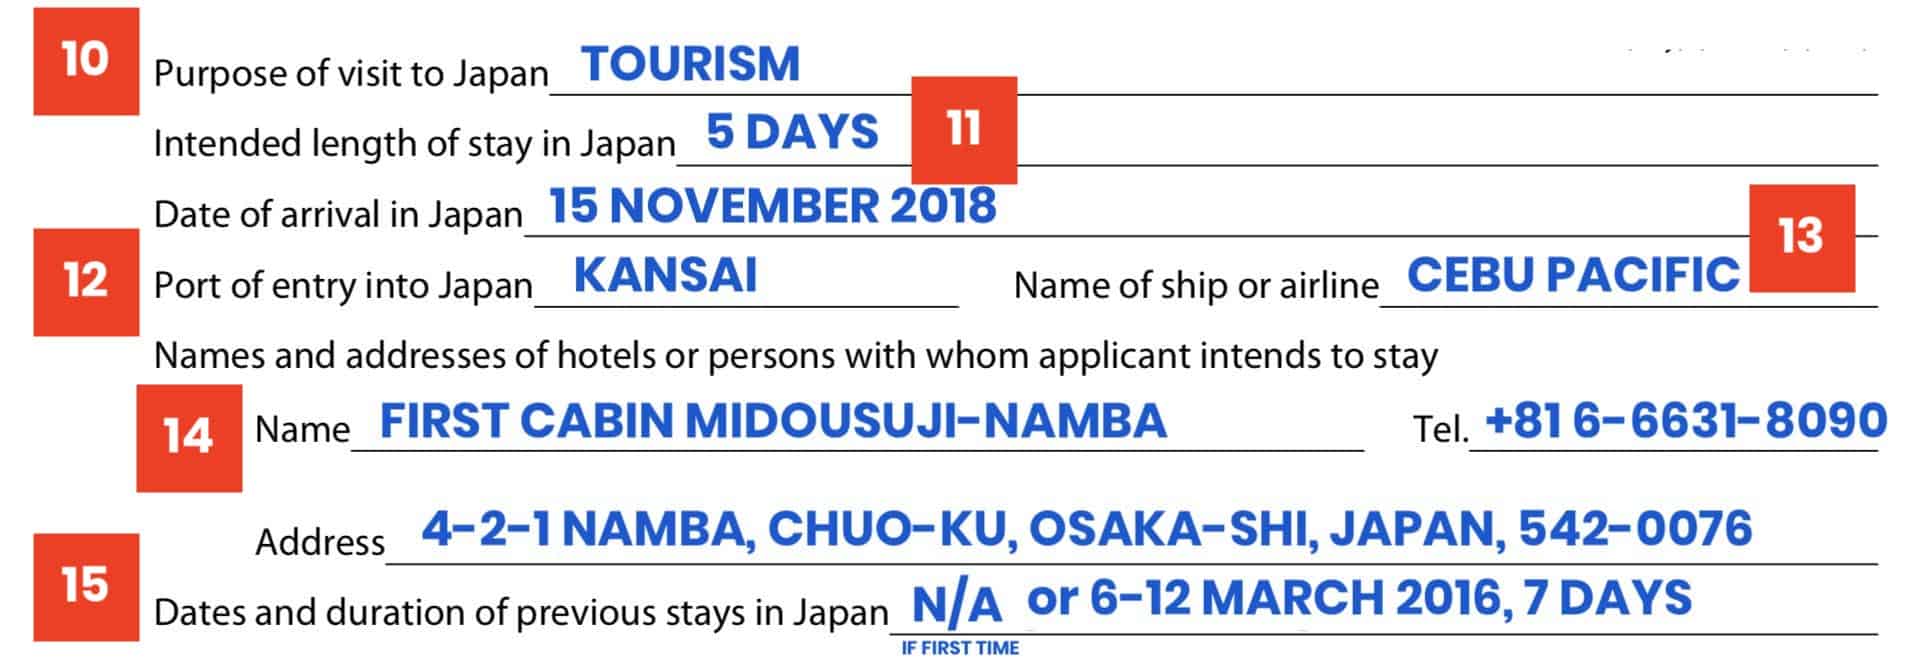
- Purpose of visit to Japan: If applying as a tourist, write TOURISM. If you’re visiting a friend or family, write VISIT FRIEND/FAMILY.
- Intended length of stay in Japan: Number of days including the day of arrival.
- Port of entry into Japan: Name of the airport. It can be Kansai, Narita, Chitose, etc.
- Name of ship or airline: Just the name of the airline or the ship. It doesn’t matter if you’re already booked or not. If you’re concerned about funds, write a low-cost carrier like CEBU PACIFIC or JETSTAR.
- Names and addresses of hotels or persons with whom applicant intends to stay: If applying as a tourist, write down the name, address and telephone number of your hotel. If you don’t know the exact address or telephone number of your hotel, Google it! If applying to visit someone in Japan, write their name, address, and contact number.
- Dates and duration of previous stays in Japan. Write N/A if it’s your first time in Japan. If you’ve been to Japan before write the inclusive dates of your previous visits and the number of days. If you’ve been to Japan many times and it won’t fit, use a separate sheet and indicate it on the form.
- Your current residential address: If you have more than one address, list them all on a separate sheet.
- Telephone number: If you don’t have a landline number, write N/A.
- Current profession or occupation and position: Be truthful! If your current occupation or position doesn’t match the ITR you’re submitting (for example, you moved to another company), you can write a letter explaining it.
- Partner’s profession/occupation: If you’re single and of legal age, write N/A. If you’re married, write the profession of your partner. If for a minor, write the profession or occupation of parents.
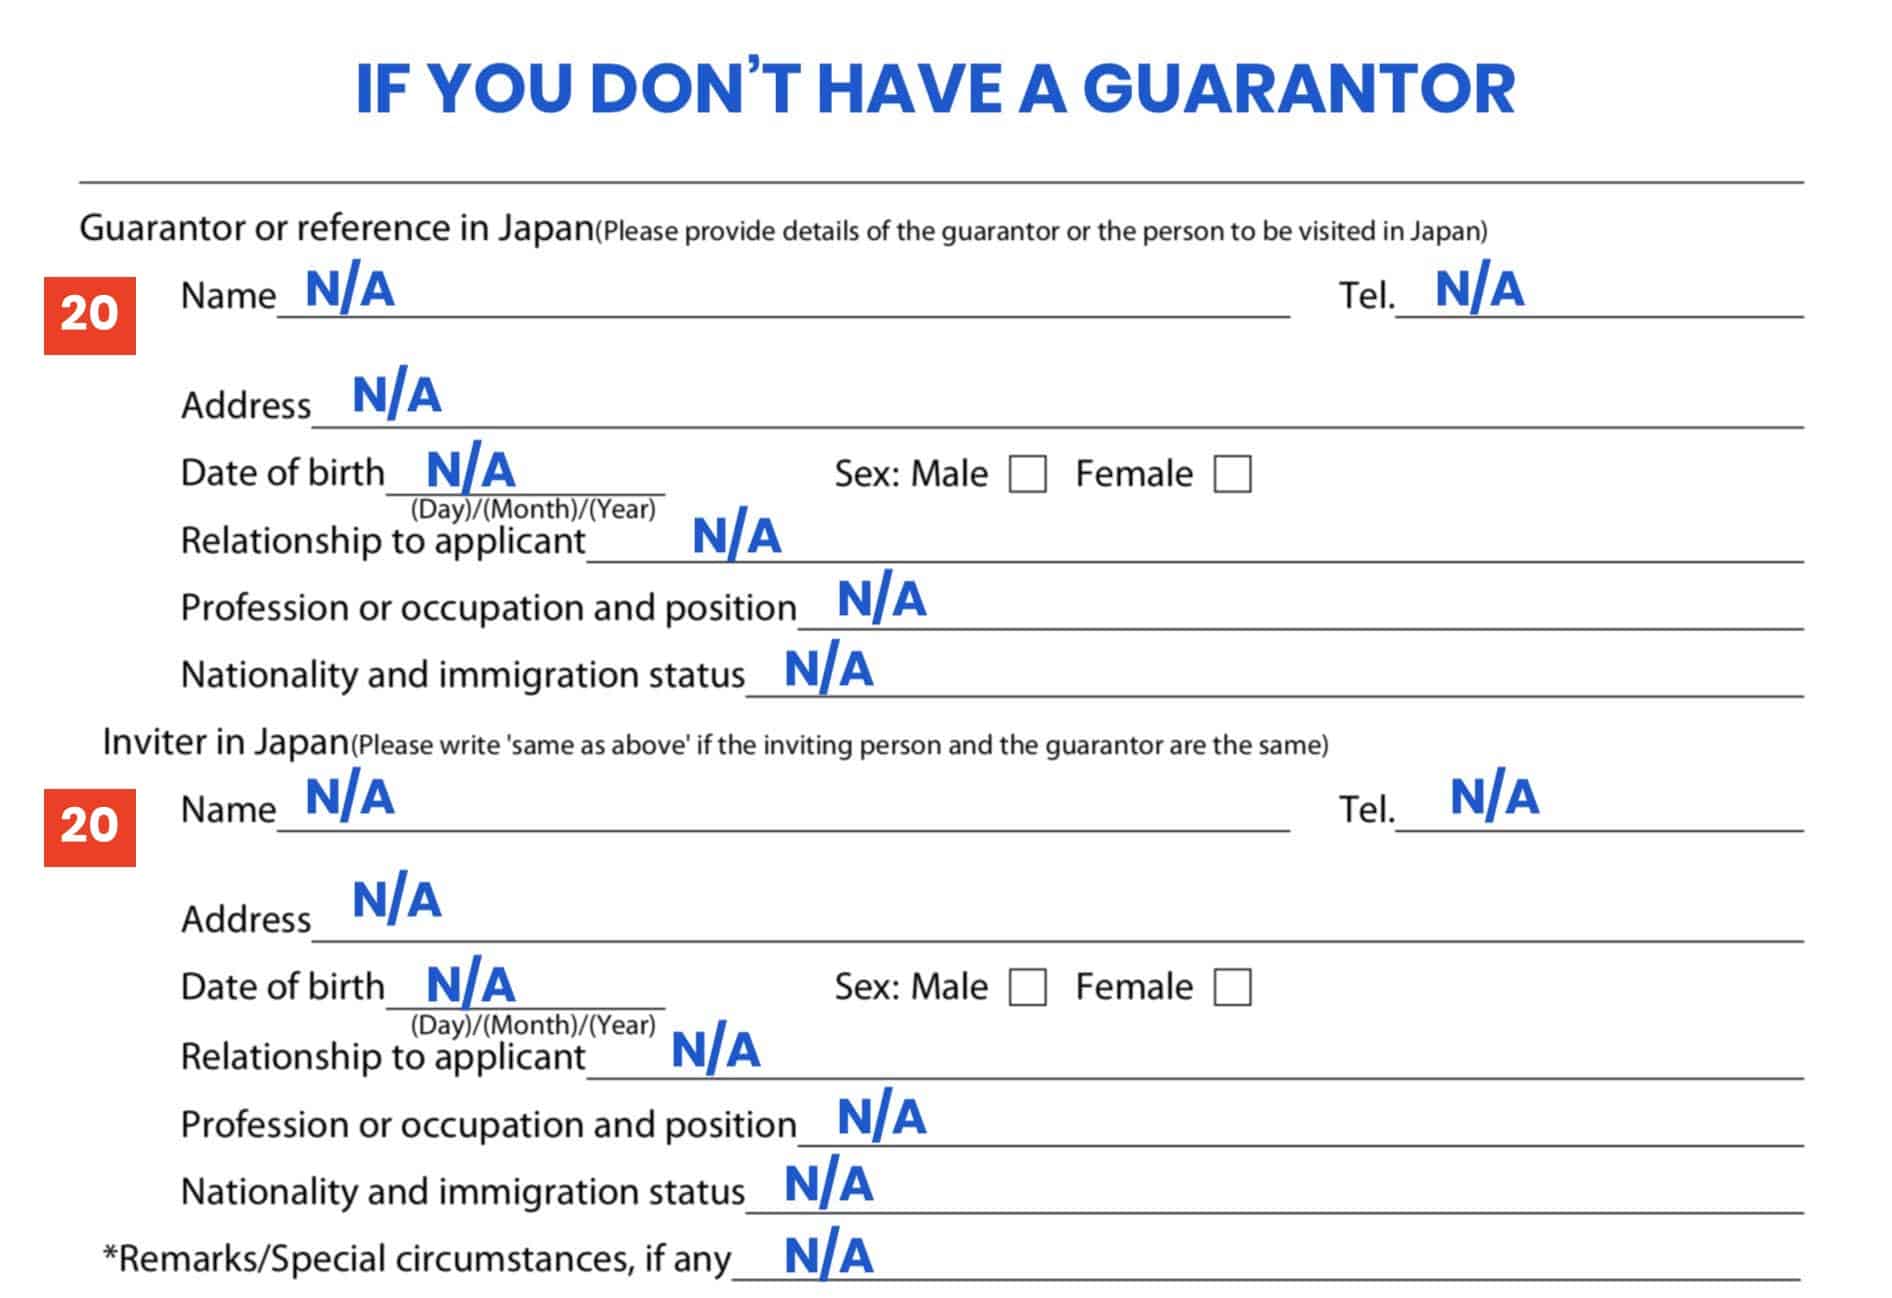
- Guarantor/Inviter Info: If you’re applying as a tourist and you’re shouldering all expenses, write N/A in ALL of the fields. If you have a guarantor, write their details. If the guarantor is the same as the inviter, write SAME AS ABOVE in the INVITER fields.
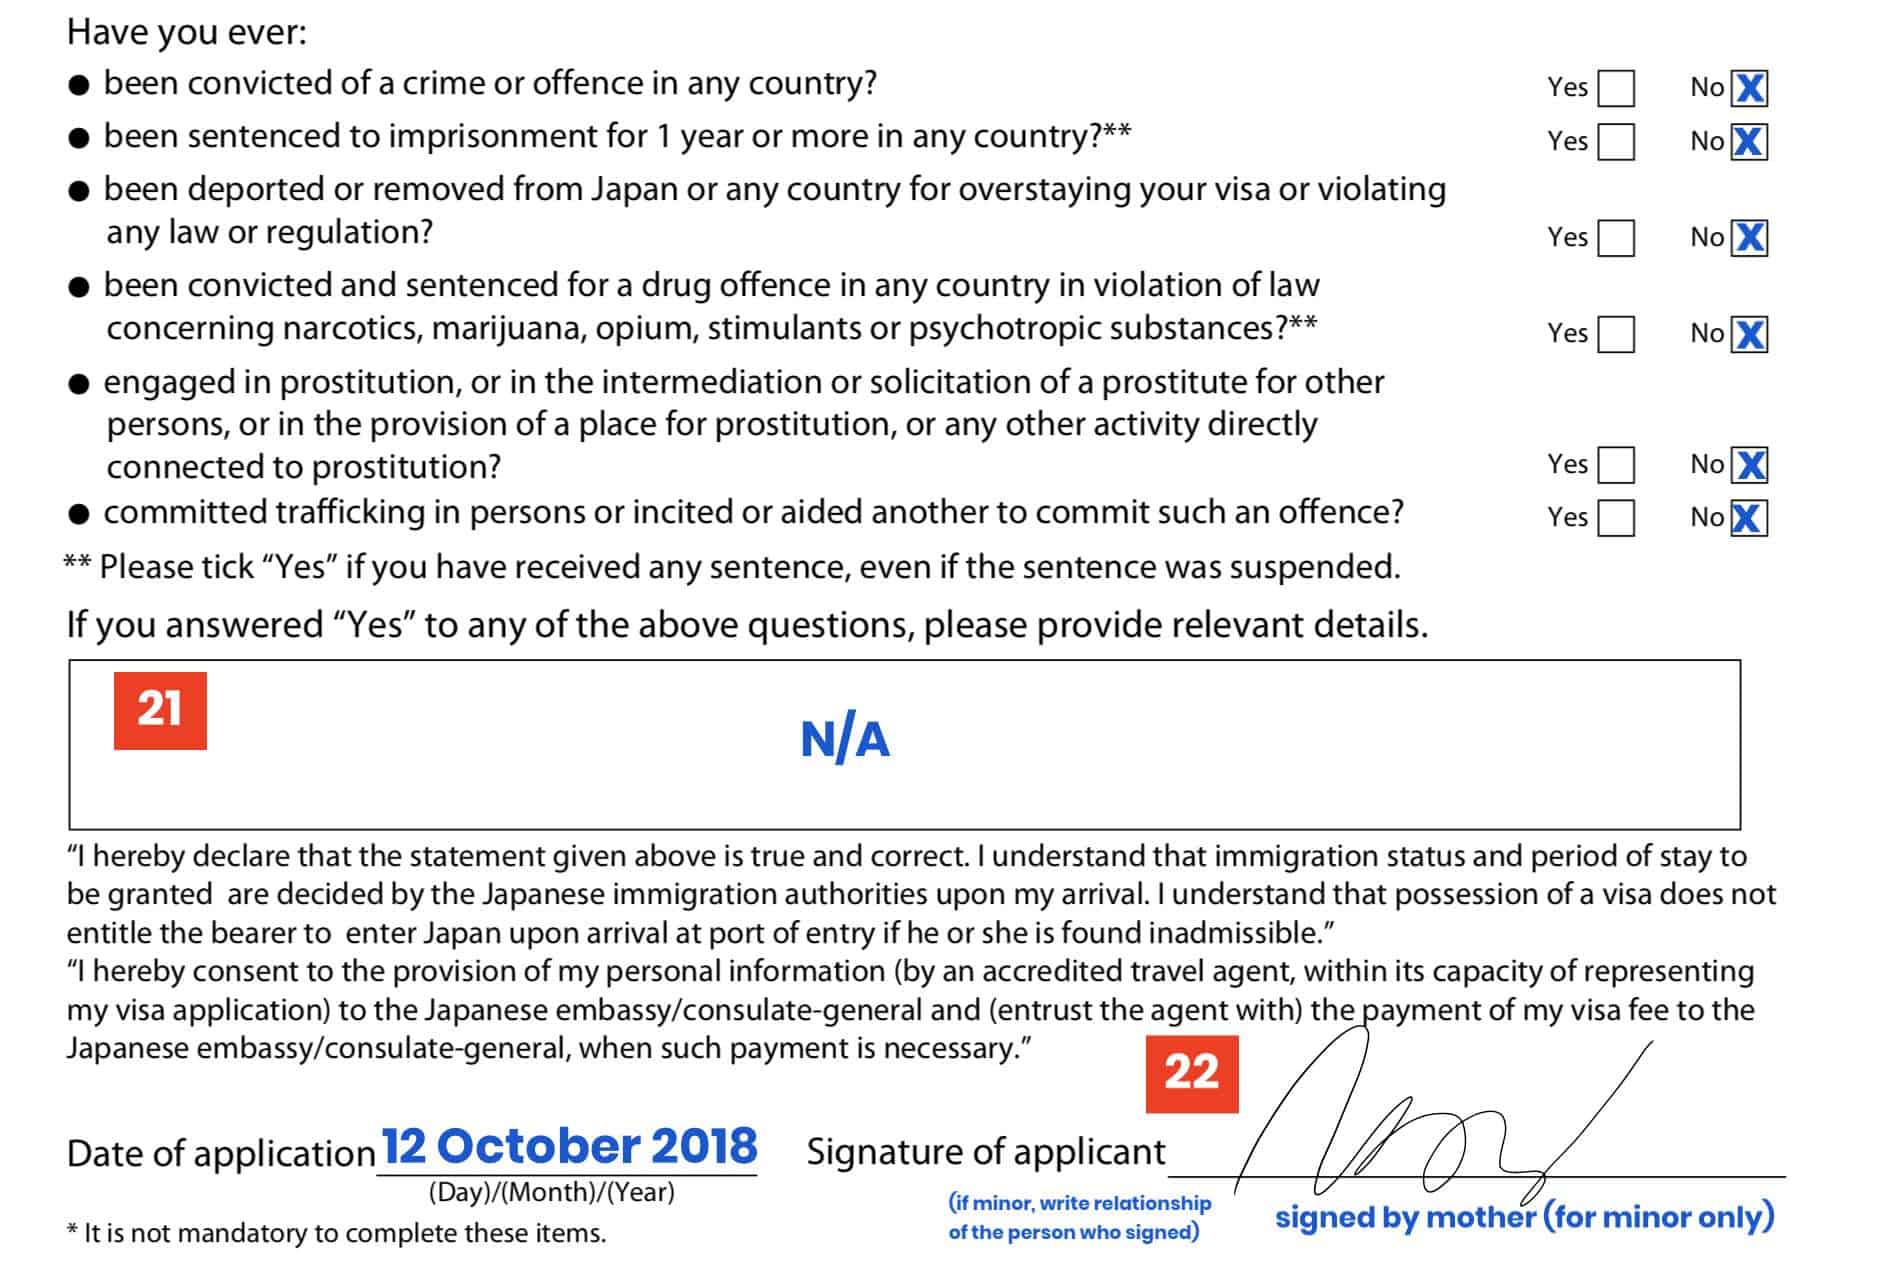
- If you answered “Yes” to any of the above questions, please provide relevant details: If you answered NO to all the questions, write N/A.
- Signature: Sign it by hand. I’m not sure if digital signatures are accepted, but I doubt it. If the applicant is minor, a parent or legal guardian can sign, but the relationship must be indicated below the signature.


Other Japan Visa Requirements
To see the other requirements, visit this page: JAPAN VISA REQUIREMENTS
Frequently Asked Questions
1. My guarantor is based in the Philippines, not Japan. Should I write my guarantor’s details in the fields under “Guarantor or reference in Japan”?
The last time we asked Reli Tours, they said YES, even if the guarantor is based outside Japan, you should still write down their details under “Guarantor or reference in Japan”. They might have changed their stance but that’s what they said last time.
But some agencies like Attic Tours say that you should write down N/A instead.
To be sure, what I suggest is to leave them blank temporarily and ask the agency what to do when it’s time to submit your application. If they tell you to enter your guarantor’s details, then do so right there and then. If they say write N/A then do it then.
Or you can call the designated agency where you plan to lodge your application beforehand.
2. Should all documents be printed on A4-size paper including the ITR and bank certificate?
In my experience, I’ve submitted ITR printed on legal size and bank certificate on letter size, but they were all accepted regardless. But I’m not sure if that’s still the case now or if that’s always the case.
2️⃣0️⃣1️⃣8️⃣ • 3️⃣ • 1️⃣9️⃣


Do i have to mention about my children or only my self and a husband? I dont see in the form about the children please answer my question thank you.
Ask ko lang, malaki ba chance na ma denied yung application mo pag may mga na leave ka na blank? like; other names, tel.no etc.?
Hi Kairu, group application? You will have to enumerate your companions in an additional form called “Accomplished List of Visa Applicants.”
More info here: https://www.thepoortraveler.net/2013/11/japan-visa-requirements-manila-philippines/
Hi sir, base sa nabasa Kong information galing po sa inyong blog. Regarding po sa “BANK CERTIFICATE issued 3months before”. Eh ung sakin po Kasi mag request palang ako today April 23, 2019 then tomorrow April 24, 2019 sya ma release. Balak ko po Sana straight nako sa Japan Embassy sa Manila. Isubmit ko na po together with other documents. Possible po ba na ma approve ako kahit recent palang ung bank Certificate ko?
Sir Iam Muhammad saif Pakistan Army retired security guard job interest
Hi Zarina, that’s perfectly fine.
I think you misunderstood. It’s NOT “issued 3 months before.” It should be issued within the past 3 months.
hi, if issued ung birth certificate last nov 2017 and mag apply ako visa this december 2018, pwede pa kaya i-allow yun?
Hindi po, kasi lagpas one year na.
Hi! What if i write down three addresses and they don’t fit in the space provided? should i just attach a separate piece of paper?
I think so.
Hi, my ticket was from Manila to Osaka, but when I applied visa, I indicated that port if entry is Narita. will this be accepted?
Hi mag apply sana ako ng tourist visa paano po ba kasi first time po. Pinag aaply ako ng bf ko nasa japan salamat po. Gusto ko sana guide agency pde poba iyon
Accepted where? If sa visa application, dapat consistent.
If na-grant ka na ng visa pero iba ung entry point mo sa dineclare mo, I think ok lang un.
can I submit my payroll bank account?
Pno kung kktpos lng ng contract s ibang bnsa as ofw, gusto mg apply ano illgay s profession no.16 in application form, tnx
Hi Arth, kung ako po nasa lugar nyo, kung ano po yung profession nyo abroad kahit na tapos na contract. Pero ako lang po yun.
Okei lang po kung hindi nailagay ang sign by mother/father dun sa signature?
My Guarantor po ako. Tapos dun sa mismong visa application yung sa may work ko now, my need ba ko ipasa na itr? Kasi dun sa instruction mo sabi mo dapat my need ako isubmit. If meron saan ko po pwede kunin?
If your current occupation or position doesn’t match the ITR you’re submitting.
Thanks!
Hi Michiko, if the ITR and current employment don’t match, you need to write a letter explaining that you recently moved to a new company etc.
Hi sir.
Ask ko po. Bf ko po is my Japanese guarantor
Dun sa no.19 ilalagay ko ba N/A or ilalagay yung last na occupation nya?
Retired na po BF ko.
Hi Aquajennie, I think #19 is for married lang so NA pa rin. Ask mo na lang din agency to be sure.
Ask ko lng
Dba Pag first tym mag apply ng late rigestration , dba need ng form 137 and baptismal , tpos ipasa na ung both original non….
So pano Po pag pang second apply na Po need pa ba ulit ng both original ng form 137 at baptismal sa pangalawang apply ng visa Po ?
Napaka-useful nitong blog mo. Ang daming kong nakuhang tips. Napakalinaw ng explanation. Thanks!!! Taga-West ka ga?
Yes po!
hey hello.. my name shehroz, im apply japan visa. please tell me how to apply japan visa and which document required to visa.
If you’re a Filipino applying in the Philippines, this is our guide: https://www.thepoortraveler.net/2013/11/japan-visa-requirements-manila-philippines/
Otherwise, I don’t know how to help. :(
Hello. Reg. sa ID Number, do I have to put the specified ID after the number? Or basta number lang?
Hello! Ask ko lang yung guarantor ko is my sister and she is working as “Seafarer” or seawoman.
Sa Royal Caribbean Cruise siya. Problem is wala silang ITR. anong pwede pa ipasa aside sa bank certificate? payslip nila or contract? Ano pwede ipalit sa ITR? pls reply. thanks
Hi Donna, ang alam ko, pwede sya magsulat ng explanation letter. Tapos submit ng other docs in its stead like payslip or COE. :)
Pero best to consult a travel agency kasi mas alam nila ang dapat gawin.
OK. Another question is yung sa visa application form na “if you have guarantor” dun ko ba i-ffill up yung name ng sister ko (taga dito siya Phils) or its applicable lang sa mga nakatira sa Japan? should i put N/a.
Hi Donna, iba-iba yung stance ng travel agencies about that. May nagsasabi na ilagay ay N/A kasi para lang daw yan pag sa Japan ung guarantor. Meron naman nagsasabi na ilagay dyan ung guarantor kahit nasa Pilipinas. Tawag ka na lang sa agency kung saan ka mag-aapply kasi medyo iba-iba talaga.
Hello
i really need some advice i am from pakistan n my brother applied for japan visa since last year through some sponsor and from last two months he said you will get your visa very soon but all in vain.kindly tell me wat ll we do to do to find out whether he applied or not
Hi Fatima,
I’m sorry but I’m not familiar with the process when it comes to other nationalities. :(
Hi po. Kapag po ba ang guarantor is nakatira sa Philippines, kailangan po ilagay yung name sa Guarantor / reference in Japan? Or yung section po na yun is for guarantor who lives in Japan?
Hi Inna, iba-iba yung stance ng travel agencies about that. May nagsasabi na ilagay ay N/A kasi para lang daw yan pag sa Japan ung guarantor. Meron naman nagsasabi na ilagay dyan ung guarantor kahit nasa Pilipinas. Tawag ka na lang sa agency kung saan ka mag-aapply kasi medyo iba-iba talaga.
Hi Yoshke,
If visiting multiple cities, e.g. Osaka, Nagoya & Tokyo, dapat ba ilagay name and address ng lahat ng accommodations? or kahit yung sa port of entry lang?
Thanks!
Hi Ysa, di ko alam kung ano ba dapat ang gawin pero ang parati kong ginagawa kapag multi-city, isa lang ang nilalagay ko sa form tapos the rest ay sa Schedule of Stay (Daily Itinerary) ko na nilalagay. Tinatanggap and naaapprove naman.
Hi Yoshke,
I want to apply for the Japan visa for the first time now while I still have my job so I can provide the requirements needed like COE and ITR. But truthfully, I really wanna quit my job na pagktapos, so say for example, I’m lucky to get approved, do you think there’s a huge chance for me to be offloaded by the Immigration during my flight date kasi kahit may approved visa ako eh I cant present any work documents na kasi I was only employed upon visa application but unemployed na upon my Japan visit?
I understand na medyo mahirap ipredict ang mga bagay bagay pagdating sa Immigration but I just really wanna know your opinion/insight on this based on your own experience or probably other people you know.
Thanks a bunch!
What’s your travel history like? And with whom are you traveling?
Hi,
Want to travel with my boyfriend. Asian countries pa lang napuntahan ko so far, South Korea is one of them.
Thanks for the response!
Another question po,should I strictly follow the scheduled activities and flights?Cant I deviate from it?I’m planning to write about the tour around tokyo. But if ever my application gets approved can I do multi-city tour?
Yep, you can deviate from your submitted itinerary. :)
Hello
I have an apartment. What will I write in occupation?is it Business owner or Self employed?and the name of employer? is it Self or the name of apartment?
Ay, di ko po alam kapag ganyang case.:S
Hi! I plan to leave on January 2020 can I apply now for Visa?
No. See FAQ 4.9 in this post: https://www.thepoortraveler.net/2013/11/japan-visa-requirements-manila-philippines/#How_early_can_I_apply_for_a_Japan_visa
Hi!
Thank you for the detailed guide. I plan to visit my aunt/cousins and probably spend the Christmas/new year holidays there. Is it alright if I fill my itinerary with tourist activity even tho I will be staying at their house?
First time and personal expense. Thank you!
Yep! That’s fine. When I handle my cousins’ applications to visit my sister, I also put tourist activities in the itinerary.
Hi Sir I would like to ask kung required po ba na ung ipapasa na birth certificate from local register this year din nakuha meron po kasi ako copy ng Civil Registry Form No. 1A kaso year 2016 pa. Yung PSA ko po kasi medyo malabo letter E sa name ko
Di ko po alam :(
Thanks anyway =)
Hello po. Ask ko lang about number 20. Yung guarantor lang po ba FROM japan yung ilalagay na details? O kahit na from philippines din? Bali group po kami, ung brother ko ung magguarantor sakin. Salamat po sa isasagot po nyo.
Hi Uma, nasagot ko na po ito sa ibang comments sa taas.
Iba-iba yung stance ng travel agencies about that. May nagsasabi na ilagay ay N/A kasi para lang daw yan pag sa Japan ung guarantor. Meron naman nagsasabi na ilagay dyan ung guarantor kahit nasa Pilipinas. Tawag ka na lang sa agency kung saan ka mag-aapply kasi iba-iba talaga.
Hello! Good day!
Meron po akong gurantor/sponsor sa Japan, He’s a Friend, Permanent resident na po sya sa japan, do I still have to pass and ITR and Bank certificate kahit meron naman na po syang pinadalang mga papers like ITR/Bank certificate.
Though I don’t have ITR and COE yet because kaka pasa ko pa lang po sa boards, ano po kayang possibleng ipakita ko for proof na uuwi ako sa pinas, though I have an exam this October 27, for med. Okay na po kaya yun and my review center?
So much appreciated po for the answer.
Hi Jane,
This post might help: https://www.thepoortraveler.net/2018/03/japan-visa-requirements-with-guarantor/
If may guarantor, usually di na need ng employment and financial docs. Pero may mga cases na pede pa rin humingi ang embassy.
Thabks you!
Oh paano po yan, since, what i said po i just passed my board exam so wala pa po akong work talaga :( so wala pa akong itr and coe .
Though volunteer pa lang po ako now sa redcross dahil wala pa pong bukas na hiring, pwede ko din ba ilagay dun sa form volunteer medtech ganun po? Position and occupation.
Hi Jean,
For me, if unemployed pa, the safest is to find a guarantor, preferably close relative. Mas straightforward kasi un. And Japan is one of the few countries na hindi kiss of death ang pagkakaroon ng sponsor.
Pag ipilit mo kasi to apply without ITR, you will need to write an explanation letter. Pero pwede rin naman yun. Feeling ko lang mas ok ang chances if my guarantor, in your case. Pero feeling ko lang yan ha. :)
Good evening po.
Kailangan po ba talaga na mag pa reserve ng place to stay online before submitting JP Visa Application?
Nope. You just need to know where you PLAN to stay. No reservation needed. You just need the hotel name, address and contact number.
Hi sir.. ask ako about itr, below 250000 yong sahod ko annualy, so tax extemted ako, paano ba yan sir? need ba resibo sa itr? tnx
Hi Mark, usually kahit tax-exempted, meron pa rin dapat na ITR from your employer. Nakalagay lang na zero tax.
Di naman need ng resibo sa experience namin.
If wala ka talaga ITR, pwede ka gumawa ng explanation letter kung bakit. Pero mas maganda talaga kung meron.
Hi! Question! Dapat ba one page lang yung form kapag prinint? Harap at likod? :) Or pwedeng 2 pages? Thank you!
Kami 2 pages pag nagsusubmit
Hello, all set na po lahat ng finillupan ko for VISA, ang tanong ko lang po is yung balance ng bank account ko is almost empty bago magfirst week of the month. I plan to stay for 7 days, including the time of arrival and departure. How much po yung needed para mapprove ako?
Thanks
See FAQ #11 here: https://www.thepoortraveler.net/2013/11/japan-visa-requirements-manila-philippines/#How_much_money_should_I_have_in_the_bank_to_get_approved
Good day po . Paano po kung unang country ko po na pupuntahan ay Japan . ppwede po ba kong kumuha ng visa? posible po kaya na maapprove po ?
Hi Dess, pwede pa rin naman. Mas may laban ka lang talaga pag may travel history na. Pero di naman ibig sabihin na denied agad pag di pa nakapunta ng ibang bansa.
Pano po ba mapapakita yung travel history sa pag pasa ng requirements? Bago lang kasi yung passport ko and nasa luma yung mga stamps.
You can submit photocopy of your past visas and stamps.
Hi po Yoshke, I am also a blogger and wala akong employer. Do you think okay na ilagay kong occupation is “Blogger” (similar to the one in your example) tapos N/A na lahat ng employer info?
Hi Lott, I wouldn’t recommend that. I think red flag pag N/A ang employer.
Need mo na ba magtravel to Japan agad? Is your blog your source of income?
Hello, please review po if tama yung procedures ko for getting my wife and son.
1. Application of COE, once na mareleased to ippdala ko lng po ito sa wife ko.
2. Apply lng po ni wifey ko sa Accredited agency ng Japan embassy sa pinas (e.g RELI TOURS & TRAVEL AGENCY,South Park 123, SM Mall of Asia, Bay City, Pasay City).
3. Wait for the release of visa then can go to Japan na.
Questions.
For #2. Yun po bang application for ei handwritten at dun na fill upan sa agency or before going to agency pwedi prepare na?
Yung po bang visa cost ei is per person?
Normally po ganu ktgal marelease yung visa?
Appreciate your advice po.
Hi Gerald,
What do you mean “getting my wife and son”? Ang plan nyo po ba ay for them to move to Japan or mag-visit lang short-term?
If short-term lang, to answer your questions:
1. Pwede mo sya i-fill up beforehand para mabilis na ung process pag andun ka. Pag may di ka sure, i-blank mo na lang muna tapos ask the staff pag andun ka na.
2. Cost is per person.
3. Normally, 7 days ang processing.
For more information, visit: https://www.thepoortraveler.net/2018/03/japan-visa-requirements-with-guarantor/
Hello
Ask lang, kasi recently lang ako nagresign sa company ko 6 months ago and now helping sa family business namin. I am applying for a Japanese Visa for vacation sa november with regards to submitting an ITR, do I still need to include the ITR of my last company, plus a letter explaining why wala po akong ITR ngayon?
Another question is kung need ba maglagay ng guarantor provided na I am working sa family business? thank you po sa pagsagot :)
Hi Raymund,
Wala pa naman talagang ITR for 2019. Submit mo yung for 2018 tapos gawa ka explanation letter to say na you’re involved sa family business na.
Whether or not kailangan mo ng guarantor, depende sa finances mo.
Hi,
Thanks for the step-by-step guide! Big help! Just a few follow up questions:
1.) Do I need to print and include my booking confirmation from the hostel I’ll be staying in?
2.) Other than the visa application form, should the rest of the documents (bank cert, COE, ITR, schedule of stay) be printed in A4 as well?
3.) How many photos should I submit to the agency?
Thanks in advance!
Hi Rodel,
I’m assuming you’re applying for a tourist visa in the Philippines.
1. Not really. Hotel reservation is not a requirement. They just need to know where you PLAN to stay. You can still submit hotel reservations but it’s not a requirement.
2. Documents that you have control of like Schedule of Stay, App Form or even COE should be A4. In my experience, I’ve submitted ITR printed on legal size and bank certificate on letter size, wala namang naging problem. But I’m not sure if that’s still the case.
3. Just one.
More info here: https://www.thepoortraveler.net/2013/11/japan-visa-requirements-manila-philippines/
Also do I need to print a copy of my government-issued ID and submit to the agency?
Thanks again!
hi goodafternoon po
1.)ask ko lang po since apat kaming mag aapply ako at 2kapatid then mother ko then yung mother ko ang aming guarantor pwede bang isang ITR na lng i provide namin and need ba naka A4 size din yung clear copy ng ITR?
2.)ask ko rin po kung pwede bang hand written ang fill up namin sa documents?
Hi Saidrex,
1. Sa experience ko po when I applied with family, 1 copy lang pinrovide namin. Actually, may dala kaming maraming copies pero 1 lang ang kinuha. Just make sure you also fill out the form called “List of Visa Applicants” para alam nila na group kayo. More info here: https://www.thepoortraveler.net/2013/11/japan-visa-requirements-manila-philippines/
2. Yep. Madalas handwritten ako magsubmit.
Dear Sir,
I’m planning to go to Japan this Dec. Kaso i was worried pagdating sa immigration bcos i dont have any job or should i say housewife na lng ako now..ano ba mga needed docs na hihingin nila or malabo ang chances ko na mtatakan nila passport ko?thank you..sna matulungan mo ako
Hi yoshke
Kaylangan ba mag submit ng travel clearance ang applicant(minor) to get a japan visa and what if kung baptismal lang ang isa submit dahil iba na ang address ng applicant(minor) nung nag aral sya. Yung applicant(minor) is 7yrs.old, grade2.
Hi Juvelyn,
Di naman po needed ang travel clearance pag visa application, sa experience ko applying for my niece and nephew.
Regarding baptismal/school record, di ko po alam ano gagawin sa case nyo po.
Hi Sir,
Good day. Ask ko lang re: filling application form. I will accompany my mom during our trip and will be covering for her expenses.
I live and work in the Philippines. Should I fill-up the “Guarantor” area with my details? And then put N/A in the “inviter” area?
Thank you so much!
Hi Dale, this has been asked many times in the Comments section, so I’m adding an FAQs section to this article na lang. See the new updates. Thanks!
Hi po. Ask ko lang po kasi hinahabol ko yung promo ng ticket for Japan and balak ko na syang bayaran tom. kahit mag aapply pa lang ako ng visa. Non refundable nga yung ticket and i take the risk na ipabook na kc sayang ung promo. Ask ko lang kung madami bang nadedeny s pagkuha ng visa application ? Im worrying din kc i cant provide for my itr but i have travelled several countries na like hongkong, taiwan and indonesia. Ano kayang chances ko na maapprove ang visa ko? Thanks.
Mahirap po ma-determine ung chances nang konti lang ang information.
Pero di naman ganun ka-strict ang Japanese embassy.
Dear sir,
I just want to be honest, I have been deported in year 1999 in Japan,for overstaying because my family that time was financially unstable, I was lucky then to have a Japanese couple who treated me so well in a laundry shop so I rendered in return best of my ability in that work. My employer treated me so well, that some of my filipino co-workers envy me in that situation, my employer then was planning to get my children so we live together while I work with them, so they reported me to the Immigration. sad to say it ended to a broken marriage…Since then I became a single parent, with Gods blessing I was again blessed to have employed in the Philippine Government again until today. I am now in my senior age, all sons are now professionals, I want to visit Japan again , to treat myself as a single mom. Please help me.
You could still possibly enter Japan because your ban period elapsed though it is not still guaranteed that you might get an entry visa for tourist as immigration has records of you already. You can try with all the papers that supports your financial capability and strong ties to your country as it will tell them that you are going back to your country. Good luck!
Hi Ma’am Nilda,
Unfortunately, I do not have any idea on what to do for cases like yours. :(
I think it’s best to consult a travel agency for that because they might know better.
Hi, Yoshke.
Good Day.
Pwede ba mag pasa ng dalawang bank / bank certificate (BPI/BPO)?
Thank you.
Hi Den, yep!
Dear sir,
I am planning to go to japan in the month of December,i am not sure on which date i will arrive in japan its either 22 December or 25 December.In my application form if i write 22 December i will be arriving in japan and submit to the embassy,but then afterwards i change my arrival to 25th December is it ok if i do that
Hi Sam, yes, that’s alright, as long as it’s still within the validity period of the visa.
Hi po. Ask ko lang po ang opinion nyo reg my situation. Wala po akong, itr, coe or business reg. self employed po ako, i buy n sell used cars, sa letter of explanation ko, ilalagay ko link ng fb page ko para makita ng consul mga binebenta kong cars. May 7 figures po ako sa bank. What do u think of my chance getting tourist visa approve? Thanks
Hi Marie, di ko po kayo masagot nang sure. Usually pag walang ITR, nadadala naman sa explanation letter + other proof of income. Pero parang malabo ung FB page kasi madali lang namang gumawa ng FB page.
Hi po! ano po kayang mas maganda, indicate ko po na may inviter ako (boyfriend ko) or mas ok po na wag na lang para di nila isipin na mag stay ako dun as tnt?
Hi,
Just want to ask what is 60K enough money in the bank to have better chance of Japan Visa approval? I’ve been to 4 countries outside of the Philippines but it is my first time to apply for a Visa. Hope you can help.
Thank you.
Hi Ann. Merong mga naaapprove na 60K lang ang laman ng bank account. Depends on how long your trip is and sometimes, your ITR.
My apologies for the typo in my previous question. I wanted to ask if 60k is enough savings in the bank for Japan Visa application. I’m planning to visit Tokyo for 4 days. I’ve been to 4 countries outside of the PH but it is my first time to apply for a Japan Visa.
Thanks,
Hi, I am planning to book a trip to Japan for 5 days to visit my relatives and go for sightseeing as well. I live in Canada and I’m applying for a visa from my country. Regarding the question of what is my occupation, I don’t have a job and I’m currently a full-time student. In that case, what do I put?
Student.
Hi. I intend to visit three cities in Japan (Matsuyama, Hiroshima, and Kyoto). I plan to stay in 3 different hotels, too. How do I fill out the application form, given that the space is not enough to mention the three hotels (name and address)?
Thank you.
Hi Janet,
Yung ginawa ko, ung first lang ang sinulat ko sa form tapos the rest, sa Schedule of Stay ko na nilagay . :)
Hi,gusto ko po sanang mag tour sa Japan for two weeks at iyong guarantor ko po is only my boyfriend. Pwde po ba iyon? Sa tingin ko parang mahirap nga kasi boyfriend ko lang… Pwde ko po bang ilagay na Instead boyfriend iyong guarantor ko ay friend nalang. Please I need your advice. Thanks
Hi ,
I am a senior citizen and this will be my 4th travel to Japan ,with my husband. But now my husband is already retired and no ITR to present. But we have Bank certificates. do you think this is enough proof we have money to travel? Thank you.
virgie
Hi po! Di ko po sigurado. Pwede po kayong magsulat ng letter explaining na he’s retired.
Pero best to contact the travel agency where you plan to lodge your application to be sure po.
Hello,
I already have a multiple-entry visa for Japan. I would like to apply one for my baby who will be barely 1 year old by the time we plan to fly to Japan.
Also, I did not indicate her birth father on her birth certificate. She has my last name.
What requirements do I need?
Hi.
Am not sure if you are able to answer this but I’ll try since we went to Japan multiple times already. Is it ok to apply for Japan Visa for a newly release passport? My friend told me that the passport should be active after 6 months from the release before applying for Visa. Is it true?
Hi Nicole,
I have never heard that rule before.
But my niece got her passport September and we applied for a Japan visa 3 WEEKS later. She was granted a visa October same year. That’s way shorter than 6 months but she was still granted a visa.
Hello
I have two bank certificates one with my name only and the other an ITF bank account with my mom.
Should I still put my Mom as my guarantor? or Is it okay not anymore since my name appears in the account name. thank you.
Since you have a bank account with your name only, you can apply on your own without guarantor. Assuming, of course, it has sufficient funds and you have ITR too. :)
Hi,
My ITR(2018) is still using my old address.
Will this have issue with the current residential address I used in my other IDs?
What other IDs?
Not sure if magiging issue. But to be safe, you can simply write an explanation letter.
Hi! I just want to ask if possible mag apply for ME visa kahit naka guarantor lang? First timers po kami ng mom and brother ko, guarantor po namin father ko. Will probably go back sa Japan after our April trip. Or should we apply for SE only? Thank you!
If you fall under the categories here, pwede: https://www.thepoortraveler.net/2017/03/japan-visa-multiple-entry-requirements/
HI , on the “ID no Issued to you by your government” section , do i need to specify if this is a SSS id umid , passport etc ID? Example CRN-123456789452(UMID)
Thank you
Me, I usually indicate the type of ID. :D
which date should i write on date of issue? like the date i issued my visa or the date of going to japan? I can’t book a plane yet cuz of corona. So there is no certain date.
The one on Page 1? Date of issuance of PASSPORT.
Hi. I just wanna ask, may sister po ako sa Japan and dun na sya nakatira. Kapag nag apply po ba ako ng tourist visa kahit unemployed ako may chance po ba na maapprove kasi may guarantor? Thank you.
Hi! Your blog is very useful especially sa mga first timer na gaya ko. If I may ask po, I already have ticket for September 16-24, 2021 but I don’t have a hotel to stay kasi andun naman yung bf ko. But he’s not my guarantor. Can I put his address sa place to stay po?
Hi Marinelle! Thanks for your comment.
I’m assuming VISIT visa yung inaapplyan mo.
Yes, pwede mo ilagay ung address niya sa address (#14 sa post).
OK lang naman na yung pagse-stayan mo ay hindi mo guarantor or na wala kang guarantor. Just make sure na sa next page, leave the GUARANTOR section with N/A answers tapos ung INVITER section ung i-fill out mo.
Very helpful po. Thank you so much! God bless and stay safe po. :)
Can I Travel to Japan I’m a US Green Card Holder
Required po ba magpasa ng COE?
I want to apply with my Wife for Japan Tourist Visa but she is not working currently so Bank Statement with Salary Credit she cannot show but I have all documents line Bank Statement, Employeer NOC etc.
Now my wife needs to fill separate Application form or I can fill her details in list of Visa Applicants?
Kindly guide.
Each applicant need to submit a separate application form. The list of visa applicants is just a reference to check which applicants are traveling together.
Hi. What if may guarantor, do i still need ITR and bank statements? Thanks.
Hi Yoshke! This post is so helpful.
Just a question with a particular item on the application form tho! I am a Virtual Assistant and I registered myself in BIR as self-employed. When it comes to item # 18: (Name and Address of Employer part) – Should I write my name (since that’s how I registered the business, under my name) or Should I write my current client’s information? Thank you so much!
hi, if wala pa kong hotel and ticket, anong isusulat? :(
Di naman po required ang hotel and ticket. Kung ano pa lang ang target mong sakyan and pagstay-an.
Hi!! Thank you so much for this guide! Just a quick question.
I’m a virtual assistant and currently working for just one client now. I registered myself in BIR as a professional as well (so I can file my taxes next year). In the employer name section, should I just write the name/company of my client? Or should I use my BIR information (business is just my name tho.)? Thank youuuu!
If I remember correctly, when I was a freelancer, I just wrote my job title / self-employed, and wrote by business name as registered.
(I think I’ve also tried writing my client’s company name on another occasion, but I also wrote a cover letter to explain it.)
Freelancer din po ako. Pano po kaya pag 2 employers. Balak ko ilagay name ng emloyers ko sa form pero pang isa lang ung space sa form. Okay lang na ilagay ko sya pareho sa space na un?or do i need another sheet?
Hi, i have always been using your page as a ref every time i’m doing an application.but this time, i cannot find anywhere on how i can list all the hotels given that the space is very limited.
Please help what should i do?
Thank you!
If I remember correctly, you can just use a separate sheet. List them down and their details (address, phone number) and corresponding dates of stay on another page.
Hi, just wanna ask if I have to sign beside a mistaken information I fill in the form or I can just leave 2 strike throughs? Thanks
Ano po sinsavi sa baba na number of application max*10 po?un mag papa appointment ka sa consulate ng japan sa uae ng pa visa appointment.malaki kaliwanagan kung masagot nyo po sir Josh.
Naku di po ako familiar sa system sa consulate ng Japan sa ibang bansa.
Hi! I have a question.
Since yung guarantor ko po is My Mom with Permanen residence na sa Japan.
May kailangan pa po ba siyang kunin doon sa Japan Embassy? Or/May kailangan pa ba lagyan ng red ribbon yung letter of invitation and Letter of Guarantee?
For visa application, wala naman po. Need nyo lang po nung Guarantee letter, and Income Certificate (Shotoku Shomeisho) from City Hall, Tax return certificate (Nouzeishomeisho: Form 2) from Tax office (Kakuteishinkokusho Hikae), OR Bank Certificate (Yokin Zandaka Shomeisho). Best if you have all three.
Need po ng stamp ng mom mo ‘yung docs na ‘yan.
Hi po, hope na makita niyo po yung comment ko. I just wanted to clarify paano po yung counting sa intended length of stay? If for example April 1- 7 yung schedule, will it be 7 days po ba or 6 days? Thank you
Hi Van! If tama ang alala ko, it should be 7 days. Day of Arrival is considered Day 1.
Hi, how are you? Sir, ask ko lang po kapag ba student applicant sa part po na current profession or occupation and position ang ilalagay po ay Student then sa Name and Address of employer po ilagay po ba pangalan at address ng school or NA lang po ilagay ko? Please advise po if ano po dapat ilagay. Salamat po in advance. God Bless
Pano kung di ko na matandaan yung exact dates nung previous stay ko sa Japan? di ko narin mahanap yung old passport ko to check :(
Hi, Dun po sa part ng employer section ng form, Pano po if I am working directly to my client (remote work direct client US) and I have three clients, is it okay lang po to put the names of my clients? Thank you
Hi. I am planning to apply for a multiple-entry visa (I already traveled to Japan early this year on single-entry) this week. And at the same time, I’m in the talks of moving to a new job/employer, though,I haven’t signed any contract yet (no start date yet) with the new employer and haven’t resigned from the current employer because everything is in the process of negotiations pa. I just want to ask, if magaapply ako ng visa this week, is it correct to put in NAME OF THE EMPLOYER field in the application form yung current employer ko pa din? I want to take a break sana before starting in the new job. Thanks!