We’re supposed to be in India now. For months, we had planned going on a backpacking trip from Nepal to India to Sri Lanka. We had almost everything taken care of including our hotels and an India visa. But something personal came up so we had to cancel the whole thing. I’m still a little bit bummed, but I guess some things are really just out of our control.


The good news is, because I have tried applying for an India visa, I can now write about the experience. I was actually quite surprised to learn that we needed a pre-issued visa to enter India. Filipinos used to be able to avail of visa-on-arrival, but that had been discontinued a couple of years ago.
Today, Philippine nationals visiting India may apply for an e-Tourist visa, e-Business Visa, or e-Medical visa. In this post, we’ll be focusing on the e-Tourist Visa only. It’s actually pretty easy. I finished my application in an hour and got my visa the next day. Here’s how to do it.
INDIAN VISA REQUIREMENTS
But first, here are the requirements.
It’s the shortest list of requirements for a visa application that I’ve seen. Haha. Basically, before you apply online, you must have the following:
- Scanned copy of the your passport’s bio page. Your passport should have at least 6 months validity and at least 2 blank pages from the date of arrival in India.
- Recent photo. Front facing and against a white background.
- Visa Fee, which costs USD 50 + USD 1.75 bank transaction fee. So that’s a total of $51.75. You can pay via credit card or PayPal.
Update: According to some of our readers, the visa fee is now USD80. They paid a total of USD82.35, including transaction charge.
INDIAN VISA ONLINE APPLICATION PROCESS
1. Make sure you’re eligible for an e-Visa.
- Apply for an e-visa if at least 4 days in advance of the arrival date with a window of 120 days. The Embassy site gives this example: If you are applying on September 1 then you can select arrival date from September 5 to January 2.
- Your sole objective in India is recreation (tour, sightseeing), visit friends or relatives, or casual business visit.
- Your passport must have at least 6 months validity from your arrival date. It must also have at least two blank pages.
- You must have a return ticket or an onward journey ticket and enough money to spend during your stay.
- Appy for an e-visa only if you’re entering India via any of the following airports because these are the only ones that would accept it:
| Ahmedabad Amritsar Bagdogra Bengaluru Calicut Chennai Chandigarh Cochin Coimbatore Delhi Gaya Goa |
Guwahati Hyderabad Jaipur Kolkata Lucknow Mangalore Mumbai Nagpur Pune Tiruchirapalli Trivandrum Varanasi |
It is also accepted at the following seaports: Cochin, Goa, Mangalore.
If you’re planning to enter India through another gateway, you will have to get a visa the old-school way. Apply at the Embassy. In that case, I won’t be able to help because I haven’t tried that one.
2. Complete the requirements.
I enumerated the requirements above, but just in case you missed it, here’s the list again.
It’s the shortest list of requirements for a visa application that I’ve seen. Haha. Basically, before you apply online, you must have the following:
- Scanned copy of the your passport’s bio page.
- Recent photo. Front facing and against a white background.
- Fee, which costs USD 50 + USD 1.75 bank transaction fee. So that’s a total of $51.75. You can pay via credit card or PayPal.
In addition, you should also have the following details of your trip because you will be asked for these during the online application:
- Travel Dates
- Airport of entry
- Hotel Address and Contact Number
That’s it. Now all you need to do is apply and pay online.
3. Apply Online.
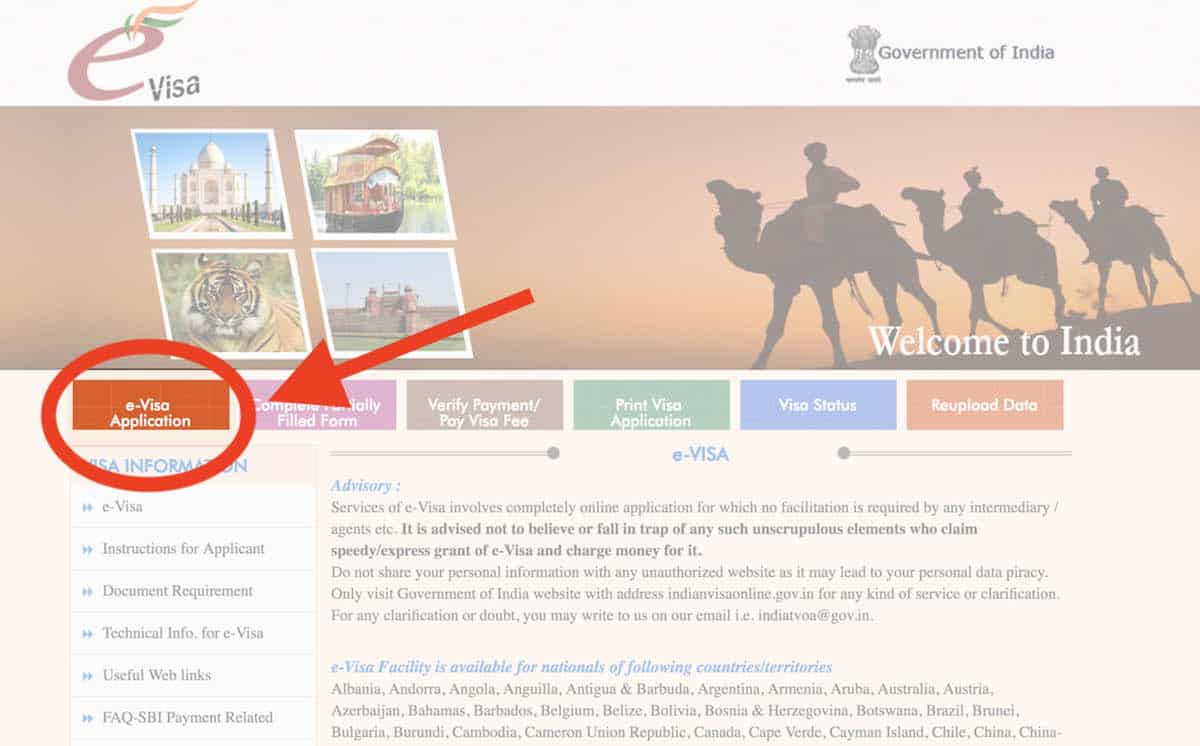
- Go to India’s e-Visa Application Page. Click on e-Visa Application on the top menu. See screenshots below for reference.
- Accomplish the short form. Don’t forget to tick e-Tourist Visa, and then choose Recreation/Sightseeing. Once you’re done. Click Continue.
- On the next page, fill out the form. You will be asked for your Personal Details, Family Details, Employment Details, and the details of your trip. It’s pretty straightforward. The only thing that confused me a little bit was the part that asked for References in India. If you’re not visiting anyone, you only need to enter your hotel, its address, and contact number. You will also be asked for your reference in the Philippines.
- On the next page, upload your photo and a scan of your passport’s bio page.

Important! There are a lot of impostor websites that pretend to be the official India E-Visa portal. It’s uncanny. They look official. But these are scams. They will charge you more than triple the real cost of the visa. Don’t fall for them. Make sure you visit the right website, which is www.indianvisaonline.gov.in.
4. Settle the visa fee.
You will be asked whether you want to pay via SBI or Axis. These are payment gateways. SBI stands for State Bank of India. I chose SBI.
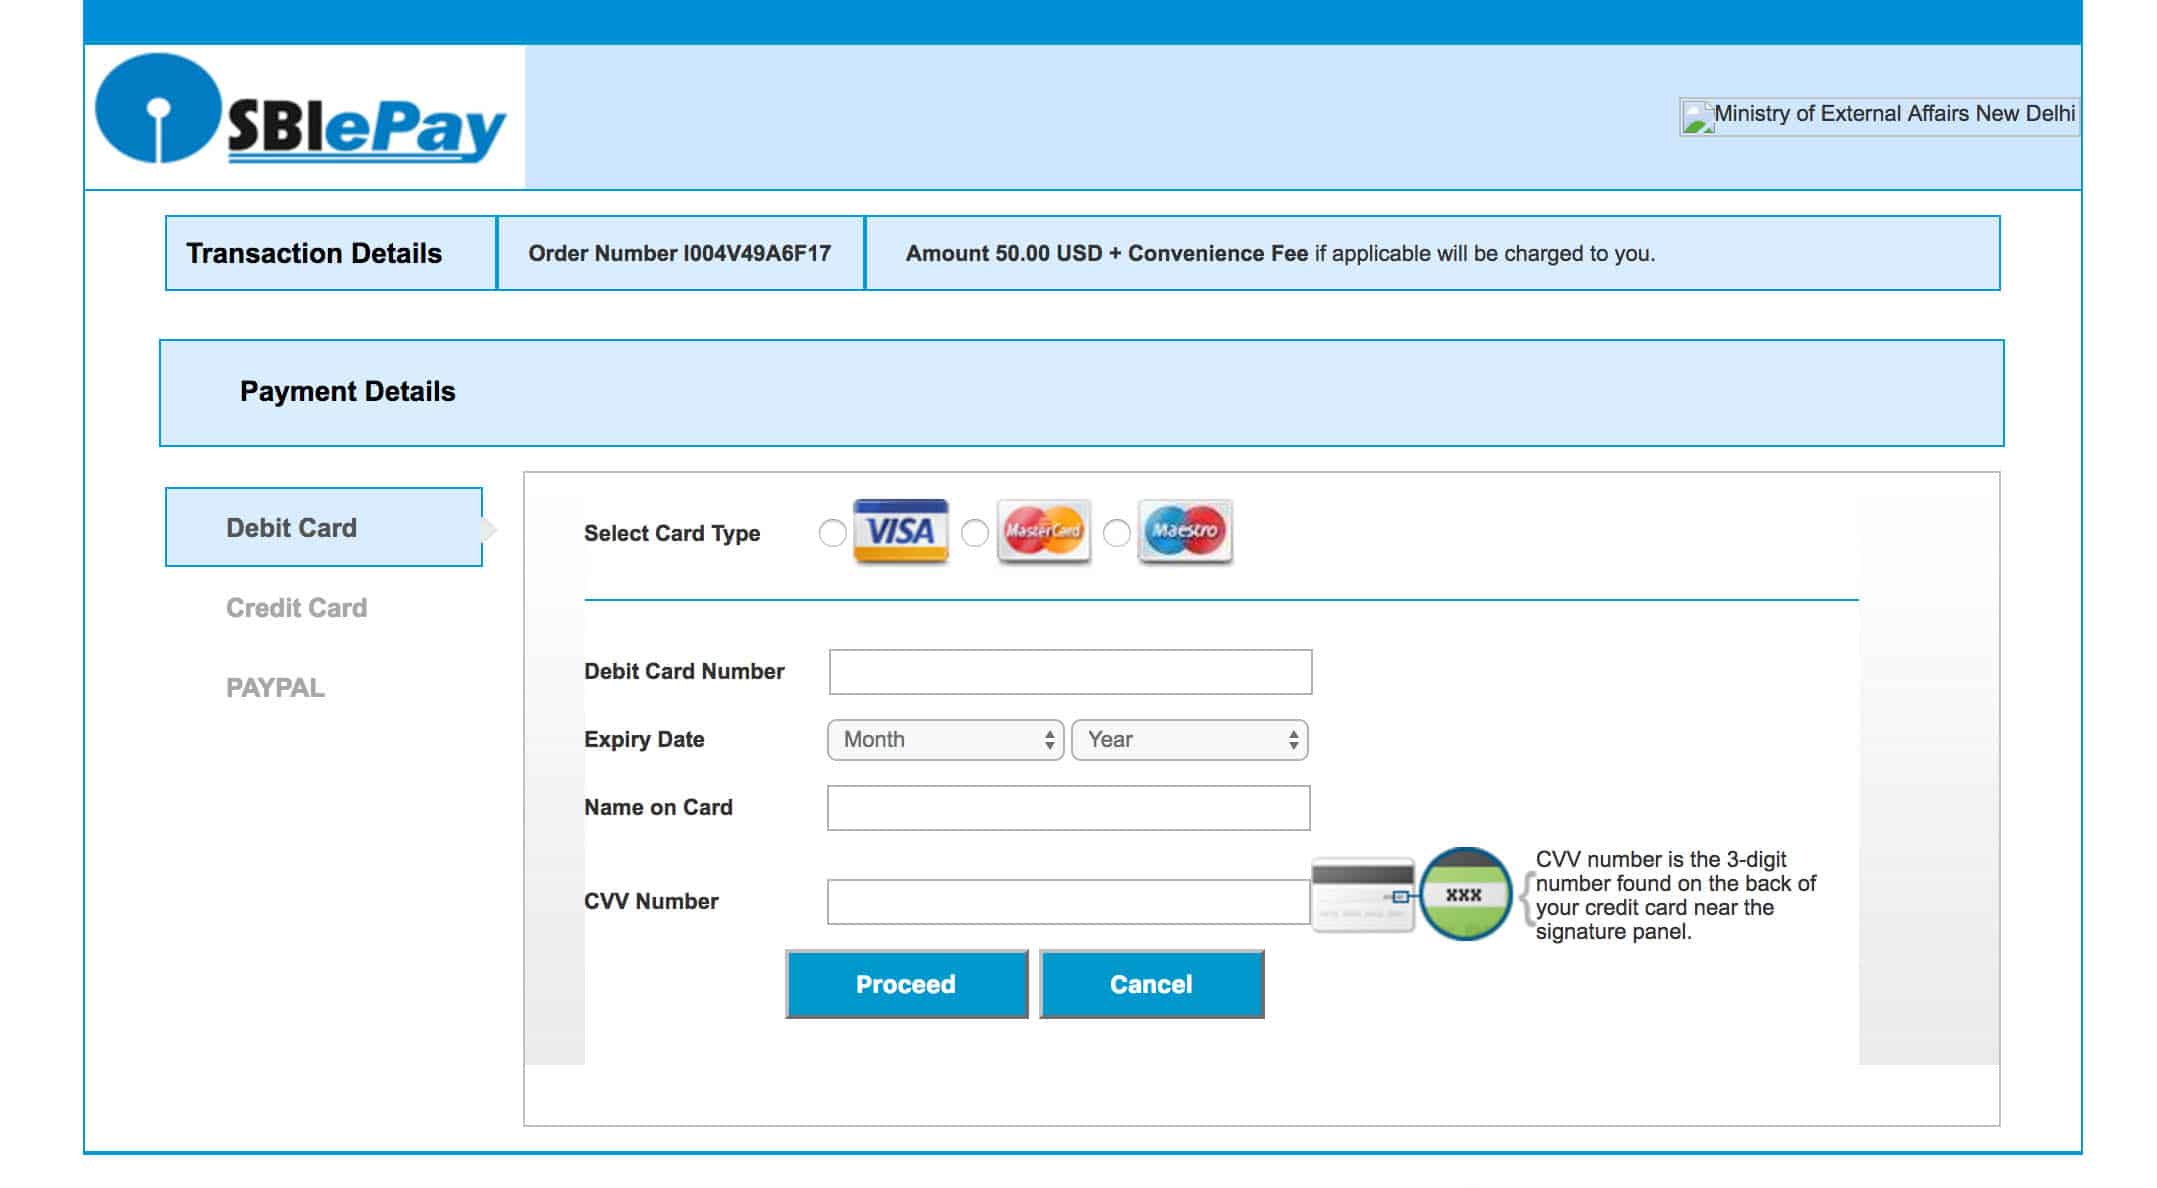
Then you will be asked if you want to pay via PayPal, debit card, or credit card. For Credit Card, Visa and MasterCard are accepted. For Debit Card, Visa, Mastercard and Maestro are accepted.
The fee is USD 50 + USD 1.75 bank transaction charge. Total of $51.75.
Update: According to some of our readers, the visa fee is now USD80. They paid a total of USD82.35, including transaction charge.
5. Wait for your visa!
That’s it! After that, the waiting game begins.
What you’re actually waiting for is an email from them containing your Electronic Travel Authorization (ETA). Here’s what it looks like.
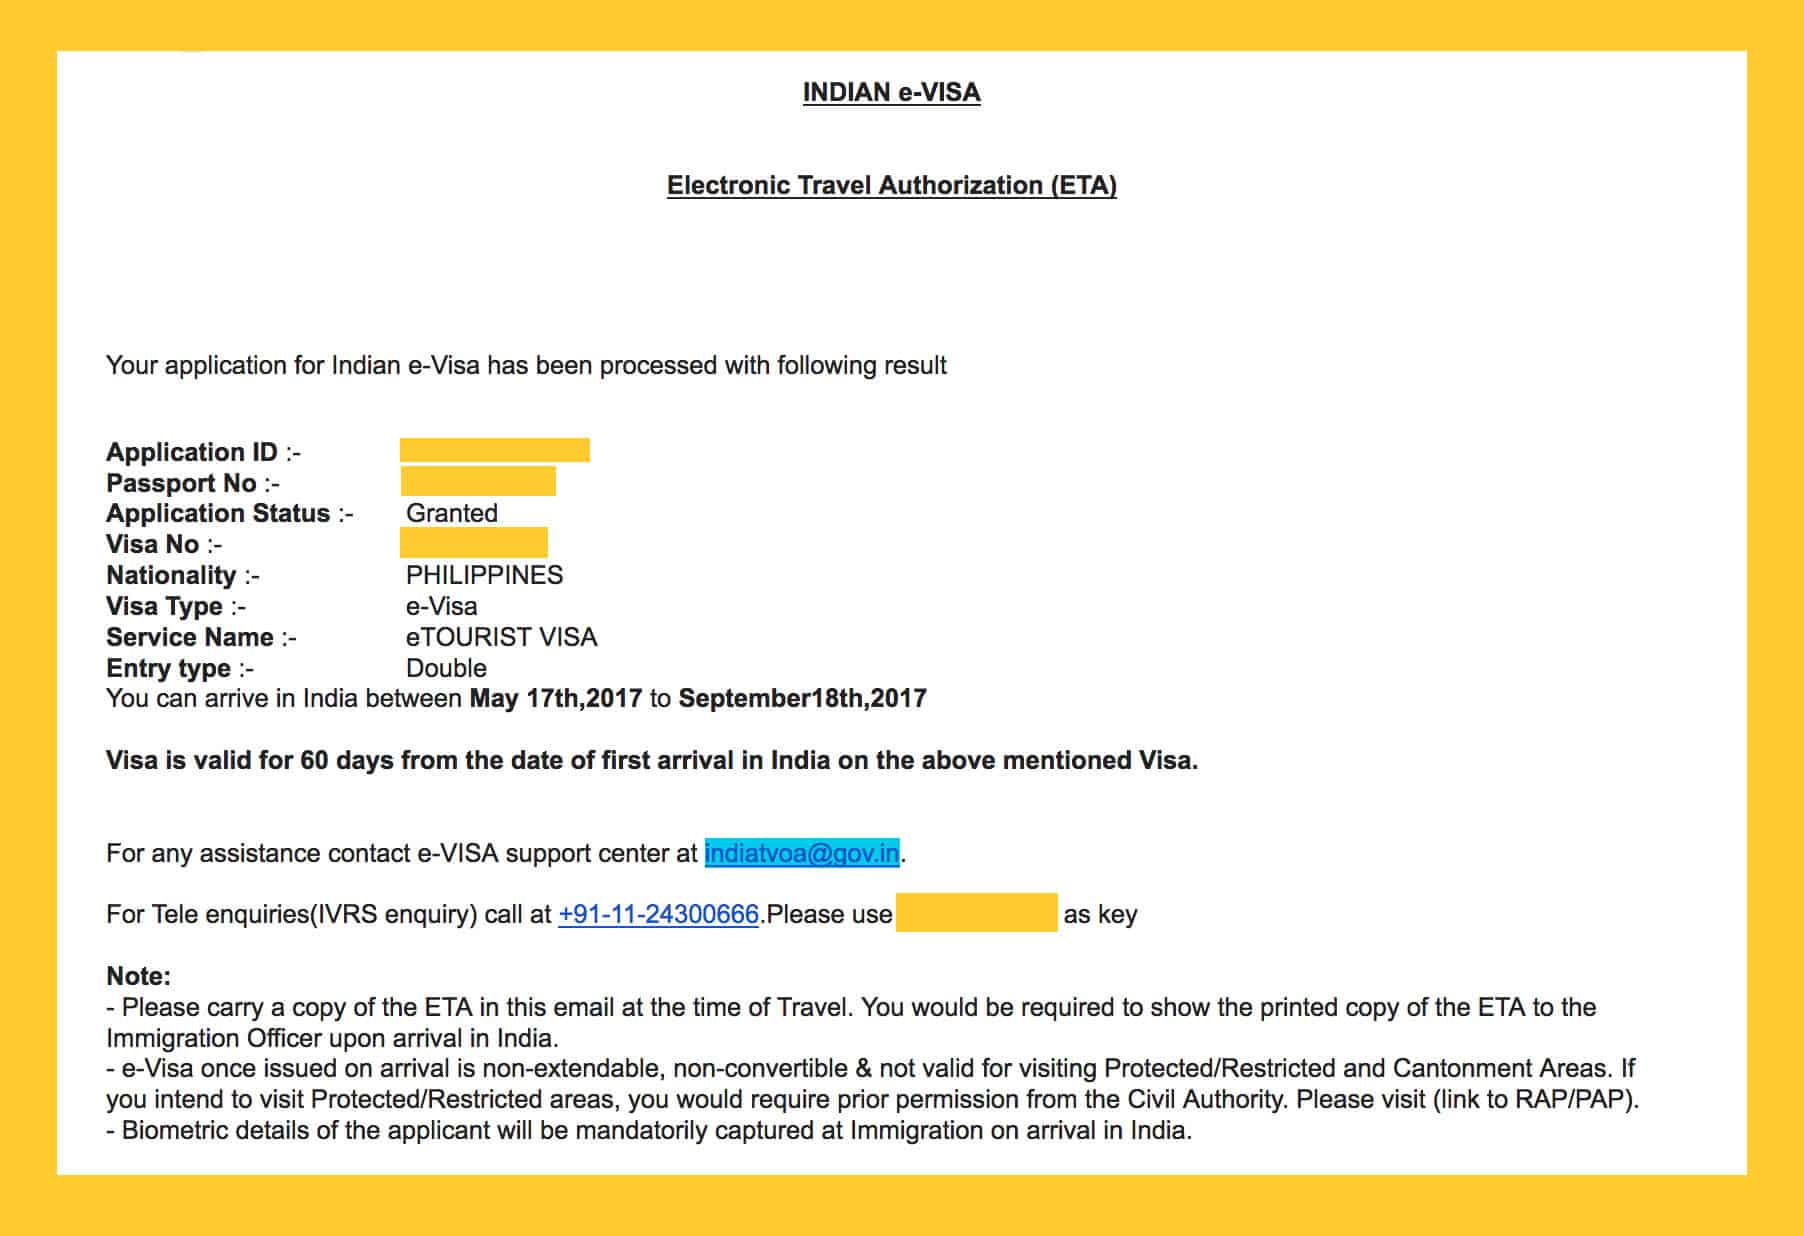
Normally, it takes 72 hours. But I finished my application on May 17 at 4pm and received my visa at 9am the next day. That was super quick.
The visa is double-entry and valid for 60 days!
The visa can also be used within 120 days of issuance. This means that even though my trip was canceled, if I want to, I can still use it within the next four months. Hooray!
6. Confirm that your visa is granted.
Before your journey, you have to double-check that the status of your visa is GRANTED.
To do that, enter your Application ID and Passport Number on this page: India Visa Status.
If everything looks fine, you’re good to go! If not, contact the e-Visa Support Center by sending an email to indiatvoa@gov.in.
Top Hotels in New Delhi, India
| The Imperial Hotel
Check Rates |
Leela Palace New Delhi
Check Rates |
| Colonel’s Retreat New Delhi
Check Rates |
Devna Bed and Breakfast
Check Rates |


Search for more: New Delhi Hotels

2️⃣0️⃣1️⃣9️⃣ • 3️⃣ • 6️⃣ (updated)
2️⃣0️⃣1️⃣7️⃣ • 5️⃣ • 2️⃣6️⃣ (first up)


Hi, thanks for this info. This has been the most informative i have read on applying for indian tourist visa. Would just like to clarify about the 60 days validity. Does this mean you can stay in india for 60 days straight? Without exiting and re-entering? Coz i am planning to stay in india for 1.5 months and most of the information i see online is that only 30 days is given to filipino tourist. Hope you could accomodate my query. Thank you in advance.
Hi Chit! Yep, the visa given to me would have allowed me to stay in India for 60 days. Not sure if that’s the case for everyone.
Hi.
Ask ko lang if what if you are coming from riyadh or outside the country, I am traveling with my workmate who invited me to stay in his place( India) – Kashmir. Ask ko lang if ano mga requirement needed to apply for evisa?
Hi good day to u! Thanx for the info. By the way im curious about the philippine immigration. Will they gonna ask alot of things like bank statements or proof of properties even if i already obtained the electronic visa from indian embassy? Hope u can give me answer for this coz i really have no idea how to deal with the immigration officers in airport coz i heard that some travelers got offloaded coz they cant provide this things. I Will be waiting for ur response and thanx a lot :)
They will only ask if questionable yung employment status mo or may nasense silang dubious. Normally, the visa, return flight, and ID should suffice.
Hi! Im planning to travel to India on April and student pa po kasi ako. My boyfriend will shoulder lahat ng expenses. I wonder if it will be a problem once I apply the visa? I’ll wait for your reply po :) thanks
Hi my girl friend is filipino and she is coming to india..how much sufficient money to show for indian tourist visa on arrival for 15 dayss??
Okay lang naman yun. They ask for employment details though, so if you’re employed, I think it would still be alright.
Is your boyfriend Indian national? If yes, mas magiging problem mo ang Immigration sa Pilipinas kesa visa.
Tanong lang po, ilan po ba ang kailangang show money pag less than 1 week lang na travel sa india? Bibisitahin ko lang sana boyfriend ko dun. Hindi po sya indian pero sa india sya nag work..
Hi KKK, we’re not sure. But ako usually, I have a per day allowance of P3500 when I travel. (Konti lang yung actual na nagagastos ko dyan. Nakasanayan na lang namin kasi yan yung requirement sa Europe. Nadala ko na lang din kahit sa cheaper countries.)
If you have an ATM account or credit card, dalhin mo na rin ung cards, makakatulong un pag tinanong ka ng Immigration.
Is your BF Pinoy?
Very helpful.
Thanks!
I got tickets to Jaipur (via SG) this July.
Salamat salamat!
Enjoy India! :)
HI! I am planning to apply for an Indian visa the soonest. May I know which or what particular airport or the nearest to take if I’m heading to Agra? Thank you.
Delhi is the nearest airport near to agra , and its better also , first tour delhi then you can go to agra , dont visit agra on friday because Taj mahal is closed for visitiors on friday .
Yung covered by eVisa? Delhi yung alam ko. Agra has its own airport though.
Hello po ask ko LNG po boyfriend kopo is Indian national we’re planning to get married in india,and I’m planning to go there this February Anu po requirements ang kelangan para walang maging problema sa immigration. Sana po matulungan nyo aq
H jen. U said u guys r planning to get married.. if u inform the same way sa immigration they will ask u to provide a sample of your india wedding card/ invitation. Its also better for u to secure first your certificate of no marriage (cenomar) from the philippines since u will be needing it once u register the marriage in india. The cfo certificate u can apply for it only in philippines, they have 2 branches only, one in manila and the other one in cebu city and u need to attend a one day seminar for it. In case u have the wedding done in india, u can have the seminar later on once u come back in philippines. They are going to keep a sticker in ur passport and a certificate from cfo. Without these, u wont be able to travel back to india pag married na ang status mo and u had ur family name changed. Feel free to contact me thru my email if u need more information.
Hi ms. Gracey, can i have you email address to contact you just for some helps and tips please? Thank you very much. Awaiting for your reply. Best regards, Michelle
I need your help. Can I get your email please…my fiance is from Manila and I am planning her process so that things can go smooth
Hi Jhen, I’m not that familiar kapag ganyan pero one thing I’m sure na kailangan mo is CFO GCP. More info here: http://www.cfo.gov.ph/gcp.html
Hello. This post is very helpful. I plan to visit India by November this year to meet up some Indian friends. They are willing to host me on my two-week stay there. Yet I’m ambivalent on how much my bank account should have and about providing to the Philippine Immigration on hotel bookings. Can you help me with this? Looking forward to your response. Thanks.
Hi jack, I have no idea on the bank account. They don’t explicitly say.
As for hotel bookings, hmmm, if you’ll be hosted by your friends, you can just say that you’ll be hosted by your friends and have an invitation letter and other proof of relationship.
Hello there….
This is so informative and helpful! A million thanks to you!!! I used it as my guide and so easy to follow! She said it exactly and I perfectly did it. I received mine so fast. Get pack and ready to go!!
Thsnk you so much
Igoy from Israel
Hello…
We have planned our wedding in india.. and will be staying in india for 3 months approx. Can some one please guide me through the process how to go about this application and how much time would it take for the approval.
How much should i pay in e.visa?
Read.
hello i’m doing the application now and im on the payment step, omg 80usd na sya, last year lang ikaw nag apply diba grabe itinaas =(
I paid 82.35 usd in total or Php4,496.09.
Ay, biglang tumalon, haha. Oo, last year lang ako. I-note ko sa post sa taas na nag-increase na ung fee. Salamat for letting me know!
hi do you have an idea why am I getting an error message ” your payment has not been received”. I used mastercard.
Hi Seth, naku, sorry, no idea. Best to call your bank.
hello sir good morning…sir tanung ko Lang kailangan ko kc ng visa 6months pataas…anong visa po ba ang available?
Ay, di ko po alam. :(
Hi I just want to ask. Do I have to buy ticket before applying for the tourist visa? Thank you
Nope!
Hello! Have you heard about anyone getting declined on visa application to India or is it very rare? After reading blogs, I think the e-visa application is safer than risking on getting visa upon arrival.
Hi! Thank you so much, your article has been a great help! However, I have one question. The port of entry for my evisa is different from the flight ticket I bought. Do I need to contact them and change it? I’ll be arriving in Jaipur instead of Mumbai.
Hi Cammy, yeah, best to contact them to know if it’s okay.
Hello.. Panu po kung di ko nagamit ung approved visa ko to india. May effect po ba yun sa next application ko?
Hello..Saan po pede magbayad ng visa to Paypal?
Not sure if I understood your question correctly. But the page will redirect you to Paypal automatically.
Ilan attempt po ba pag bbayad ng visa ?
hi will scanned copy of passport ok na picture taken of the passport ? wala ako scanner e. thanks
Hi Bella, I dunno. I submitted a scanned copy eh so I wouldn’t know if tatanggapin nila ung photo.
hello panu mag apply ng visa dito sa Saudi to india? may friend na po ako dun kaya may tutuluyan na ako… not more than 10 days stay…
Ang visa is yung paper lang? .. hindi yung dinidikit sa passport?
Yep!
I want to visit Kashmir to visit my friend. Can I apply for an Indian E-visa using the same procedure?
Hi. Im a student do u think they will approve my visa? i have stable money on my bank account, my parents are sending me money monthly. My Friends will shoulder all my expenses there I am just worried if they will approve me…. Please help me with this. Thank you!
Hi JJ, di ko pa alam. Depende po kasi yan sa maraming factors eh and sa kung sino ang magpoprocess. Wala naman kaming view sa ganun.
Hello po gusto ko po sana mg apply tourist visa sa india. Visit ko lng po parents ng bf ko.. Mkakasabay ko nmn po sya pag uwi.. Ok lng po b wla ako ma i show money? Wla p po ako bnk account.. Ok lng po b un? Plano ko po sana by april..
Yung visa, madali lang makuha.
Pero baka mahirapan kayo sa immigration.
Hello po
Im fe tanong lng po balak po pumunta ng bf ko sa pilipinas kailangan pa po ba nia ng invitation letter na galing sa family ko
Hi Fe, Indian national sya? If so, wala ako idea sa requirements. :(
Hi nagaaply po ako sa site for the e-visa pero for some reason hindi ma-upload yung picture ko. Ilang araw ko na po sya tinatry at lahat nung required for the photo nameet ko naman. But for some reason ayaw ma uploaf. May tips po ba kayo?
Hmmmm. No idea what might be causing that. Do you get any error message?
Im planning to arrive in new delhi then to kashmir india .. ano pa need ko na iba para sa kashmir india naman.??
hello! pano po we are trying to follow po the steps in processing kaya lng we cannot push thru payment nka ilang attempt na po kmi pero lagi sinasabi “due to technical reasons etc”nka twice attempt na po kmi pero laging failed. what to do po? thank you..
Hi Glenna, best to contact them directly kasi baka nga may technical issues ang website nila now. Wala din naman ako magagawa about it.
Hello. Just wanna ask po, it says here sa article na 51.75 USD ang bayad, but after doing the process 80USD ang babayaran, maybe may mga changes na rin sa fees? at kunwari po nakapagselect ka na po ng date of arrival, kaso hindi ka po makakatuloy instead sa susunod na week ka pa makakapunta, okay lang po ba yun? nagapply ka ng September 1, date of arrival:september 6, pero di ka po makakarating dun ng september 6 kundi september 13… okay lang po ba yun? may show money po ba? Maraming salamat po.
Hi Erika, mukhang nagtaas na nga sila.
Dun sa hindi masusunod ung unang sinelect, okay lang naman kasi 6 months ung validity ng visa.
Meron po bang “show money”? Like other countries na kailangan…baka kasi meron, bigla akong pauwiin.
Thank you.
tanong po ulit, paano po kung nag apply ka online, tapos, di ka nakapagbayad agad, or di ka nakapagbayad 4 days before your indicated date of arrival, ano po mangyayari? ano po dapat gawin?
Hi Erika, kung di ka nakapagbayad, ang alam ko, di confirmed yun, so hindi nila yun ipoprocess. Yun ang alam ko, di ko sure.
Ung akin laging failed..
That means po ba na pwede pa magbayad tapos iprocess nila? or kailangan ulitin yung process from filling and payment? Thanks a lot.
Also, about sa show money… some of us naman pupunta lang dun for tour, bisita sa friends pero walang gaanong pera kasi may palibre sa kaibigan. May minimum amount po ba na dapat meron ka before ka nila payagan makapasok sa india?
I tried to pay the e visa more than 10 times and sad to say it’s still failed. Wat to do??
Try using another card or use Paypal.
Wala po bang show money, di na tatanungin sa immigration?
return tickets and ID will do?
First time to travel kaya baka hanapan?
Ask ko lng po, cno pde makag guide sakin about tourist visa,, good for 6months bibisita ako sa friend ko.. and she will sponsor everything..all the expenses
Good day po,
I really need ur advise. I’m planning to apply e visa this month and my Indian friend who lives there will sponsor me ,I HV no any financial proof like bank book or cards and I’m currently unemployed po.
Gusto ko lang po sanang itanong kung OK lang po ba na financial proof ng sponsor ko ang ipapakita ko sa Immigration? First time ko po kasing mag travel abroad. Thanks po.
Hi Vnza, sa immigration sa Pilipinas, medyo malabo. Malaki chance na ma-offload if wala kang proof of employment or income.
HI.. I JUST WANT TO ASK, I APPLIED FOR AN EVISA BUT ON THE DATE OF ISSUE OF THE PASSPORT ITS NOT ACCEPTING THE DATE WRITTEN IN MY PASSPORT, IT KEPT ON SAYING IT SHOULD BE GREATER OF EQUAL TO THE DATE OF BIRTH, AND IT WONT GO ANY OTHER YEAR ASIDE FROM 2018. MY PASSPORT WAS ISSUED APRIL 16 2015 BUT WHEN I ENTER IT, ITS ALWAYS INVALID. I USED MY BIRTHDAY AND THE YEAR 2018 INSTEAD WOULD I HAVE PROBLEM WITH IT?
Hi Sani, you might have a problem with it because the visa should reflect the details on your passport. Try contacting indiatvoa@gov.in to see if there is a way to correct it.
This is the best guide, about Indian e-Visa, I have read so far. I will read this again and again. hoho.
I will be going to India on April 2019 so I am gathering information regarding Indian e-Visa. I will get back here once I have question. (wink) Thank you Yoshke Dimen.
Thanks Gillyn! :)
Good day Sir,
yung sa passport po ba, hindi na kailangan ng scan copy ng back part?
and sa Photo, pwede 2×2?
Thank you po
Hi Gillyn, if I remember correctly Bio page lang. And yep, parang 2×2 rin ung inupload ko.
Sir Yoshke,
I am So happy that my e-visa is already granted!!
Cheers!.
Happy kiddo,
Gillyn
Yay! Congrats! :)
Hi! Thank you for this post! this helped me a lot with my Indian visa application :) I actually just finished it *cross fingers* Anyway, after payment, it gave me the note that says “payment successful” and some thank you note for applying for indian visa etc. and it has application ID and passport number as blank. I’d like to keep the application ID sana just for record purposes and for follow up if I have to pero wala eh. Is it normal po ba na blank lang yun?
Hi Doreen, hmmm, that’s weird, yung sa akin merong application ID, hindi sya blank. :S
Ok na, nasa email pala na e-sesend nila sa’yo :) And thanks for your blog, it helped me a lot. My visa is approved :)
Hi Doreen,
Update mo kami kung ano ang mga magiging experience mo going to India.
I will be glad to hear from you..
Thank you in advance..
Ingat and Enjoy India. God Bless
Hi Ms. Doreen and Mr. Yoshke,
is it even an issue sa Philippine Immigration na wala kang Middle name sa eVisa? since it was not even asked during application?
Ms. Doreen, I really need your response over this matter. Advance thank u for the both of you po.
Best regards,
Gillyn
Hi Gillyn, di ko sure pero parang hindi naman issue. Kasi sa Australian e-visa and Turkish e-visa, wala ring middle name pero never naman ako nagka-issue.
Yay! I will do that :) Thank you! God bless din
Yayyyy! Congrats! Ambilis din naapprove. :D
Thank you! :) Nov. 12 ako nag apply, Nov 13 at 21:51 na receive ko yung visa and Nov. 18 flight ko haha. Kaloka, kala ko talaga di na ma a-approve but your blog made me feel at ease and made it easy for me to apply for the visa. Thanks again! God bless! :)
Hello! Do I need confirmed hotel booking before applying an e-visa? Thanks!
Hi Janice, in my experience, no.
Hi! Ask ko lang about filling-up ng online application form, yung sa Given Name, no need na ba na i-include yung middle name dun? kasi sa ibang blogs merong sinasabing ilagay din yung middle name after ng given name. Just want to be sure. Salamat in advance.
Hi Panila, di ko na matandaan. But I think di ko sinama yung middle name.
Thanks Yoshke! I already got my e-visa! =)
Yayyyy! Congrats! Enjoy India!
So yes, i did not put my middle name, just the given name. Thanks again!
hi, thanks to this blog i was able to get my e-visa easily, i applied on Dec 20, 2018 at around 9am then i got my e-visa just after 12 hours, its GRANTED! thank you very much….
Yayyyy! That was fast! Congrats! :)
Hi, I’m just confuse on the part na need ng proof of expense when coming to india? Pero which part of the application sya ipprovide? If di naman sya kasama sa requirements. And yung ticket na rt is for the Philippine immigration right? Lastly, mataas ba ang rejection rate nila? Or basta you have enough money and you are employed. Hoping for your answer. Will travel to India 2019. :)
You mean proof that you can support the trip? Sa visa application, di needed yun. Pero may chance na tanungin sa Immigration so best to be prepared with it along with return ticket.
Hi Yoshke! For clarification lang po about dito
“Apply for an e-visa if at least 4 days in advance of the arrival date with a window of 120 days. The Embassy site gives this example: If you are applying on September 1 then you can select arrival date from September 5 to January 2.”
Ibig sabihin ba if expected arrival date ko ay February 26, dapat sa Feb. 22 na ako mag-process ng e-visa?
Hi Janice, no, it’s not like that. AT LEAST 4 days in advance. Emphasis sa AT LEAST.
If February 26 ang target travel date mo, you can apply for a visa any time between 120 days before that and Feb 22. Latest na pwede kang mag-apply ay Feb 22 pero that’s cutting too close. To be safe, dapat earlier than Feb 22.
I scanned my passport and sobrang black nya huhu. Okay lang ba picture-an ko nalang ang passport ko? Tapos my 2×2 picture ako dito, scanned ko rin to sya di po ba? Pero after scanned, cropped ko nalang sya para hindi masyado malaki ang size?
Panong sobrang black po? Pa-scan mo na lang ulit nang mas maayos.
For photo, ang best po gawin is upload a digital copy of the image para clear. Go to a studio and have it professionally done tapos hingi ka ng soft copy (digital copy) nung image tapos yun ang upload mo.
Applied today. Sana ma-approve yung application ko huhuhu.
Good luck!!!!
I have a friend who is a Filipino and she wants to travel here in India
If she’s not booking the hotel here in India will she be allowed to travel ?
I’m the resident of India and if I do refer her, still need to book hotel. If no them how to refer ?
Hi Adil,
Will this be your friend’s first time to travel abroad?
If she’s declaring she’s staying with someone, she might be asked to provide proof of relationship, invitation letter, and proof that the inviting person can afford to sponsor her.
If she’s traveling as a tourist, she will need hotel booking and proof of employment and proof that she can afford to travel.
Is there any minimum fund required in ur bank account after having visa and flight tickets?
Will the immigration officer ask ur bank statement or e-visa portal asks of bank statement ?
Is it mandatory to be employee ?
If there’s is any minimum fund required then how much it Should be ?
Can’t we book hotel after arriving in India?
If this is for your friend, you might want to check this out: https://www.thepoortraveler.net/2014/03/offloaded-philippine-immigration-rules-requirements-airport/
If this is her first time to travel overseas, this too: https://www.thepoortraveler.net/2013/03/philippines-first-timer-international-flight-travel-guide-abroad/
Approved na e-visa ko after 2 days from application date and will travel on February 27th. My destination is in Cochin. Will share my experience after my travel. Thanks Yoshke! Super duper big help ang blog na ‘to.
Congrats, Janice!
hello. I applied Business Visa for company training. I applied February 27, 2019 until now my application was still processing at the embassy as the agent replied my email. How is that possible?
Hi Eric, no idea.
What do you mean “agent”? Did you hire a travel agent or are you referring to embassy staff?
Hi, questions lang sana about sa requirements
1. Sa pag upload ng copy of passport , no need na ba to upload the pages where it show stamps?
2. Do I need to provide any bank certificate or such?
3. Need ba to have confirmed flights? or dates lang ang kailangan
Thank you.
1. Just the bio page.
2. No.
3. Dates lang.
Hello yosh…ask ko if pde pang iedit ang e-visa application nakapagbayad na ko ng fee… Nagkamali kc ko don sa reference in india kc NONE ang nilagay ko dapat pla name ng hotel address at phone #…. baka kc mareject visa ko…any idea how to correct it….many thanks..God bless you,,
Di ko po alam :(
Hi!
I have a friend in India that invites me to witness their festival this Sept. 28-Oct. 5, 2019. He will shoulder all my expenses when I arrived in India.
My question is, when should I apply for visa? How much is the probability that I got rejected from getting it? Will I get a refund if so? Another, should I book a round trip plane ticket now?
Please help me. Thanks.
Hi hello… what if i have no bank account pero cash on hand meron… i want to travel in India for 10 days… ok lang kaya sa immigration?
Hello..
What if i have no bank account… pwede po bang financially proof to travel yung cash on hand… planning to travel india for 10 days.
Hi how if you’ll be staying in India for probably a month or 2 how much po kaya yung minimum ng bank statement na pwedeng ipakita if ever
Hi yhel, di ko po alam. Pero ang rule of thumb ko po dyan ay:
cost of the flights + cost of accommodations + 100 dollars per day = MINIMUM na laman ng bank account
Hi Yosh,
I applied my Indian Visa today but when I clicked SBI as payment, it was found that 25 USD lang yung babayaran.
I though 5k plus yung bayad for visa. Need clarification on this.
Thank youuu sa sagot.
Hi Dave, hmmmm, they might have changed the cost? But it’s weird because the trend is pataas dapat. Weird na 25 lang. First time I heard about something like this so I dunno what to say. :S
Hi, worried din ako about sa middle name. And yes, visa is only 25USD nlng but 30days lang po sya.
I want to ask din po, i will be visiting a friend in india, kailangan ko po ba ng invitqtion letter from him? And i will be traveling to india from thailand po.
Hi, Thanks for your blog very informative. But I just want to know something. I am planning to visit NE India – Dimapur-Diphu-Kohima. I am alone traveling next year around October. I want to see the winter festival usually held there. Is there any problem with the immigration if a woman like me traveling alone? I have bank account, I am employed with coe and salary transaction but freelancer, and it’s not my first time. I only visit NE for 9 days.
Hi. Not working na po yung site sa pagapply ng visa. Sabi not available to your area. Bakit po kaya ayaw
hindi po yata sila tumatanggap ng e-visa applications ngayon dahil sa COVID-19.
hi sir … thanks for the good information you provide like this .. i have to ask you i have a friend from philipines .. if i want to invite her here in india i am basically from gujarat .. then other documents from me required if my frend want to visit here? and hotel stay is compulsery sir ? if i want to stay her at my home then what should the pricess? reply as son as possible sir
Ask po kung wala n bang kaylangan na documents actually po visit Visa lang ako sa India May mga friend ako n gusto kung makita na meet ko sa Saudi Arabia