Whether for leisure or employment, every international travel requires a passport, one of the IDs issued by the Philippine government to its citizens. A passport, which is proof of your national identity and citizenship, is a vital document that you must always carry with you when traveling abroad.


The application process is actually simple; however, securing an appointment schedule for application is where the challenge lies. While we still have the COVID-19 pandemic to deal with, we must note the changes in the office hours and the number of people allowed per day to ensure proper social distancing.
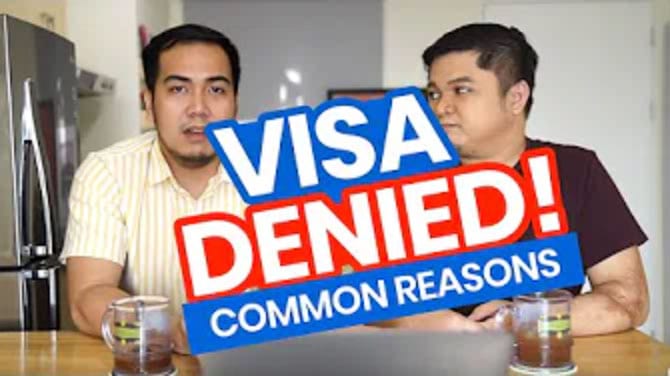
This post will focus on our step-by-step guide to DFA NEW PASSPORT APPLICATION as well as additional reminders and tips. If you are renewing your passport, check this article instead: PASSPORT RENEWAL APPLICATION PROCESS!
LIST OF PASSPORT REQUIREMENTS
1. Online Appointment Confirmation
The first thing to do is to secure a slot by setting an appointment online. To give you enough lead time, it’s best to do it at least three months before your desired travel date. The earliest available slots might be too late for you because of the heavy volume of applications, especially during these extraordinary times when community quarantines forced government agencies to operate with a skeleton workforce and halted or delayed most government operations. We’ll tackle more of this in the HOW-TO section below.
NO WALK-INS are allowed. Since the COVID-19 pandemic, walk-in or courtesy lane services are suspended until further notice. This is to manage and control foot traffic. Those who are eligible to use the courtesy lane are required to book an online appointment. For urgent applications, you can send an email at oca.cl@dfa.gov.ph.
But prior to the pandemic, the following were allowed to walk in:
- Senior citizen and 1 companion. The companion must be an immediate family member. If not, the companion must show proof of travel arrangements with the senior to show they’re traveling together. It can be a plane ticket or hotel booking.
- Person with disability and 1 companion. Companion must be an immediate family member. If not, the companion must show proof of travel arrangements to prove that they’re traveling together. It can be a plane ticket or hotel booking.
- Pregnant woman. A medical certificate or records must be presented if the baby bump is not yet noticeable.
- Minor seven (7) years old or below, plus their parents and minor siblings.
- Solo parent and their minor child. The parent must present a valid solo parent card.
- OFWs: Land-based and Sea-farers. Must bring any of the following: valid iDOLE card, work visa, employment contract, or seaman’s book stamped at international border less than 365 days from date of application.
2. Duly Accomplished Application Form
When setting an appointment, you need to complete the application form. Filling out the application form is usually done online. You will receive an e-mail confirming your appointment schedule when you are done paying for the application processing fee. The e-mail also contains the link to your application form. Click the link to download, and then print out your accomplished form.
If you need a blank copy of the application form, you can get it here. You need to print it out on A4-size paper.
3. Birth Certificate
The copy of your birth certificate must be:
- Original
- PSA-authenticated
- Printed on PSA security paper
If the PSA-authenticated Birth Certificate is not readable, get a copy from the Local Civil Registrar.
If LATE REGISTERED: If registered within the past 10 years, submit an ID that pre-dates the registration or current ID with NBI Clearance. If registered over 10 years ago, no additional supporting requirements needed.
4. Valid ID
You only need to bring one original and a photocopy. Any of the following is accepted:
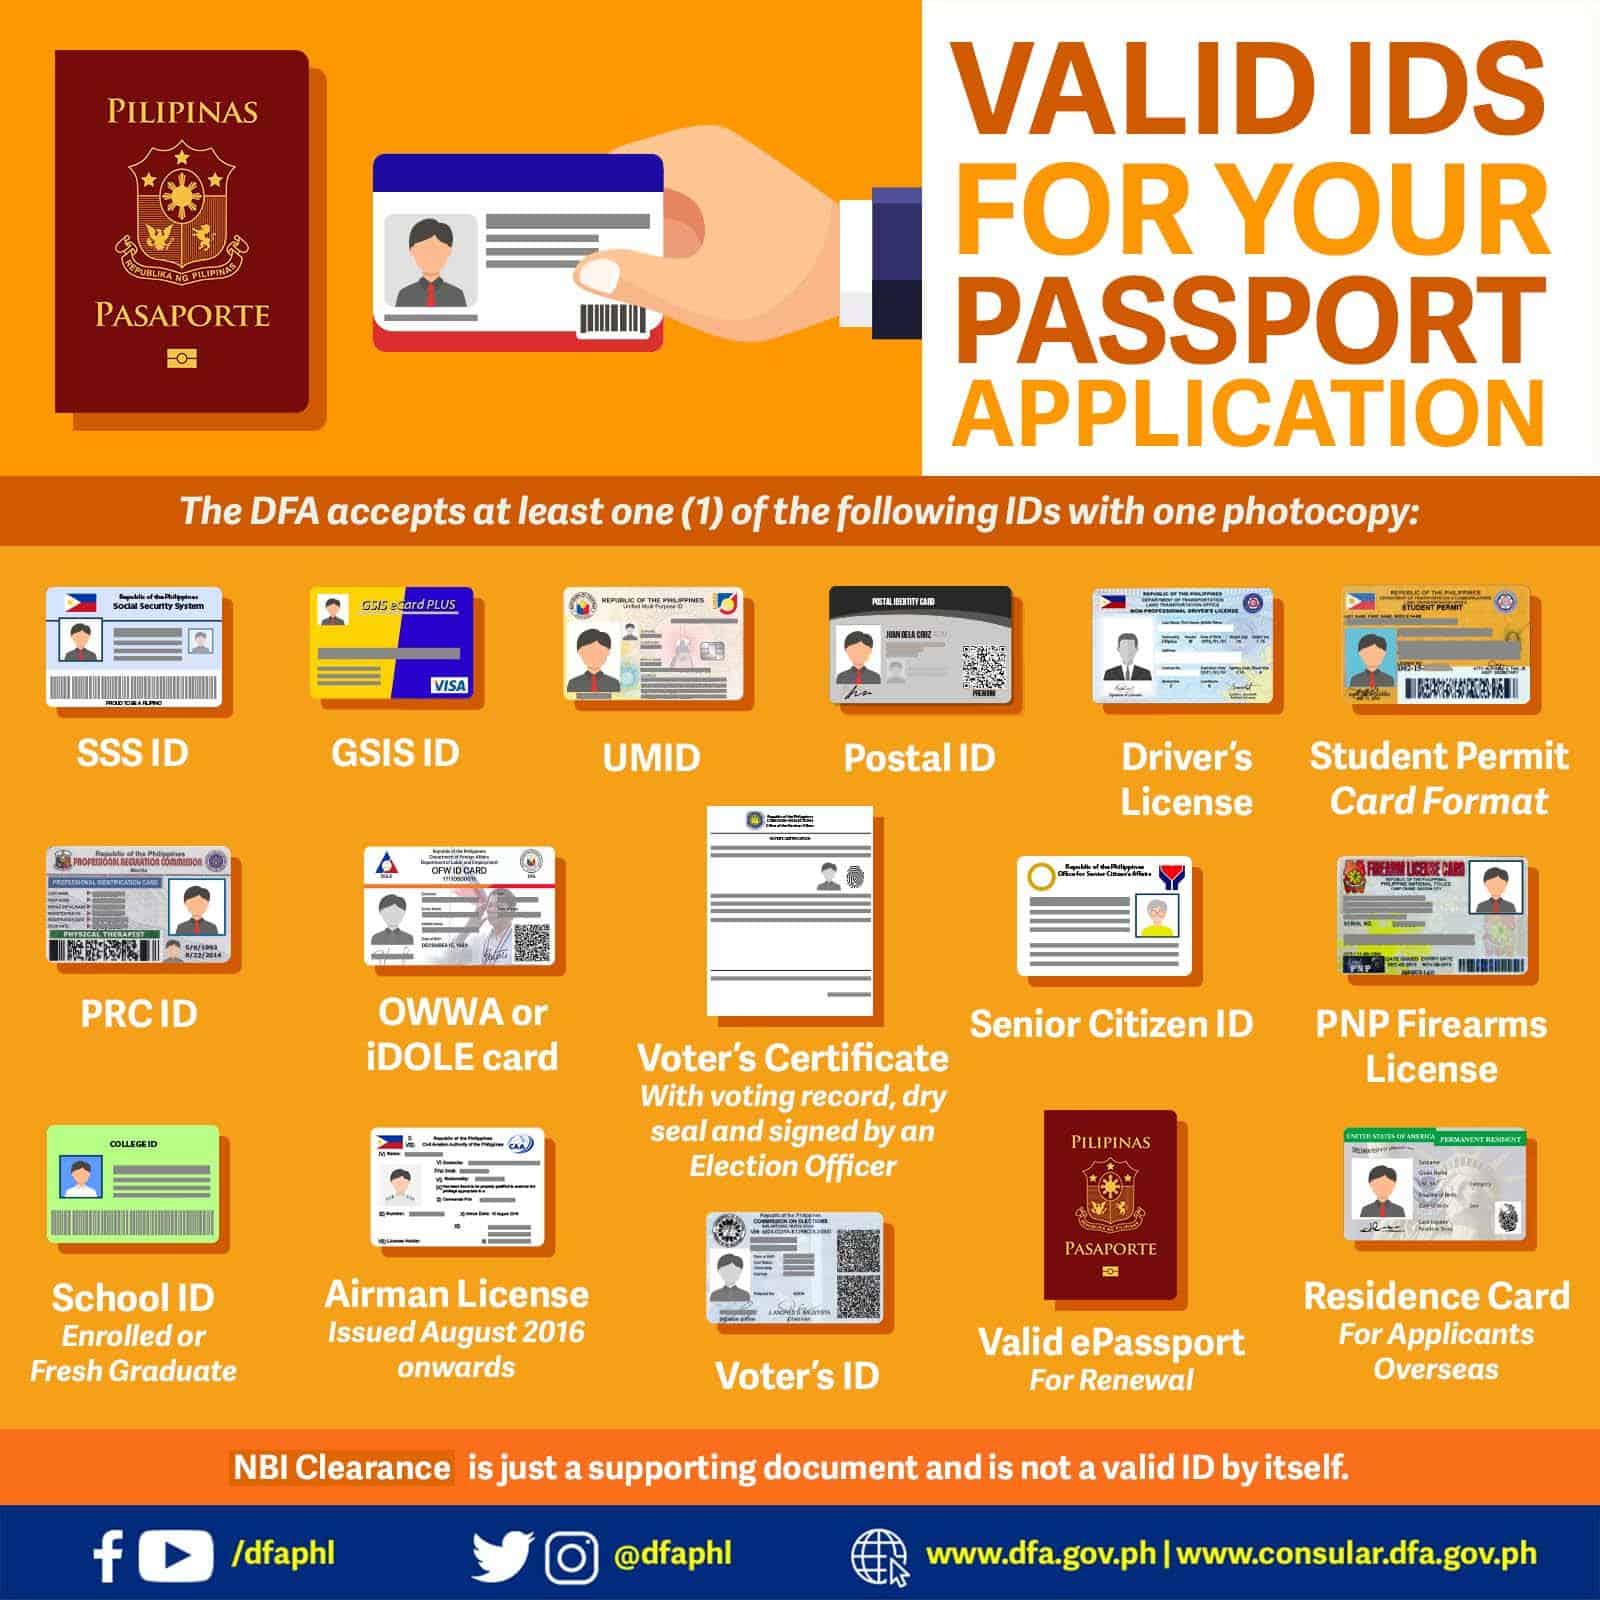
- Social Security System (SSS) Card
- Government Service Insurance System (GSIS) Card
- Unified Multi-Purpose ID (UMID)
- LTO Driver’s License
- Professional Regulatory Commission (PRC) ID
- Philippine Identification (PhilID)
- Overseas Workers Welfare Administration (OWWA) E-Card
- Voter’s ID or Voter’s Certification from the Main Office with Dry Seal. If presenting the Voter’s Certificate, you may also need to provide NBI or police clearance. [Update: As of Aug 2022, the DFA website states this: Voter’s ID or Voter’s Certificate issued from COMELEC main office in Intramuros, Manila. They have removed the part about certificates issued by the regional offices and NBI/Police Clearance. We’re still clarifying if Voter’s Certificates from regional offices are still accepted and whether or not the NBI/Police Clearance is still needed. Will update this again as soon as we have the answers, but for now, please contact DFA directly for clarifications.]
- PNP Firearms License
- Airman License (issued August 2016 onwards)
- Philippine Postal ID (issued November 2016 onwards)
- Senior Citizen ID (if senior)
- School ID or Certificate of Enrolment with student’s photo and the school’s dry seal (if student)
- Seafarer’s Record Book (SRB) issued from February 2020 onwards by the Maritime Industry Authority (MARINA)
REMINDER: Make sure that the ID (original and photocopy) is readable, untampered, and must contain the same information as other documents presented.
5. Personal Appearance
Whether you apply on your own or through a travel agency, all applicants must be physically present at the DFA Office on your appointment schedule. The passport application process entails collecting your biometrics data and taking a photo of you. For passport photo capturing, take note of the proper attire or dress code. Colored contact lenses and accessories like earrings, necklaces, or other facial piercings are not allowed during photo capturing.
POSSIBLE ADDITIONAL REQUIREMENTS
Depending on your status or condition, here are other possible additional requirements for a new passport application:
If applicant is a married female using spouse’s last name
- Marriage Contract (Original and a Photocopy). Must be PSA-authenticated and printed on PSA security paper.
- NBI Clearance. ONLY IF the marriage took place within 6 months before the date of passport application. This is according to the DFA Facebook page when we inquired.
NOTE: You do not need to present your Marriage Contract if you recently married but you chose to keep your maiden name.
If applicant is a minor
For minor applicants or those applying for a minor, these are the additional requirements:
- Valid Government-issued ID of either parent with one photocopy.
– Passport
– Social Security System (SSS) Card
– Government Service Insurance System (GSIS) Card
– Unified Multi-Purpose ID (UMID)
– LTO Driver’s License
– Professional Regulatory Commission (PRC) ID
– Overseas Workers Welfare Administration (OWWA) E-Card
– Voter’s ID or Voter’s Certification from the Officer of Election with Dry Seal. [Update: As of Aug 2022, the DFA website states this: Voter’s ID or Voter’s Certificate issued from COMELEC main office in Intramuros, Manila.]
– PNP Firearms License
– Airman License (issued August 2016 onwards)
– Philippine Postal ID (issued November 2016 onwards)
– Senior Citizen ID (if senior)
– Philippine Identification (PhilID)
– Seafarer’s Record Book (SRB) issued from February 2020 onwards by the Maritime Industry Authority (MARINA) - Marriage Certificate. This must be provided if only one parent is accompanying the minor. If the parents are unmarried, the Mother must execute a Special Power of Attorney if she is not accompanying her child. Special Power of Attorney executed outside the Philippines must be authenticated by the Philippine Embassy or Consulate in that foreign country.
- Certified True Copy of Local Civil Registrar (LCR) Birth Certificate. This must be provided if the applicant is a newborn (less than 1 year old), who has no PSA Birth Certificate/Report of Birth yet. This needs to be PSA-authenticated. If born abroad, the original copy of the Report of Birth or first endorsement from the Consular Records Division must be submitted.
IMPORTANT! Personal Appearance of both the minor applicant AND either parent (or authorized adult companion) is required.
- If for some reason, either parent can’t accompany the child for the application:
– A Special Power of Attorney must be executed by the parent to designate and authorize someone else to accompany and help the child through the application process. Special Power of Attorney executed outside the Philippines must be authenticated by the Philippine Embassy or Consulate in that foreign country.
– A copy of parent/s valid ID and/or passport attached to the Special Power of Attorney or Affidavit of Support and Consent.
– Passport or Valid Government-issued ID of authorized adult companion. See the list of acceptable IDs above.
- If either parent is not traveling with the minor:
– DSWD Clearance must be submitted.
– Affidavit of Support and Consent must be provided. Affidavit executed outside the Philippines must be consularized by the Philippine Embassy or Consulate in that foreign country.
– Passport or Valid Government issued ID of authorized adult companion. See list of acceptable IDs above.
NOTE: For other cases such as late registered, no birth certificate, illegitimate child, dual citizens, or naturalized Filipinos, additional supporting documents are required. Visit the DFA Consular for a more updated list of requirements and if you have other specific concerns and inquiries.
STEP-BY-STEP PASSPORT APPLICATION PROCESS
1. Set an appointment online.
Before anything else, the online appointment is FREE. What you are paying for is the passport processing fee. Now that it’s clear, let’s proceed.
Walk-in applicants are normally not allowed EXCEPT for emergency and special cases. Regular and non-emergency applicants must secure their slots by setting an online appointment. As much as possible, do it months before your desired travel date to give you enough lead time. Due to the heavy volume of applications, available slots might be too late for you.
To give you an idea, say you decide to apply online in August, the earliest available slot might be in late September (tough luck) or October or even November. Or there might even be NO AVAILABLE SLOTS AVAILABLE.
How to set an appointment online?
- Visit the DFA Online Passport Appointment System website.
- Read the Terms and Conditions, and then tick the box. This means that you have understood the terms.
- There are two options: INDIVIDUAL Appointment and GROUP Appointment. Choose the one that applies to you.
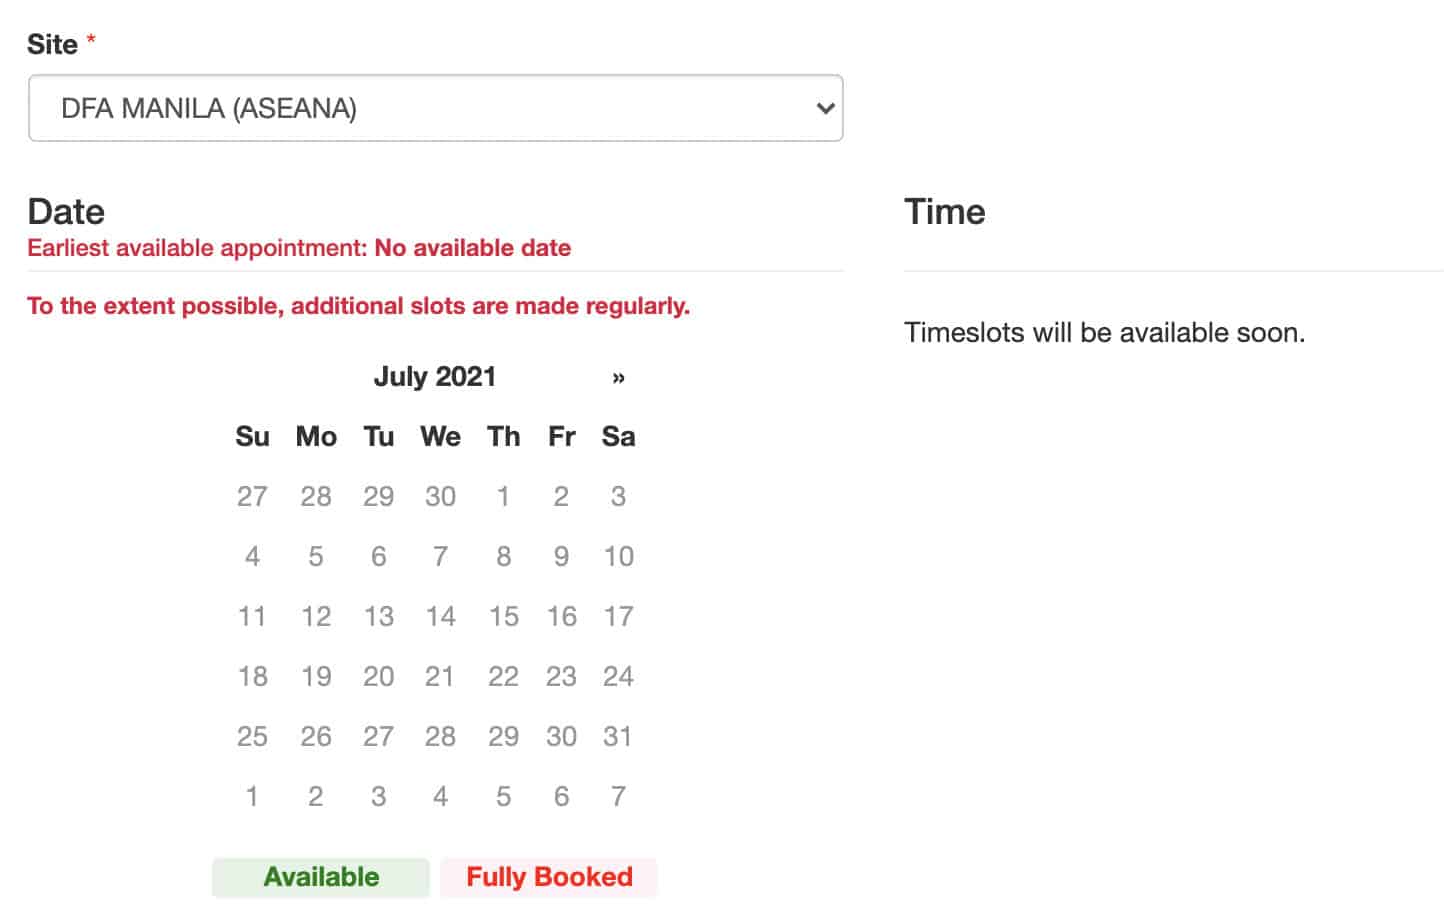
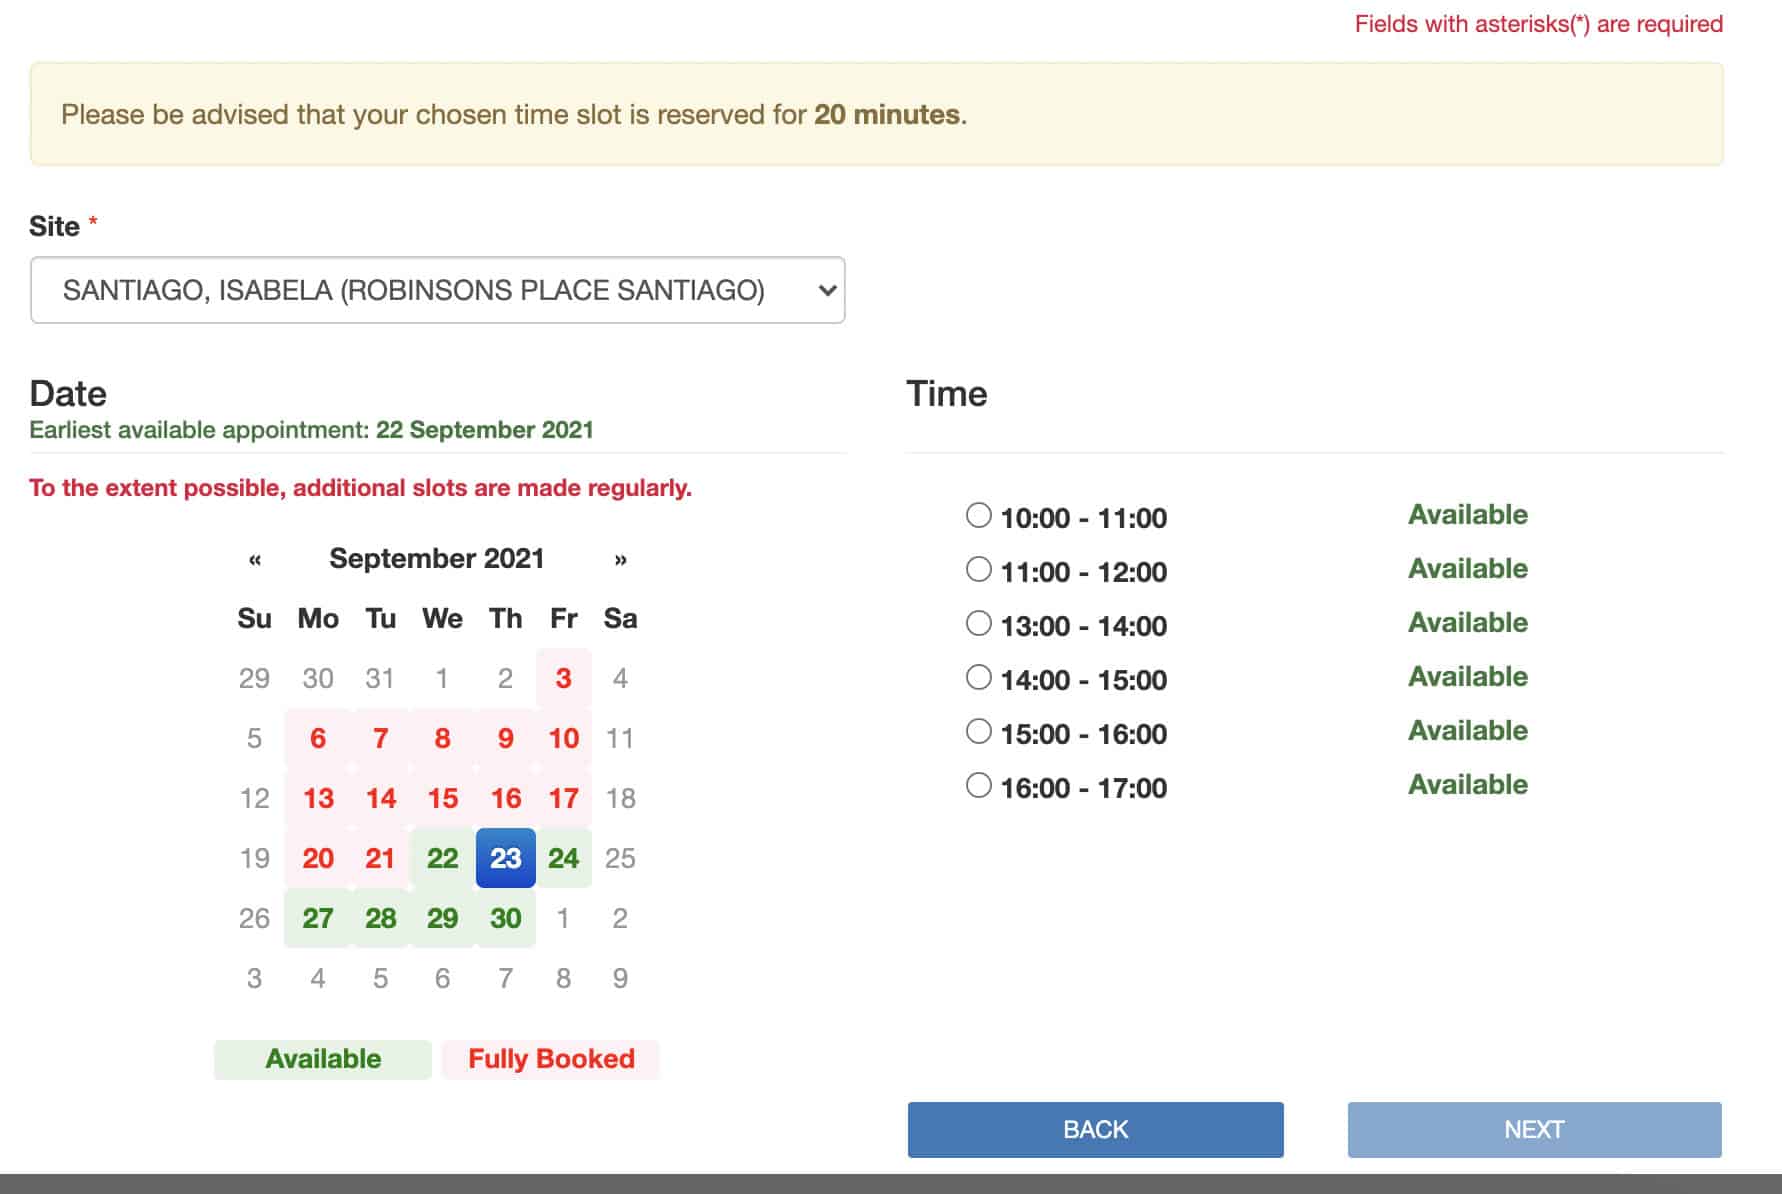
- Choose a DFA office/branch. Select the one nearest you or the one most convenient for you. Later on, you can change it and check other branches if you are having a hard time securing a slot with your first choice. Hit the Next button.
- Select a date and time from the provided calendar. The earliest open date is noted above the calendar. The dates in GREEN are AVAILABLE, while those in RED are FULL.
However, the most challenging part is getting empty slots because of the volume of applicants. The DFA has taken steps to improve the system to serve applicants better, but it can still get frustrating. You may check other branches. For example, if you’re Manila-based, try other checking other nearby cities within the metro or even nearby provinces.
This poses a problem for those who need a quick appointment. Some of my friends even went as far as flying to Puerto Princesa or traveling to Northern Luzon provinces just to get an appointment because of their travel dates were near. But of course, if there’s no such urgency, you don’t need to go to such extreme lengths. You may simply wait and try and try again another day.
You may also try some of these tips:
- Make sure that you have strong internet connection. Since it’s an online “battlefield”, you have to ensure that your internet connection is reliable. The slots will not wait for your network to keep up.
- List down all your preferred dates. This will give you more options in case the date you originally want is already full. This will save you time too. Instead of spending precious seconds weighing other dates, you already have shortlisted the most convenient dates for you.
- Decide quickly. Again, you are beating time here, so you must be decisive because slots can be taken in a snap. You see the date you want still available one minute, but then it’s gone the next. Afternoon schedules are usually the first to get filled.
- Refresh the page. There are times when available slots pop out of nowhere. Well, these might be those slots reserved for applicants who failed to pay within the allotted time period.
- Check the site regularly. As much as possible, the DFA opens additional slots daily. The system refreshes regularly, so check the site from time to time for possible additional slots.
- Try searching at around these times: 6AM – 8AM, 12NN, and 9PM. Available slots usually appear at these times, from Mondays to Saturdays (except holidays).
- Search other DFA branches/offices. There are six (6) branches in Manila: DFA Central (ASEANA), DFA NCR North (Robinsons Novaliches), DFA NCR Northeast (Alimall), DFA NCR West (SM Manila), DFA NCR East (Megamall), and DFA NCR South (Alabang). However, these NCR branches run out of slots real quick. If you desperately need to renew your passport, you may try looking at regional branches/offices.
When you get a slot, the system can hold the slot for you for the next 20 minutes only so you should be able to finish everything fast. Otherwise, you’ll lose that slot.
UPDATE: In addition to the regular processing sites, the DFA has set up Temporary Off-site Passport Service (TOPS) facilities within Metro Manila that can process passport applications. These are:
– Robinsons Las Pinas
– Robinsons Magnolia, Quezon City
– SM Aura, Taguig
– SM Mall of Asia, Pasay
– SM North EDSA, Quezon CityBut certain restrictions apply. Passports processed at any of these TOPS sites will be shipped via courier, adding an extra 3 to 5 working days. Payment for TOPS is via CREDIT CARD or DEBIT CARD ONLY! Make sure you have your card with you when you start the appointment process.
2. Fill out the application form.
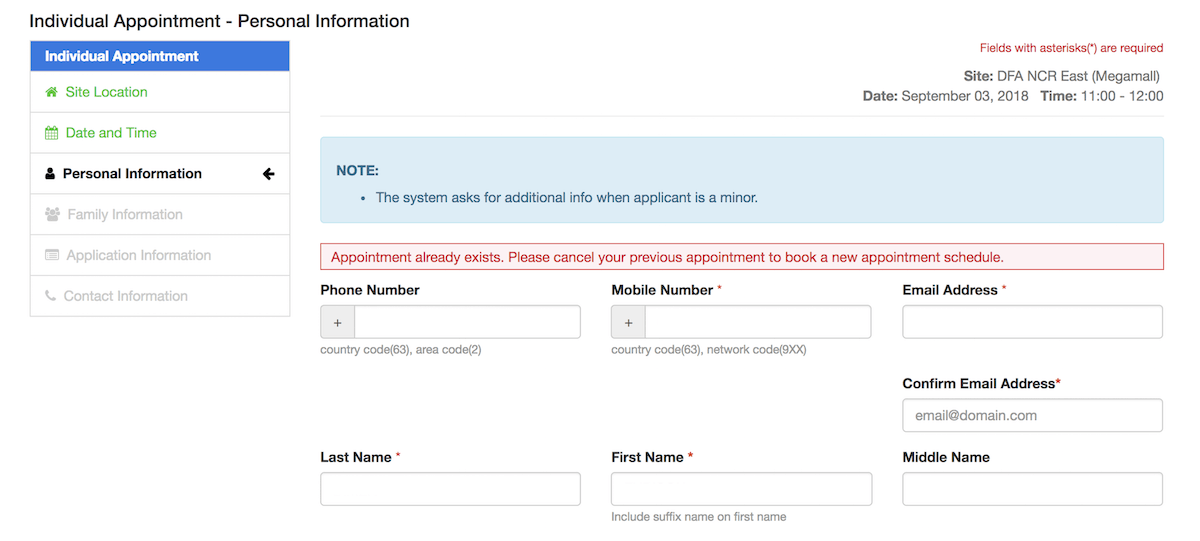
After you get a slot, you will be directed to the next step, which is filling out the four-page online application form. Remember, you only have 15 minutes to complete this. Prepare the following information before you schedule an online appointment to save more time.
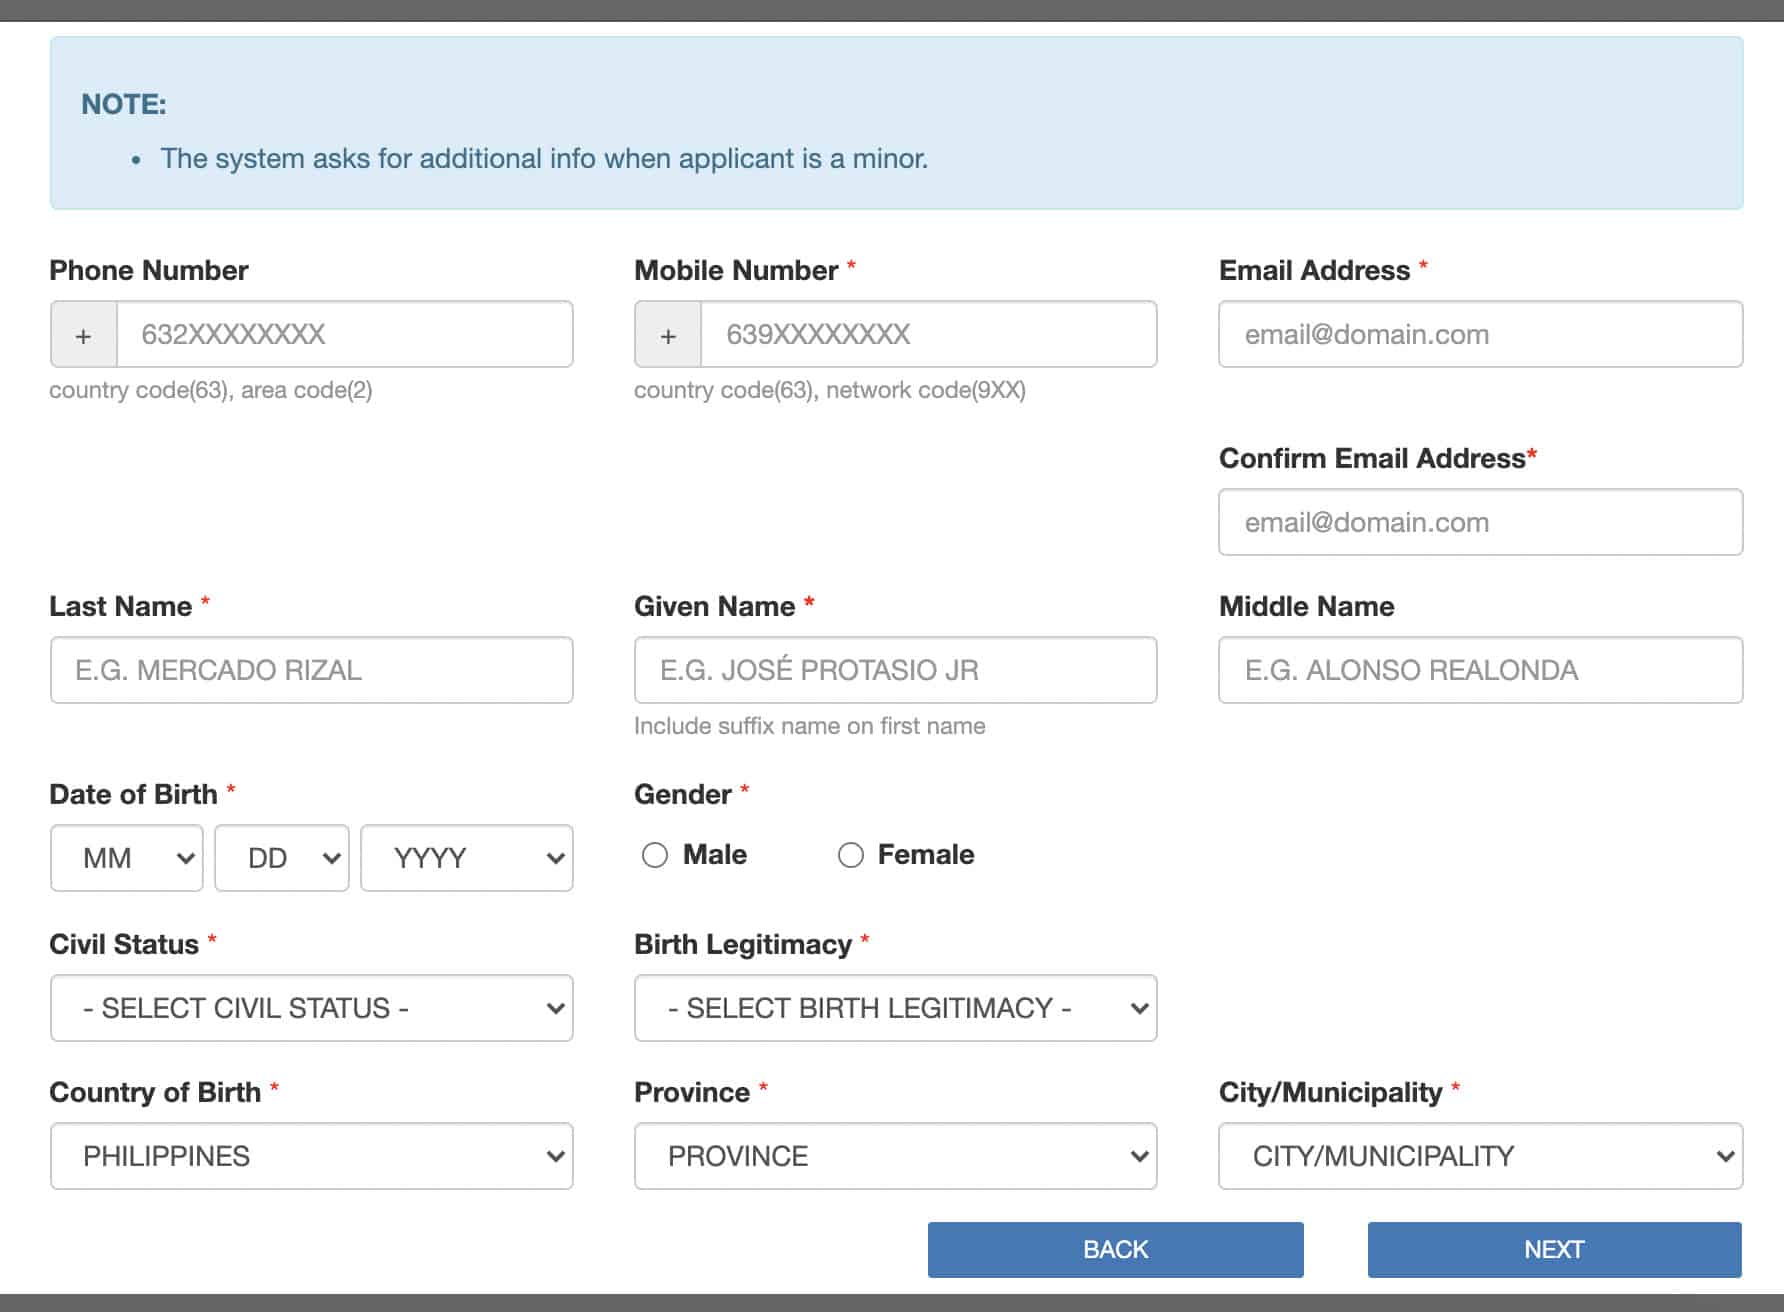
- Personal Information: The first page contains your Personal Information such as Name, Birth Date, Contact Numbers, E-mail Address, etc. For your email address, input your free Gmail account. I tried using my custom email address at first, but I failed to receive a confirmation email that also contains the reference number for paying the passport processing fee. I had to wait for the schedule to expire after 24 hours to try to set an appointment again. On the second try, I used my free Gmail account and immediately got the email confirmation.
- Family Information: The second page requires your Family Information like your Parents’ and Spouse’s names and Citizenship.
- Application Information: The third page is all about your Application Information including Application Type, Citizenship, and Emergency Contact Person and his/her contact number.
- Contact Information. The fourth page asks for your home and office addresses and contact numbers.
You will be given time to check all the information you input. Make sure you have no typos and everything is correct, including the spelling.
3. Pay the passport processing fee.
The next step after you submit the form is the payment for the passport processing fee. Choose one of the two processing options, depending on what applies to you:
- Regular Processing: This costs P950 and takes 10-15 days in Manila.
- Express Processing: This costs P1200 and takes 5-7 days in Manila.
We heard that the processing time in the regional offices takes longer compared to Manila. They say the length of days for processing may take 20-30 days, but we haven’t confirmed this yet.
This is how the payment process goes:
- Select between regular or express processing.
- Then hit PAY NOW.
- A message will pop up. Click the “I agree” box, then hit PROCEED TO PAYMENT.
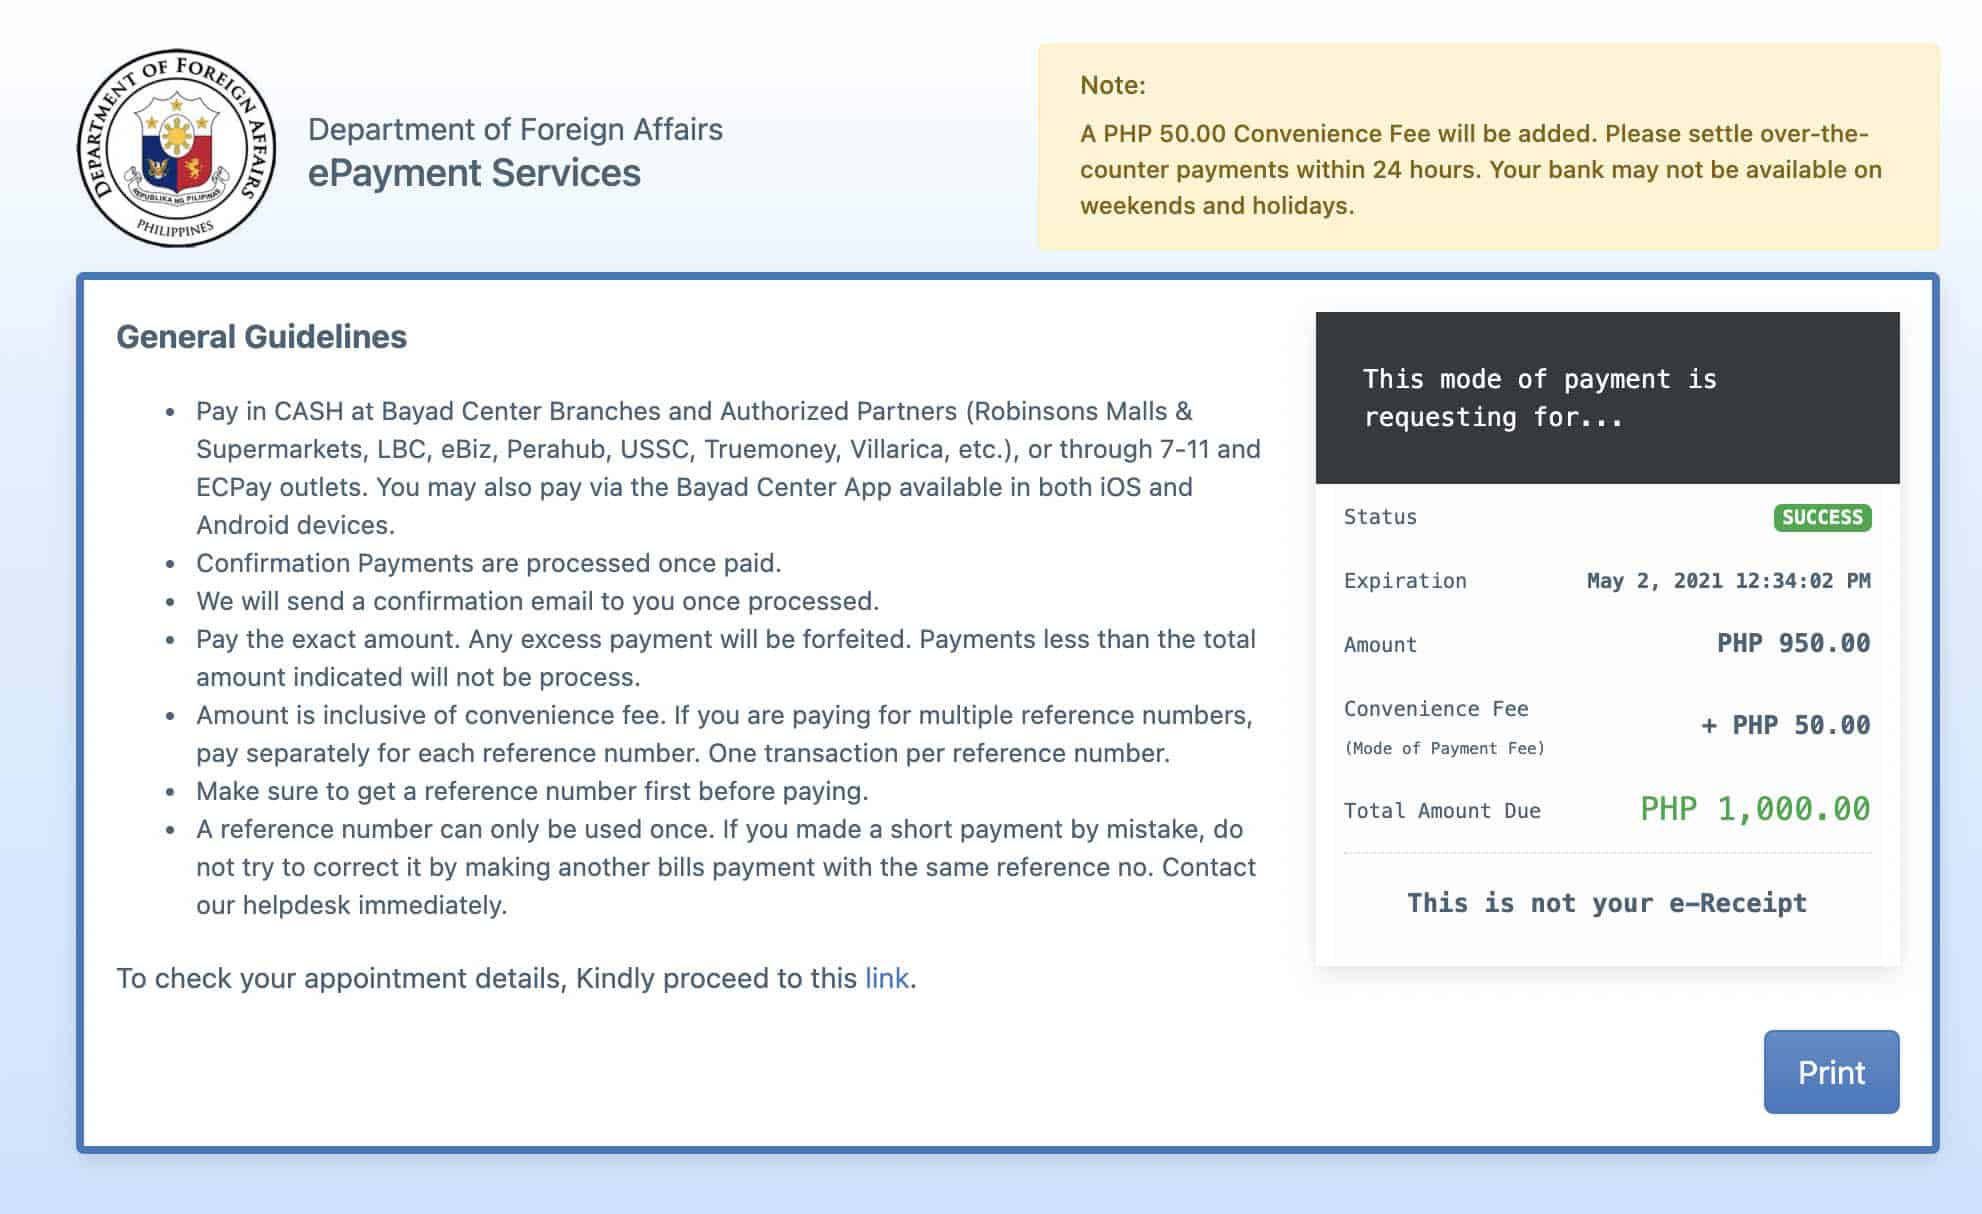
- You will land on the PAYMENT page where you will see the payment options, the total amount that you need to pay, and some reminders. A convenience fee of P50 per person is normally added on top of the total processing fee amount. Hit PROCEED.
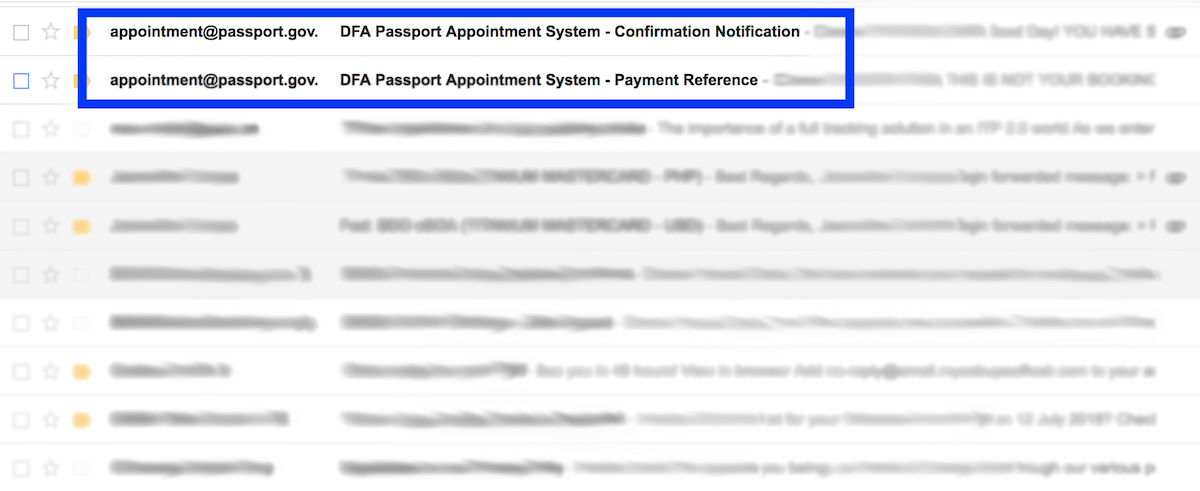
- You will receive an email providing your Payment Reference Number and instructions on how to settle your payment. Hold on to your reference number.
- You need to pay the processing fee within 24 hours. Go to your chosen authorized payment center. You have to secure a copy of your reference number. Make sure you declare and pay the exact total amount.
- After settling your payment, an appointment confirmation will be sent to your email. You will find three files attached to the email: your application form, the receipt, and the checklist. You need to secure a hard copy of each file. Print them all out. Use A4 paper. You need to bring them on the day of your appointment.
REMINDERS:
- These are the payment centers authorized by the DFA for the transaction of the passport processing fee:
– Bayad Center
– EcPay
– Pera Hub
– Robinsons Business Center and Department Stores
– Waltermart Department Store
– 7-Eleven
– USCC (Western Union)
– Villarica PawnshopThe credit card/debit card payment facility and the over-the-counter cash transaction in selected banks are not yet available.
- As of writing, only CASH payment is accepted.
- You need to pay the EXACT amount. No more, no less. The payment will not be processed or will be forfeited if it’s not the exact amount.
- You can only use your Reference Number once, meaning one transaction per reference number.
- If you encounter any problems regarding payment, contact the DFA helpdesk immediately at (02) 234 3488.
In my case, I chose to pay via 7-Eleven. Using one of their in-store electronic machines, I chose “bills payment”, and then selected DFA. I input my reference number and the total amount, which includes the P50 convenience fee. I took the printed slip and went to the cashier to pay. That’s it!
4. Show up at your chosen DFA Office on your appointment date.
The day finally arrives! You need to appear personally at your chosen DFA office on your scheduled date. Don’t forget to bring all the requirements with you, plus the Application Form printout (hard copy), the checklist with your confirmed schedule, and your eReceipt (two copies).
For my most recent passport renewal, I was fortunate to get a slot at the branch nearest to where I live — DFA NCR South. My appointment was at 5:00 PM, so I arrived at 4:30 PM. Here’s my experience:
- Document Verification. Even at the entrance, the guard will ask for the checklist with your confirmed schedule. They will check if you bring all the requirements with you. Don’t forget to bring a photocopy of your old passport (renewal) or valid ID (new application).
- Processing. They will review your documents/requirements. When they are done checking, they will stamp your receipt with a date of release.
- Data Encoding and Biometrics. This is the part where they will encode your personal information like your name, birth date, and other details. They will give you time to check the encoded details on the computer screen, so check those spelling and typos. After that, they will take your photo, fingerprints, and signature.
- Delivery. This is an additional step for those who want their passports to be delivered instead of personally picking them up at the DFA office. DFA partners with courier and forwarding service companies. I availed of this service and paid the delivery fee of P150. They will take your application receipt and then hand you their own delivery receipt. Expect your passport to arrive one to two days after the scheduled release date. You may skip this part if you want to personally pick up your brand new passport on the scheduled release date.
NOTE: A team member applied at DFA ASEANA a couple of years ago. If you are also applying there, some touts will trick you into buying a long brown envelope or ballpen. You do not need them. You can put your documents in a folder or envelope if you want to keep them neat and organized. It won’t hurt also to bring an extra pen just in case.
REMINDERS:
- Don’t be late. Be there at least 30 minutes before you confirmed schedule. Those who arrive late for their appointment will not be accommodated.
- Make sure to bring all the requirements — both the original and the photocopies.
- The DFA implements a “No Escort” policy. Companions, who are not applicants, are not permitted within the DFA premises UNLESS they are the guardian of a minor or they are assisting a person with special needs.
- Wear proper attire. The DFA enforces a strict dress code, which prohibits wearing spaghetti straps, sando, plunging neckline, sleeveless top, tube top, halter top, and see-through top. Colored contact lenses, eyeglasses, and accessories like earrings, necklaces, or other facial piercings must be removed during photo capturing.
- Make yourself presentable, looking your best. Remember that your photo will be taken for your passport with 10-year validity, so that image of you will stick with you for a long time. But please avoid applying too much makeup.
5. Pick up your passport.
If you did not avail of the passport delivery service during your application at the DFA office of your choice, you have to go back on the indicated release date of your passport. If there’s a change in the schedule, the DFA will email you in advance. Make sure you bring your application receipt and other proof like the claim stub, if applicable. Check all the details on your passport before leaving the counter. Make sure your name is not misspelled and there are no typos.
Can’t claim the passport yourself?
An immediate family member can claim your passport on your behalf, provided that she has an authorization letter prepared and signed by you and other requirements. An immediate family member can be your mother, father, brother, sister, husband, wife, or child of legal age. They must bring the following:
- Authorization Letter
- Original Receipt
- Applicant’s Valid ID (original and photocopy)
- Representative’s Valid ID (original and photocopy)
No immediate family member available to claim your passport on your behalf?
If no immediate family can claim it for you, the person must bring the following:
- A Special Power of Attorney
- Original Receipt
- Applicant’s Valid ID (original and photocopy)
- Representative’s Valid ID (original and photocopy)
Before we answer some of the most frequently asked questions about passport application, allow us to share with you a useful tip when planning a trip abroad. Aside from travel documents, one of the most essential things to take care of before an international travel is, of course, the budget.
Traveling abroad is not as straightforward as traveling domestically. It’s hard to estimate costs, especially when the destination has its own currency. It is important to watch your expenses so you know just how much you still have and you won’t encounter any unwanted surprises along the way.
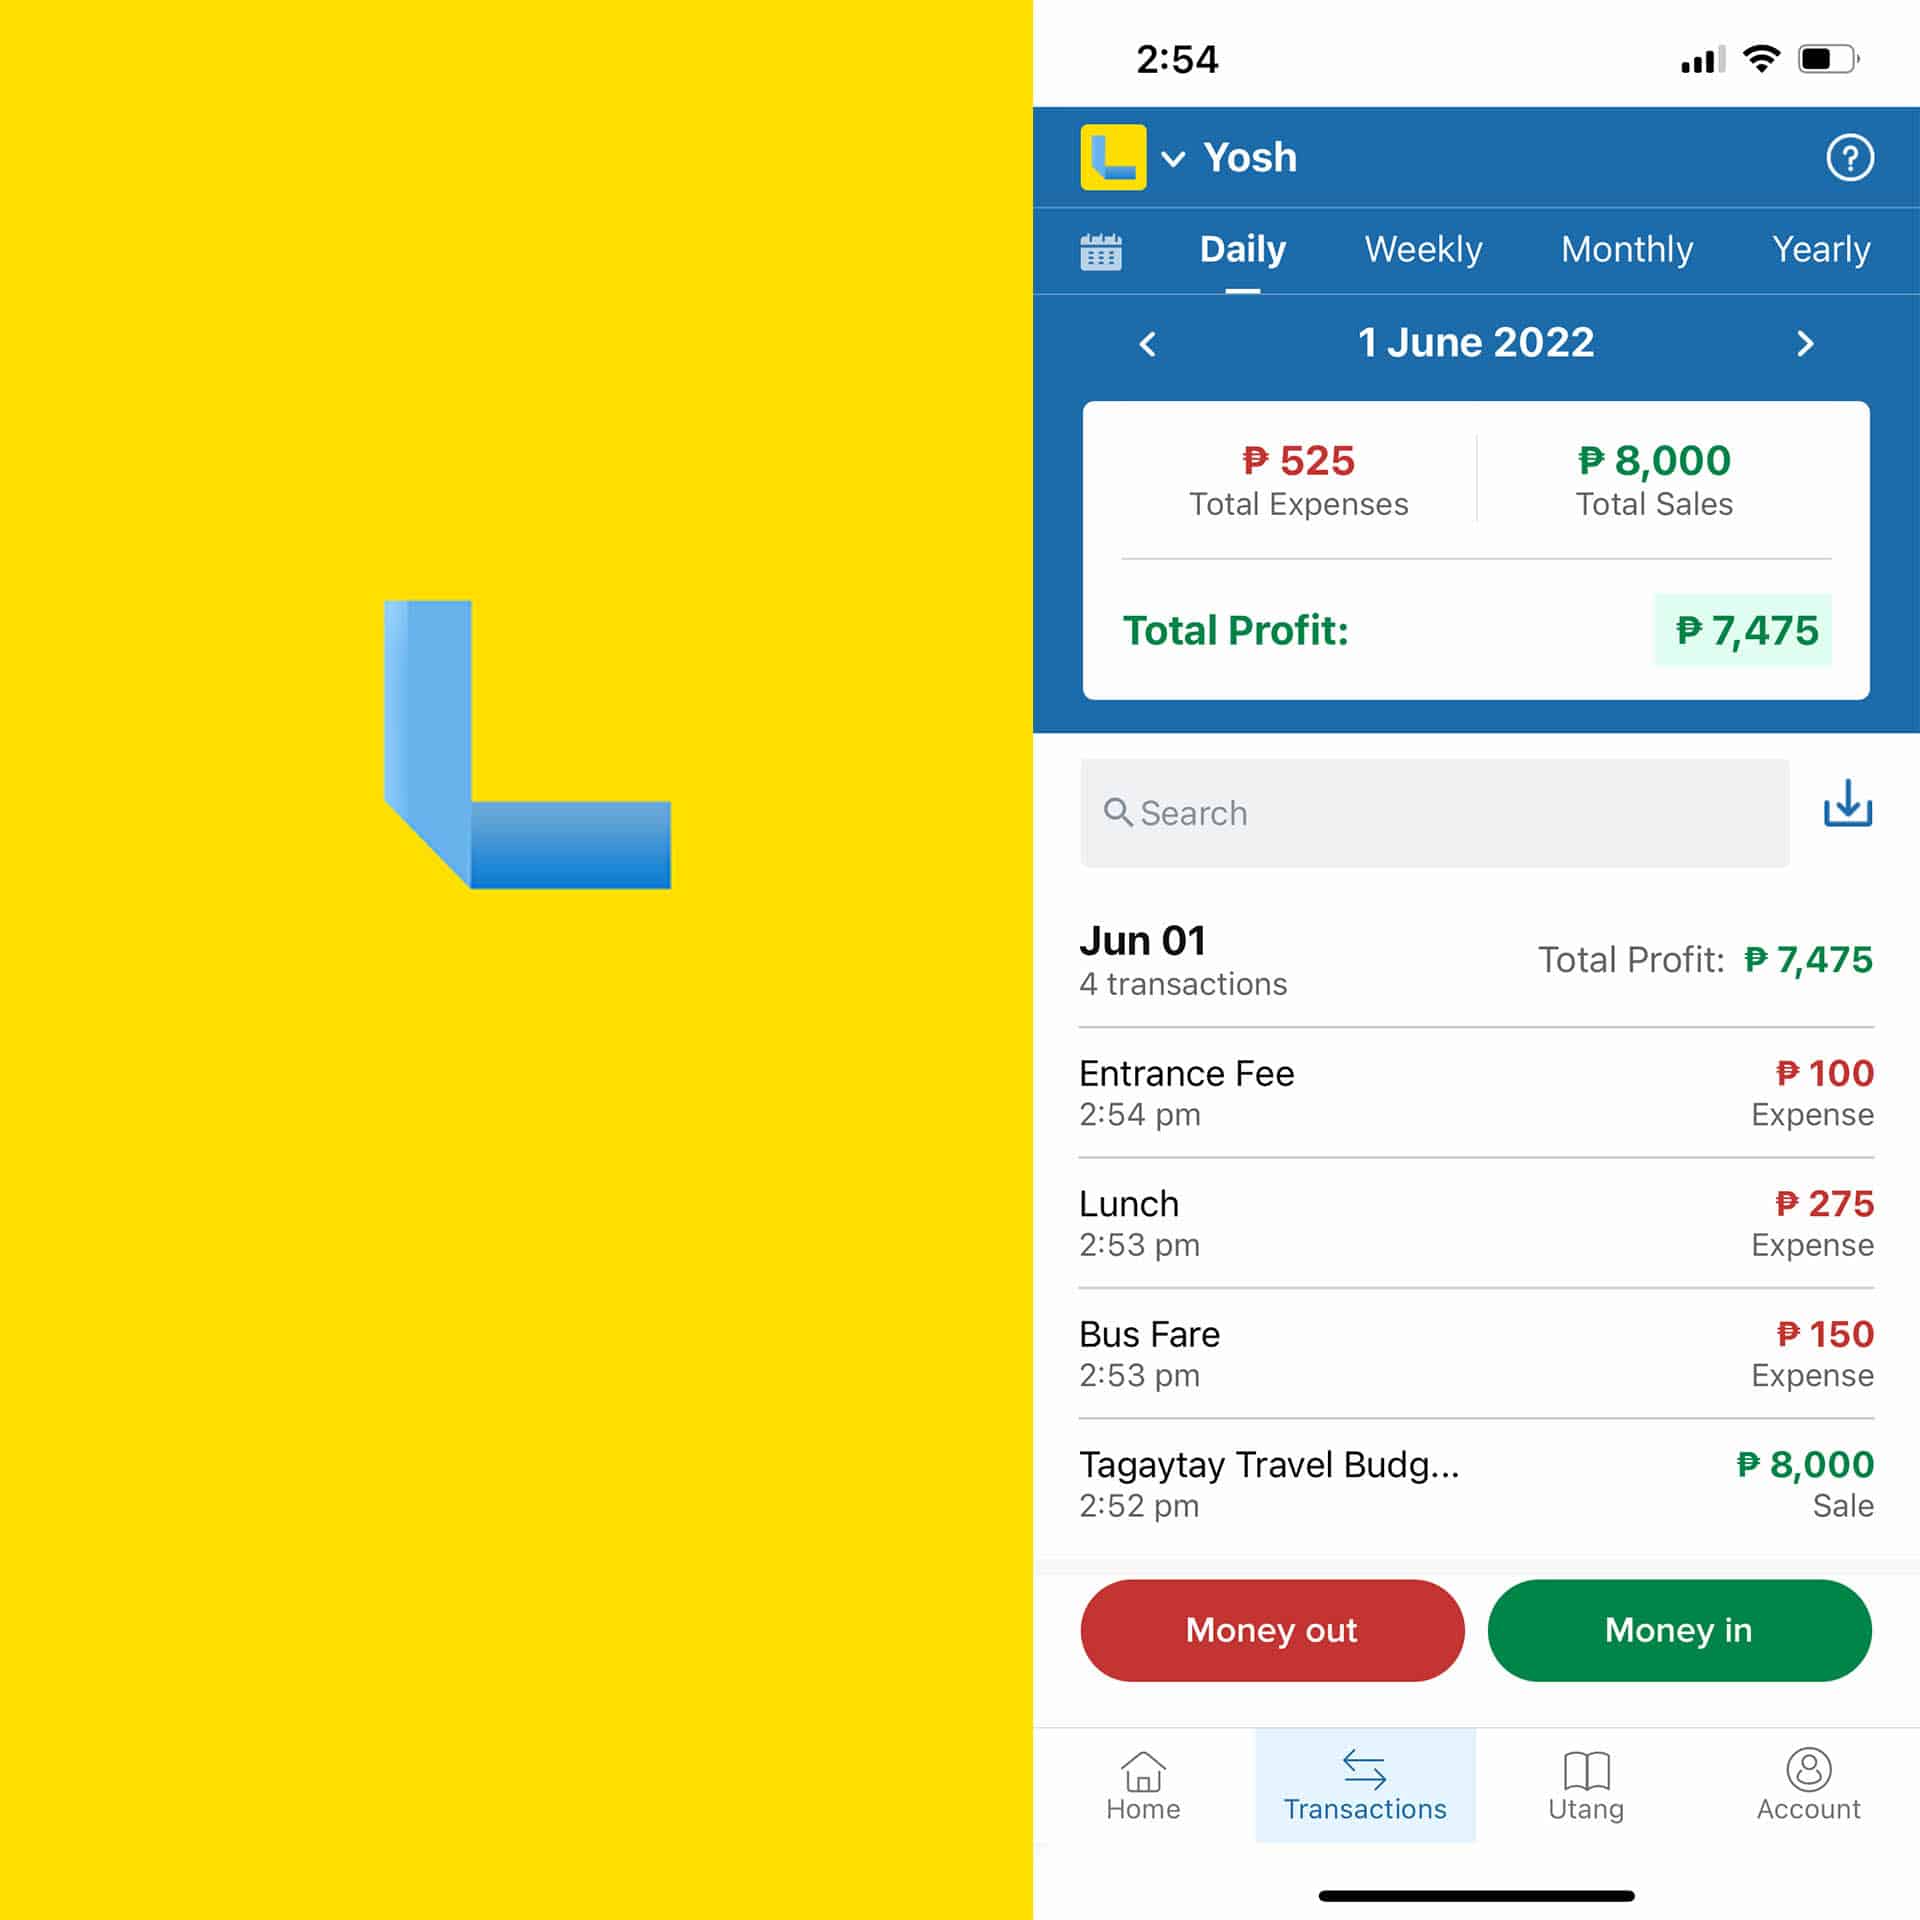
For that, download LISTA, our partner for this article. LISTA is a mobile app that will help you track your spending so you could enjoy your trip to the fullest! It was originally meant for small businesses, but guess what? Travelers can use it, too! It allows you to take note of your expenses before or during the trip! The app works offline, so you don’t have to have an internet connection to use it.
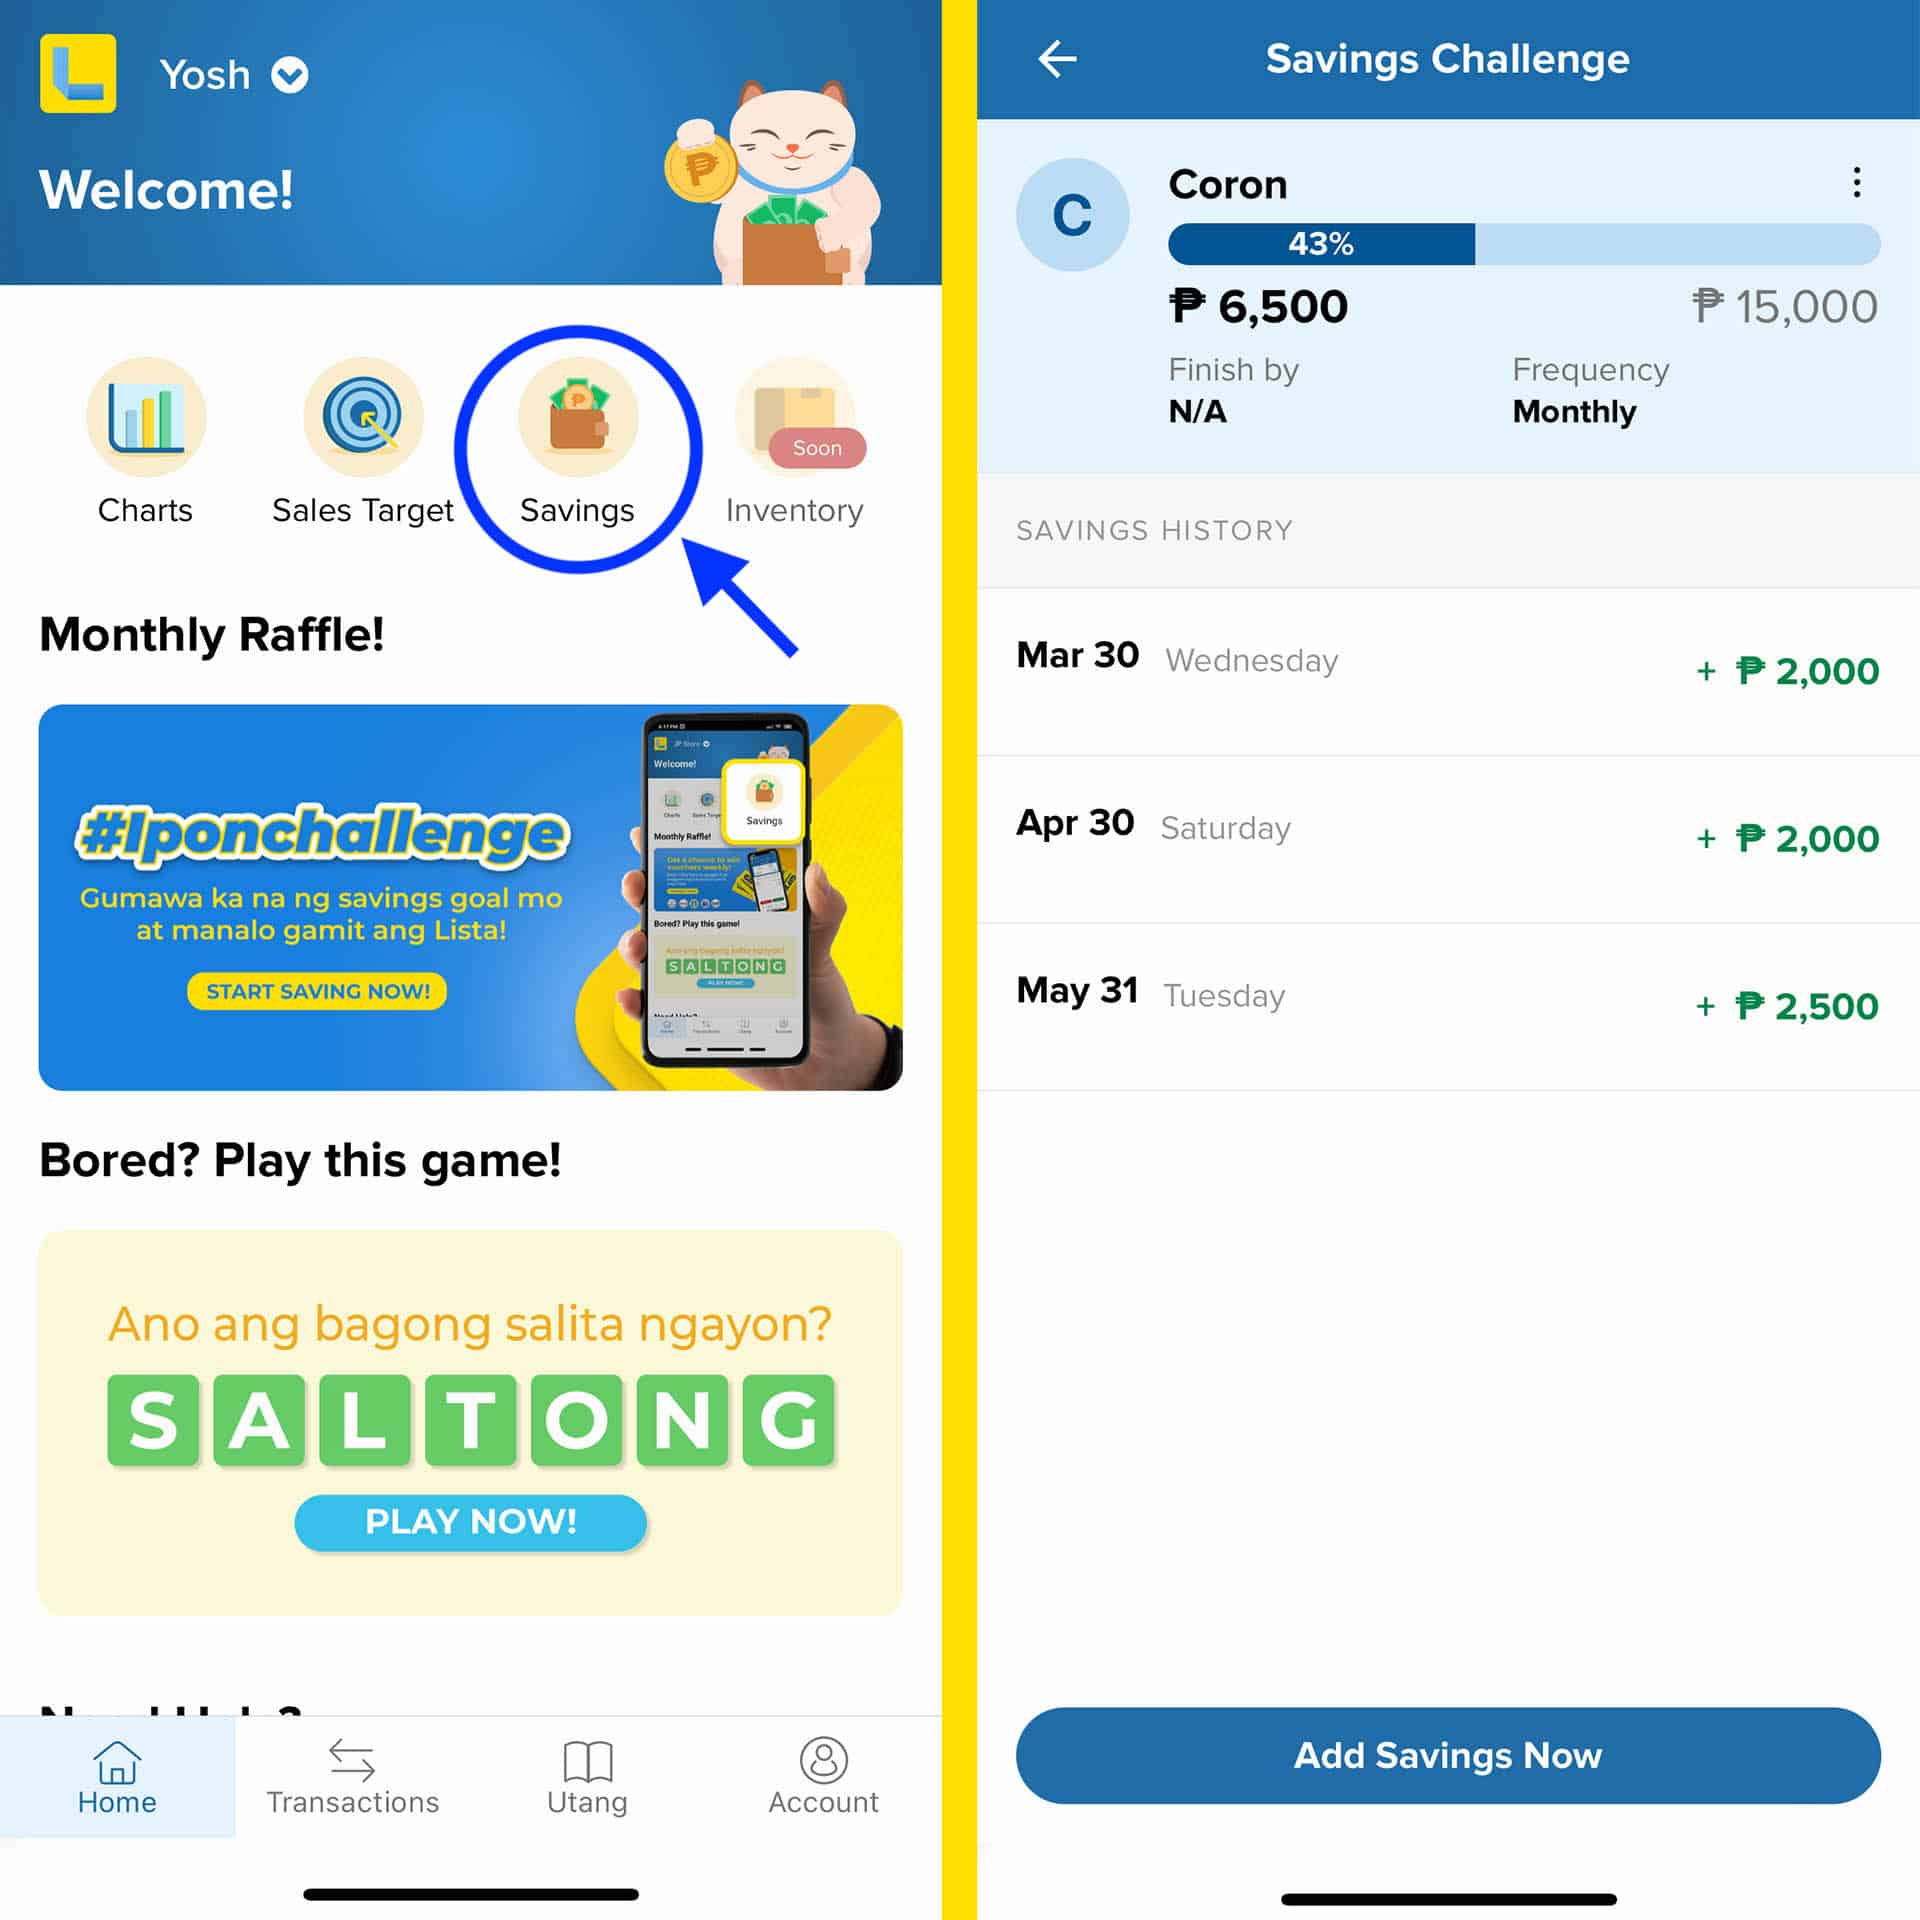
Another key feature is the SAVINGS CHALLENGE tab! If you’re applying for a passport now, you can use the waiting time to also save cash for your next trip! Using the LISTA app, you can set a target amount, the target date and the frequency you’re comfortable with so you know the exact amount to save per day, week or month to turn your travel goals into reality.
May next travel ka na ba? I-LISTA mo na!
FREQUENTLY ASKED QUESTIONS (FAQs)
Who can apply for a Philippine Passport?
Since a passport is proof of your Filipino citizenship and your allegiance to the Philippines, only Filipino citizens are eligible to apply and acquire a Philippine passport.
- Natural-Born Filipino Citizen
- Naturalized Filipino Citizen
- Dual Citizen (One citizenship is Filipino)
- Filipino Citizenship Obtained by Election
- Filipino Citizenship Granted by Act of Legislation
Can I apply in the province even if I don’t live here?
YES. The most important thing to do is to make sure you have a confirmed appointment. Just remember that the processing days differ per area/region. You can check that on the payment part of your online appointment process.
I didn’t receive an email when I secured an appointment. I don’t have a reference number. What can I do?
First, check your Spam or Junk folder. It might be there.
Not there either? Call the DFA hotline: (02) 556-0000.
Tip! Make sure that you are using a free Gmail account.
I tried using my custom email address at first, but I failed to receive a confirmation email that also contains the reference number for paying the passport processing fee. I had to wait for the schedule to expire after 24 hours to try to set an appointment again. On the second try, I used my free Gmail account and immediately got the email confirmation.
If you are using a free Gmail account, but still didn’t receive an email confirmation, call the DFA hotline: (02) 556-0000.
Can I reserve multiple appointment slots for myself?
NO. If you have an existing application, the system will tag another attempt to get a slot under your name as an ERROR.
The only way for you to reserve anew is to CANCEL the first/existing one.
I can’t make it on my appointment time. What should I do?
You have the option to either RESCHEDULE or CANCEL your appointment.
However, changes must be made at least three (3) working days before your schedule. If you fail to do this, the system will mark and penalize you.
Can I change my appointment schedule?
YES. Go to this page, and then click on View Appointment. Input your Appointment Code and your email address, then click on View Details. Once logged in, choose RESCHEDULE.
You should do this not later than 3 days before your original schedule. The rescheduled date must be no longer than 30 days from the original date.
I didn’t make it to my appointment schedule. What should I do?
Wait for 30 days. There is nothing else you can do if you didn’t show up on your appointment schedule.
As a penalty for “No Show” applicants, you have to wait for 30 days to make another appointment.
I made a mistake or misspelled something on the form. How to change it?
You cannot change it online, BUT you can correct it at the DFA office on your appointment schedule.
Remember that during the data encoding stage, you will be asked to check and review the information entered by the officer. This is your chance to correct the mistake or the spelling.
I’m applying for a DSWD clearance, a visa, and a passport for a minor. What should I get first?
Here’s the correct order: DSWD Clearance first, then Passport next, and finally, Visa.
The DSWD Clearance is one of the requirements for the passport application of a minor. Then after working on the passport, you can finally apply for a visa. The passport is essential for visa applications.
Is personal appearance required?
YES. Your photograph, signature, and biometrics will be taken, so your physical presence at the DFA office is a must.
How long does the application process at the DFA take?
We’ve renewed passport at these DFA offices: Megamall, ASEANA, Alabang, and Lipa.
Based on our experience, it took us about an hour — from document verification to availing of the delivery service.
How many days does the passport processing take?
Here are the usual processing times:
- Regular Processing. 10-15 days in Manila.
- Express Processing. 5-7 days in Manila.
Based on my recent application, my appointment was on September 12. I signed up for the passport delivery service and got my passport on September 22. That’s a total of 10 days.
We heard that the processing time in the regional offices takes longer compared to Manila. They say the length of days for processing may take 20-30 days, but we haven’t confirmed this yet.
What is an ePassport?
The Philippines has been issuing ePassport since 2009. An ePassport has an integrated circuit chip or microchip where the biometrics data are stored. An indication that you are holding one is the chip sign or icon at the bottom portion of your passport’s front cover.
These are the advantages of the ePassport:
- It is equipped with an Automated Fingerprint Verification System (AFIS), preventing multiple passport issuances to one person and improving imposter detection.
- It is considered highly secure by world standards, thwarting passport tampering and reproduction.
- Countries are more confident and accepting of ePassport because of its biometric technology that provides advanced border security and protection.
- Holders of ePassports can avail of the “e-gates” (automated border clearance) service, automated issuance of boarding passes, and more efficient travel transactions with airlines.
- It speeds up clearance at immigration checks.
2021 • 07 • 23


Where to get Psa authenticated marriage certificate on security paper?
you can check on PSASerbilis.com.ph
Hello. What if I need to schedule an appointment for my family (4 members), can I choose group appointment instead of individual appointment?
Can I book a group appointment for my passport renewal and first time passport application also for my daughter? or should it be separate appointments?
Maam pno at anung requirment ng 5years old boy po kukuha ng passport
Lahat Ng tanong mo nasa taas
Nandyan na LAHAT SA taas…mag basa ka KC ..para Kang Reyna..
helo o my umid na ako Kaso Single pa ako dun,,Allowed pdn po ba na gamitin un if ppnta na ako for appoinment sa Dfa?Then meron ako NBi po dito married na gamit ko,,inaaccept po sya if kkuha ppnta sa DFA ano po pweding support documents kailngan kasi NBi lang meron ako?thank you po
Same question din po, nakakuha ka na po ba or di allowed yung umid na single pa yung lastname?
same po. nakakuha po ba kayo?
Yes po. Basta new application.
Same tayo ng problem ko ngayon… nakakuha ka na po ng passport regarding sa supporting documents mo?
Hi po. Does it take time po for the confirmation email to be received? I have already paid po at 7/11. But as of now, wala pa po akong narereceive na confirmation email.
Hi Belenda! ‘Yung most recent application na ginawa ko (for my relatives), that same day na nagbayad ako, dumating ‘yung confirmation.
Have you checked po yung junk/spam folder? Minsan napupunta po doon.
Im a student and may damage po yung school id ko, is it still acceptable?
I apply for a new passport, kaso may problema ang id ko. The staff said kumuha po ako ng postal id at binigyan niya ako ng 1 month, kaso ang problema lagpas 1 month ang process ng postal id, ano po dapat kong gawim
This is very helpful. But i just want to ask. Is it okay if i booked an appointment at simple renewal site at bacolod even if i am a new applicant for passport? Thanks.
Hi Po..sa akin ganyan din pero ayaw nilang e proceed Ang application q kc nagkamali lng aqu ng lagay inisa q nlng sa Nanay q kc dati may passport sya kaya ginawa q sa dlawang application q ganyan Ang nka lagay na simple renewal instead na new .Pero ayaw nila
Ay, di ko po alam. :(
Hello po pano po kung may Mali sa information ko like birth place father name at meron pa po pano po Yun bayad napo sya may appointment napo ako September po pano po Yun pwede pa po ba Yun maiccorect
Hello ate nag kaayos po ba yung mga mali mo sa passport mo nung pumunta ka sa dfa office?
Hi Jen, pwede n’yo pa po ipabago kapag andoon na po kayo. Ipapa-check po sa inyo ‘yung details to confirm na tama lahat.
Pano po kapag nasa payment magbabayad nalang then suddenly naclose mo tas triny mo ulit gumawa ng panibagong appointment pero nakalagay is appointment already exist. Pero wala naman ako narereceive na email and di ko pa siya nababayaran. Thank u po
Naexperience ko po sya dati. Nag-wait lang po ako ng 24 hours tapos nagtry na lang po ako ulit magschedule. Gumana naman po basta after 24 hours.
I have already my appointment to secure a passport, however, my office assigned me to work abroad in the next month, can I have my application done earlier than my appointment, since I am going abroad in a month or two?
Hi Gina, naku, di ko po alam pag ganyang situation. Best po to contact DFA directly.
Hello po, need din po ba A4 size yung mga photocopies (ID&Birth cert.)? Thank you
Hello po, no need na po.
Hello po, tanong ko lng po pwede ko po ba gamitin as valid i.d ung voters i.d ko na pagkadalaga ang last name sa pagkuha ng passport kaso ang ginamit ko n kc na last name sa pag applying passport is sa asawa ko na , pde po kya un and if pde zno need supporting documents. Ty in advance
Hi Kristel, need po ng marriage certificate from PSA.
If you recently married (if nangyari ang kasal within 6 months before application), according to the DFA FB page nung nagtanong kami, need din daw ng NBI Clearance.
hello po, so okay lang po na maiden name pa rin yung ipresent namin na ID sa DFA? Kasi po wala akong valid ID na married name na eh. Same po kasi kami ni Ms Kristel, yung inapplyan namin na apleyido eh sa asawa na po namin, hindi po maiden name.
Hello po, pwede lang hindi nalang kukuha nang bagong ID? Basta magdala lang nang marriage certificate?
Ang alam ko po, di naman need na kumuha ng bagong ID. Basta valid ID + orig marriage cert ay okay na if more than 6 months nang kasal.
I’m planning to use my Voter’s Certificate as Valid ID. Naka-indicate dito na need din ng NBI/Police Clearance in addition. Need din ba ng photocopy dun? Also, dapat bang may dry seal din yung photocopy ng Voter’s Certificate? Thank you for the guide.
Hi KAAF! Hmmm, they recently removed the note about NBI Clearance when using Voter’s Certificate. Now it only indicates: “Voter’s Certificate issued from COMELEC main office in Intramuros, Manila.”
Last time we checked, around late June/early July this year, certificates from regional offices were still included. But they removed that part na. I’ll try to get in touch with DFA and gather more info and let you know when they reply, but try to message them din directly about it and about the dry seal.
(Will also add a note about it dito sa post.)
Any update po about sa voter’s certification na sa regional office lang po kung pwede po siya as valid ID. TY
Thank you for the update. Sa September 19 pa naman yung sched ko pero baka need ko rin kumuha ng ibang ID just in case. Or, just get another voter’s certificate from Intramuros (fortunately it’s close enough where I’m from).
Hi KAAF, I can confirm that you need an NBI or Police Clearance with you Voter’s Certification even if it is from Intramuros. They asked me for it on a recent appointment I had.
How about hindi from Intramurous. I am from Cebu and Voters cert lang ma ppresent ko. Okay lang kaya yun?
same issue ko, pa update naman if pwede Voter’s cert galing sa region lang
Valid po ba yung PhilID or National ID?
Yes po.
Hi, ask ko lang if mag papaxerox ng docs like PSA and ID need ba sa A4 or short bond paper? Thank you
Hi! Naku, di ko po sure. Pag nagaapply po kasi kami, ine-A4 na lang namin lahat pati photocopy so di ko po alam if ok lang na hindi A4.
Hi! This is a sample comment!
This is Sample reply!
Hi ok lang po buh na yung birth cert ko is NSO pa po yun tagal ko na nakuha ehh year 2015 pa. Kaya NSO pa yun
pwede po ba sa Valid ID na gagamitin national ID?
Hi! We asked DFA FB page and they said it is accepted.
Online application, hindi po makapgproceed ang middle name sinasabi use only philippine alphabet.. Anu po ibig sabihin?
Hello po, missing ang expired Passport ko pero meron ako photo copy ng old/missing Passport# ko that was issued August 2011. Gusto ko kumuha ng passport for future use, pwede lang ba ako mag apply as Renewal o as New passport na talaga? Thank you sa sagot in advance.
Hello po magandang hapon po tanong lang po paano po Yun appointment kopo nung September 12 sa passport diko po nkuha dahil kulang nga Po ako Ng government IDs tapos tinatakan po Nila valid hanggang October 12 po nag asikaso po ako ulit Ng mga hinhanap Nila ano po gagawin sir babalik paba ko sa Oct 12 Kasi sayang po tlga Yung nabayad ko andto na po hawak kuna po Ang postal ID na kailangan Nila Kasi government I’d po hinhanap Nila and psa. Makukuha pa po kaya Yun sa October 12 sna masagot po thanks
Hi! Ask ko lang po if need pa ba na authenticated ang photocopy ng Birth Certificate? Or just a simple/ordinary na photocopy lang? Thank you.
Hindi naman po need na authenticated yung photocopy.
Pwde na Po ba sa dfa santiago Yung ephilld printed Po Ngayon???
Naku, di ko po alam if accepted na now. Itawag nyo na lang po sa DFA Santiago mismo.
hello! when my friend applied for visa, he was asked for a NEW copy of his birth cert. i have a scheduled apptmnt next week and wondering if they’ll accept my existing PSA birth cert or should i get a new one? thanks!
Hi, pano pag walang valid id? secondary ids lang meron ako saka PSA. thanks
Anong secondary ID po ang meron kayo?
Sir pwd po ba gamitin ang national id as valid id sa requirements?
Yes, according to the DFA. https://mb.com.ph/2022/10/21/national-id-now-valid-for-passport-applications/
What means your name must be in Philippines alphabet ?
hi di po nila tinanggap voter certificate ko sa dfa tas pinapakuha po nila ako ng postal id within 30 days. pede po ba hindi na ulit gumawa ng bagong appointement if ok na po yung postal id? pede po bang bumalik na lang ako dun ng di na gagawa ng bagong sched?
Hi Isha, thanks for sharing. Ano po yung sabi sa inyo nung andun kayo sa site? Kasi sa experience po ng kakilala namin, pinabalik lang po sila and hindi na pinag-appointment. Pero depende po yan siguro sa instructions sa inyo.
Hi..I entered incorrect month of my birth,It’s already paid and schedule for appointment NXTweek possible pba and allow nila macorrect un?if not ano Po mangyyre?tysm po
Hi Mae, di ko po sure, I would still show up sa appointment kasi I think pwede pa pong ma-correct ‘yun on site. Ipapa-check naman po sa inyo ‘yun lahat and makikita naman nila sa birth certificate mo yung correct.
hi sir bakit po ayaw ng given name ko invalid daw po must use only philippine alphabet..ano po ibig sabihn nun..thank you, pa email namn po ako tnx
I accept po b khit mali ang midle name ng nanay na nklagay sa birth cert isang letter..pero tama sa mariage contract..
Hi! I recently lost my cardholder and all my ID’s were there. My appointment will be tomorrow. I know I can’t reschedule my appointment already. What can I do?
Hi po may problema po ako sa online appointment ng passport bale new applicant ho ako eeh, yung last name and given name ko di ma valid need daw Philippine alphabet only, may advice po ba kayo?
Thank you so much for a informative details. God Bless Us po.
Hello, nakapagbook napo ng schedule sa online and nakapagbayad napo. Pagpunta po sa Lugar, Robinson malolos sinabing for renewal lang daw po sila. Paid napo, pano po Ang mayayari dun, Inaccept naman ung payment sa online. New applicant po
Naku, first time po naming maka-encounter ng ganyan. Itawag n’yo na lang po sa DFA Hotline para sure po.
Hi, Good afternoon. Yung mom ko po is mag aapply ng passport but yung sa marriage contract nya and birth certificate is magkaiba ang spelling ng name ng lola ko po. Will they allow her to apply kung ganun po ang case nya. And kung hindi naman po, saan po pwedeng ayusin or saan po pwedeng ipacorrect.
Naku hindi ko po alam ‘pag name ng mom ‘yung magkaiba.
‘Yung sa case ng tita ko, ‘yung birth dates nya ung magkaiba. Ang ginawa niya nagkuha sya ng notarized na affidavit na sinasabi na ‘yung nasa birth cert ‘yung tamang date.
Hello po, valid po ba ang postal id this year?
Good day po, may I ask po for other websites in DFA for Online Appointment?
Eto po: https://www.passport.gov.ph/appointment
nbi clearance kailangan pa po b for renewal..?thank u sa sasagot
Normally po ay hindi kailangan ang NBI clearance. Sa special circumstances lang po yun like (1) you got married and changing your name and the marriage took place within 6 months before the date of passport application, or (2) wala kayong valid ID and you can only present voter’s certificate, etc.
But under normal circumstances, hindi required.
national id po ba ay acceptable ng DFA for passport?
My brother has no valid id. Is voters certification with police clearance can be considered as valid?
Hi Analie, di ko po sure pero ang alam ko po is if galing COMELEC Main Office sa Intamuros ung cert, pwede po yun.
Hello Po just wanted to ask Po, Meron na akong passport dati when I was still a single, mgayon Po I’m married and gusto Kong e renew Ang passport ko ano Po ba dapat Kong Gawin at dalhin when I was about to book for renewal single pa Ang tatanggapin? Yun ba dapat ko e click sa data form na kailangan ko e fill up? I wanted to change the status for my old passport from single to married and at the same time renewal na din Po. I hope to get an answer. Thank you
Dito po yung requirements for renewal: https://www.thepoortraveler.net/passport-renewal-requirements/
May additional docs lang po kapag nagchange ng name after marriage like Marriage cert (and NBI clearance in some cases).
helo o my umid na ako Kaso Single pa ako dun,,Allowed pdn po ba na gamitin un if ppnta na ako for appoinment sa Dfa?Then meron ako NBi po dito married na gamit ko,,inaaccept po sya if kkuha ppnta sa DFA ano po pweding support documents kailngan kasi NBi lang meron ako?thank you po
Will you be using ung married name nyo na po sa passport? Allowed naman po ang UMID pero may additional documents po as stated dun sa ADDITIONAL DOCUMENTS section sa post, under “If applicant is a married female using spouse’s last name”.
hi sir yosh ask lang po ng kaibigan ko,kung pwede daw po ba nyang gamitin yung apelyido niya nung pagka dalaga kase 9years naman daw po silang hiwalay mag asawa ?
Thank you so much.
Hello,what are the requirements to get a passport for those who are married to a foriegner?
My problem is my surname is not in Philippine alphabetical . That’s why I can’t send a appointment .
Hi Alliah! Dami ngang nagmemention ng error na ‘yan but hindi ko kasi sya naencounter pa so I don’t know what to advise. :(
can I change my birthdate if it’s incorrect online?
Hello na change nyo po ba onsite while nag ttype sila? Mali po kasi city/town of birth ko sa online, pwede po ba ipa correct onsite?
wala po akong valid id pwede bang psa po ?
What if I was able to book online but was not able to pay it withing the allotted time. Do I need to cancel the appointment made? Or will it automatically cancel?
Really helpful site. Thank you!
I need to reschedule my appointment. I followed the steps you provided above but there’s no option for rescheduling… it’s still more than 7 days before the appointment date. Only options available are “cancel, download, check status”
Hi! Need po ba Ipa notarize pa Yung SPA pag di immediate family member po Ang kukuha? Thanks!
Hello po ask ko lang if. Kumuha ako ng passport po . Pero single pa po ako. Tapos kapag kinasal na po ako na meron na ako passport. Madami po ba requirements and mahal po ba bayad. Kapag palitan ng apelyido ung passport ko po? Ty!
Ito po ng additional na marriage certificate pag nag-renew.
Sir pwd po b valid I’d ko lng po national id ska voter’s certificate ok lng po b un lng dalin ko pag kumuha nko ng passport maapproved n po b un
Ang alam ko po, accepted naman ang National ID.
Hello po maam/sir. Pano po if photocopy lang po ng psa birth certificate lang po ang nasa akin? Makakapag apply po ba ako? Nakay papa po kasi yung original copy nasa province po siya and nandito po ako now sa manila
Dapat po ay original. Since nasa Manila po kayo, pwede po kayong kumuha sa PSA sa QC ng original copy.
hi, tomorrow na po yung schedule ng partner ko, one day process lang po ba yun at makukuha kaagad yung copy ng PSA? Thank you
Hi po tapos napo namin bayarin ang appointment namin. Sinadya po ko Mali in kasi ayaw tanggapin ng system yung name at apilyedo sabi doon invalid daw. Tas nilagyan ng name sa papa kasi need naman doon kahit wla naman sa live birth. Ano po gagawin namin pag ganun.
Hi po. I have recently remove my mole. Sa old passport ko na expired na is my mole ako, pag nagrenew kaya ako magkakaproblema ba?
wrong gender po kc birth certificate ko..kung may PAO po ba ako na nka notary makaka apply po ba ako ng passport
can I accompany my minor grand-son if incase the parents can not accompany during his personal appearance at DFA? what are the requirements to be presented?
What if ung pick up date and time po di ako nakapunta coz of some reasons..pede pick up the other day?
Good morning to all! I am late registered on my PSA Certificate. I am applying for my passport. Now, DFA required an NBI Clearance if delayed registered. Eventually, I applied for my NBI Clearance and it was annotated as “MULTI-PURPOSE CLEARANCE”? The question is.. Will the DFA-Passport-On-Wheels accept my NBI Clearance with an annotation of “MULTI-PURPOSE CLEARANCE”? Thank you for your response! God bless! O:)
Hi..how to cancel appointment because i entered of wrong gmail.
Panu po kung may mali sa birth certificate ko.napaayus ko na po pero maghihintay pa nang 6 months at kailangan ko na kumuha nang passport. Maaapprobahan po kaya un?
Try nyo po kuha ng affidavit sa abogado and show another ID na tama na ung detail.
Hello good Day sir! Please I want to know if it’s allowed to give a Philippines passport to someone who’s from another country but want to travel to other countries for business?
Hello, I did not include my middle name on the appointment form during the online process. Can I still proceed to the DFA office to correct my mistakes, or will they automatically reject my application?
You can correct it.
Hello.. may nakatry na po ba dito na gumamit ng Temporary PhilID? Yun lang kasi ang available na ID sa mga nabanggit na ID..Help naman po.. thankv you very much..
Paano kung di ka nag proceed sa photo capturing at biometrics. Pwede ba yon balikan? Sa DFA Aseana (Manila) ako nagpa appointment nun ee. Wala kasi binigay sakin na instruction non kaya akala ko yun na yon.
Posible rin bang may ibang schedule sa photo capturing at biometrics?
What do I need to do po ang spelling ng name po ng nanay ko iba sa mga valid ids nya is it ok po if affidavit nalang sya?
Iba po sa valid ID and sa birth certificate? Di ko po sure, pero baka po need ng affidavit talaga.
hi po admin..tanong lang po, kailangan pa rin po ba ung orig na pasport expired kapag renewal? nawawala po kasi uung pasport pero meron nman po akong colored photocopy ng lost pasport..?
Panu Po f di ko babayaran in 24 hrs..pede ko pa Po ba byaran ngaun
Hi, Just want to ask if PSA and NBI is valid ID for a newly passport applicant?
Ano po schedule ng claiming ng Passport? and its time.
hi po admin..tanong lang po, kailangan pa rin po ba ung orig na pasport expired kapag renewal? nawawala po kasi ung pasport pero meron nman po akong colored photocopy ng lost pasport..?
Yes po, need ‘yung original passport. If wala po yun, considered lost na, and mag-aapply na ung additional requirements for lost passport: https://www.thepoortraveler.net/passport-renewal-requirements/#If_your_current_passport_is_lost_or_damaged
Tanong ko lang po kung ang NBI CLEARANCE is acceptable as VALID ID
Good day.
Share ko Lang po. March 13,2023 was my appointment for the renewal of my passport at SM lanang davao city.
Then March 29,2023
Was the day my passport to be pick-up at SM ecoland Davao City.
When I got my passport I noticed that the ” issuing authority” DFA Manila when in fact I applied it here sa DFA Davao po same when I had my first passport.
Question ko po,ok Lang po ba yon Ang nakalagay sa issuing authority ay DFA Manila instead of DFA Davao?
What if i don’t know my company address?
If you chose the “lost” option when having an online appointment, the passport number is still required. However my passport is lost for a long time already. I had that passport when I was still 6 and now I’m 20 years old. I have no idea what’s the passport number. What should I do? Should I apply for a new one?
Hello sir need pa daw Ng medical Kasi may peklat ako sa left side Ng mata ko. Ano pong sasabihin sa doctor? Salamat po.
Good day, ask kolang po if kukuha po ba ako ng certificate of registration at mag dadala ng School ID? I’m currently enrolled as a fourth year student but no valid ID.
Good day,
It is okey in the office that i have a baby to bring during the appointment?
Hello po,
May dala dala akong 1.5 year old na bata , makapasok ba ako na may dalang bata? Walang maiwan kasi. Pls reply.
Ask qo lng po ilang valid ID po ang kailangan pag kuha po ng new passport…
1 lang po
Good day po! Ask lang po sana if acceptable po ang Voters Certification na galing pong Regional Office-comelec as valid id sa pagkuha ng passport? or Voters Certification po talaga galing Manila? Thank you po sa response
good morning po need Pa po Ba ng nbi clearance? first time ko po kasi makakuha ng passport salamat po sa zasagot
Normally, hindi po. Need lang po yun sa mga special cases as mentioned sa post.
Wrong po yung Birthplace and Birth Province and naprint ko na rin po yung application form, pwede pa rin po ba ipacorrect yun sa apperance?
Hi po sir, would like to know if pwede pa din bang ma correct ang maling na encode like birthplace until now? Since I had check the site, and it was indicated that they cannot edit the information on the site that have been entered already. Pwede paba ma correct or not?
Hello, Napa correct nyo din po ba onsite? For renewal po yung sakin.
Mam\sir ndi na poh ba need ng mga supporting documents
I want my passport to be delivered to me but I made a mistake in the payment option. What should I do?
I would like to ask po kasi UMId lang yung id ko na acceptable for new passport application but yung lastname ko sa umid is single pa, pwede kaya yun attach ko nalang nbi clearance? Thank you po sa makakasagot.
Valid po ba Ang national id sa pagkuha ng passport?
According to DFA FB Page, yes.
Sir hello po, mali po yung birth day ko at middle ng papa ko sa online appointment ko hindi ko po napansin mababago po ba yun sa office nyo? Sched ko po bukas salamat po
Hello, asking for a friend po. She recently loss her passport and now she will have an appointment on Monday to get a new one. Her case is that she has a US Passport po kasi and she did not mentioned it on her Application form. Magkakaroon po kaya ng problem if ever?
Pwede po ba student license
paano po pag walang valid id? tapos yung postal is hindi na nag ooperate mula pa nung march 10 kaya hindi ako nakakuha ng postal id, ano po kaya pweding gawin?
I have a question, what if I choose the payment method OVER THE COUNTER. how much I will pay for the processing fee of online appointment itself and by the way this is for group appointment. Thank you and Have a good day
good day,kung ang birth certificate AT marriage certificate ay dating NSO PA,e accept parin ba?
I misspelled my middle name on my application. Can I still correct it during the day of my appointment or do I need to cancel and apply again for an appointment?
Hello sir,First time ko pong mag apply ng passport, ang tanong ko po is ano po ba yung mga needed na requirements kung pati mga anak ko ay I apply ko sa pagkuha ng passport. Mother po ako at hindi pa kami kasal den minor pa mga anak ko.Tapos gamit ko pang ID is philHealth. Sana masagot nyo po,salamat.
Do you process passport for a child who is 14 years old?
hello, i didn’t save the appointment code, what should i do? thank you for the answer
Ang photocopy na Birth Certificate at Marriage Contract kailangan bang authenticated? Thank you po!
Pwede pa po kaya ang NSO instead of PSA?
bakit di ko ma view yong previous application ko di pa naman ako nag bayad may schedule agad?
Hi can we apply passport if there’s a discrepancy on the spelling of last name, using affidavit of discrepancy?
been reading all the comments here like seriously? Most of the question are like indicated in post already. Basa basa din pag may time hehehe
hehe, oo nga po eh. Nasa FAQs din po.
Is it okay to have hair color for the appearance? Thank you
Hi! Di ko po alam for sure, pero may kulay po yung buhok ko sa previous passport ko. In-allow naman.
Hello sir nagtatanong lng Po aq how long to process a new passport
10-15 days po.
Kc po gs2 ko po kmuha ng passport kaso wla po kng id na last name ni husband puede po kya marriage contract at nbi po
My voters id po ako Kaso Single pa ako dun,,Allowed pdn po ba na gamitin un if ppnta na ako for appoinment sa Dfa?Then meron ako NBi po dito married na gamit ko,,inaaccept po sya if kkuha ppnta sa DFA ano po pweding support documents kailngan kasi NBi lang nid ko po sa passport ung lastname nya
hello! dumoble yung middle name ko sa passport appointment ko, is there any way to change this? :(
Hi! Dun sa experience ko po, pinapa-check lahat ng details doon sa Encoding part of the application. I think you can have it corrected doon. But I’m not sure.
maam / sir can i ask? can i get passport even if my gender in my live birth is wrong?
i am female but gender in my livebirth is male.
Hi! I think need pa rin na kung ano ung se x sa birth certificate kasi wala pa raw tayong Gender Recognition Law.
Do they accept national i.d and voters certificate?
Hi Jensie, according to DFA, national ID is accepted.
Good morning Phil health at tin id lng po ang meron ako pwde ko po bNg gamitin yun as a valid id with my birth certificate?
Hi. Good day po. What if po nah email po sila ng IMPORANT PLEASE VE INFORMED THAT YOU OR YOUR NAMESAKES PERSONAL INFO MATCHED ONE OR SEVERAL RECORDS OF INDIVIDUALS IN THE DEPARTMENTS DATABASE, still makakakuha prin po ba sa apointment date?
– sana po mapansin admin. Thankyou in advance.
Naku, di ko po alam kapag ganyan. :(